Accurate Cuts Every Time: The 5-Step Measuring System for Beginners

I’ll never forget the bookshelf that didn’t fit.
I’d measured. I’d cut. I’d sanded. I’d even double-checked my math.
But when I went to assemble it, every shelf was 1/8” too long.
Why? Because I’d forgotten to account for the dado depth in my measurements.
I ended up planing down every single shelf by hand — a 3-hour nightmare that could’ve been avoided with one simple habit.
That’s when I realized:
Precision doesn’t start at the blade. It starts at the tape measure.
And if your measuring system is broken, even a perfectly tuned table saw will give you inaccurate cuts.
Today, I’m giving you the exact 5-step measuring system I teach every beginner student — the one that’s saved me hundreds of dollars in ruined lumber and countless hours of frustration.
No guesswork. No “close enough.” Just accurate cuts every time.
Why Your Cuts Are Off (Even When You “Measure Twice”)
Most woodworkers think the problem is their saw.
But after 15 years of teaching, I can tell you this:
90% of inaccurate cuts come from measuring errors — not machine errors.
Here’s what usually goes wrong:
- Using different tape measures on the same project
- Marking with dull pencils that leave 2mm-wide lines
- Forgetting kerf width (your blade removes 1/8” of wood — and that matters)
- Measuring from the wrong reference point (edge vs. fence vs. miter slot)
- Not verifying cuts before glue-up
The good news?
All of these are fixable with a simple system.
The 5-Step Measuring System for Accurate Cuts Table Saw Users Trust
This isn’t theory. It’s the exact workflow I use in my own shop — and teach in my weekend classes.
Follow these 5 steps, and your cuts will fit like they were born together.
Step 1: Use One Measuring Tool for the Entire Project
The Problem: Switching between a retractable tape, a folding rule, and a digital caliper introduces tiny inconsistencies that compound.
The Fix: Pick one tool and stick with it.
- For most projects: a 25’ steel tape measure with a locking hook
- For small joinery: a 6” combination square with a fine scale
🧑🔧 Daniel’s Story: I once used my phone’s measure app for a drawer front. It was off by 3/32”. The drawer never closed right. Now, I only use my Starrett tape — and I check its hook for wear every month.
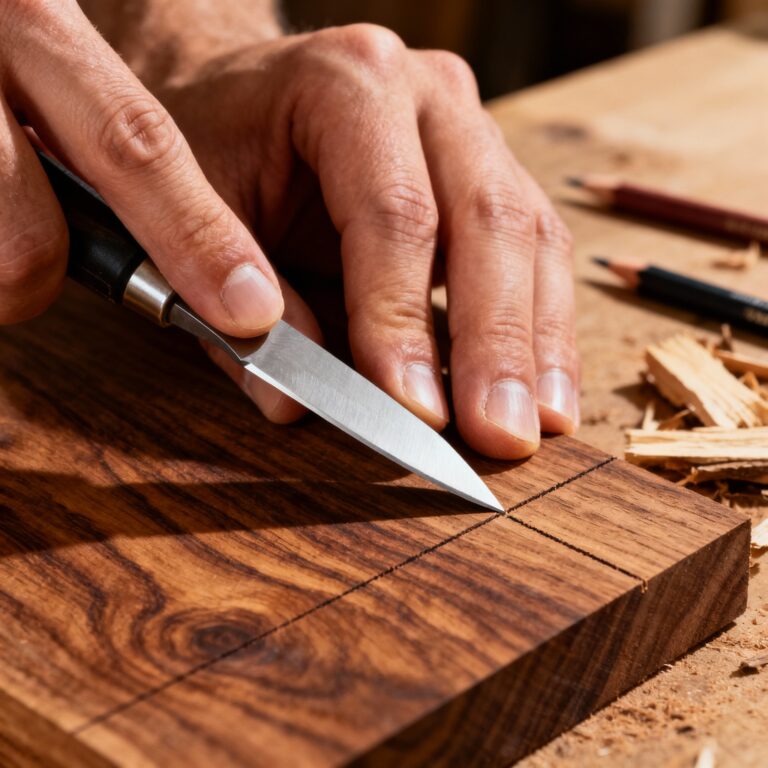
Step 2: Mark with a Sharp Knife — Not a Pencil
The Problem: A pencil line is 2–3mm wide. That’s 1/16” of slop — enough to ruin a tight joint.
The Fix: Use a sharp marking knife or utility knife to score your cut line.
- The line is 0.2mm wide — nearly invisible, but precise
- The groove guides your saw blade or marking gauge
- Works on any wood — even oily exotics
Pro Tip: Hold your square firmly, and drag the knife toward you — not away. You’ll get a cleaner, straighter line.
Step 3: Account for Kerf Width in Every Measurement
The Problem: Your blade removes 1/8” of wood (or more). If you don’t plan for it, your parts will be too short.
The Fix: Always ask: “Is this a ‘to’ measurement or a ‘through’ measurement?”
- “To” measurement: Cut on the waste side of the line (e.g., final length)
- “Through” measurement: Cut on the line (e.g., dado width)
Example:
You need a 12” shelf that fits between two 3/4” sides.
Your cut length = 12” + 1/8” (kerf) = 12 1/8”
Why? Because the dado removes 1/16” from each side — total 1/8”.
📌 For more on joinery math, see our guide to Wood Joinery for Beginners .
Step 4: Verify with a Test Cut (Before You Touch Project Wood)
The Problem: Assuming your setup is perfect without testing.
The Fix: Always cut a test piece from the same species and thickness as your project.
- Cut it
- Measure it
- Dry-fit it
- Adjust if needed
Rule: If it’s not tested, it’s a guess.
And guesses cost money.
📌 Pair this with our Table Saw Blade Alignment Guide to ensure your test cuts are truly accurate.
Step 5: Label Every Piece Immediately
The Problem: “Was this the left side or the right side?”
“Is this 23¼ or 23¾?”
The Fix: Write the measurement directly on the wood in pencil after you cut it.
- Use clear, large numbers
- Include units (“23.25” or “23¼”)
- Circle critical dimensions
This prevents mix-ups during assembly — especially on complex projects.
Common Measuring Mistakes (And How to Avoid Them)
❌ Mistake #1: Measuring from the Fence Instead of the Blade
Your fence is a guide — but your blade is the truth. Always verify cut width by measuring from the blade to the fence, not the other way around.
❌ Mistake #2: Ignoring Wood Movement in Layouts
A board that’s 12” today might be 12.1” in humid July. For critical fits, build in 1/32” of play.
❌ Mistake #3: Skipping the “Final Verification” Step
Before glue-up, lay out all parts and measure the total assembly. Does it match your plan? If not, fix it now — not after the glue sets.
📌 These mistakes are covered in depth in our 10 Woodworking Mistakes Beginners Make guide.
Tools That Make Precision Easy
You don’t need expensive gadgets — just the right basics:
- Steel tape measure (with a true-zero hook)
- Sharp marking knife (or utility knife with fresh blade)
- 6” combination square (for short measurements)
- Fine-tip pencil (for labeling — not marking)
- Digital caliper (for joinery under 6”)
Pro Tip: Keep all your measuring tools in a dedicated pouch — so you never grab the wrong one mid-project.
Real Project Example: The Drawer That Finally Closed
Last year, a student came to me with a drawer that wouldn’t close.
He’d measured everything “perfectly.”
We ran through the 5-step system:
- Used one tape measure
- Marked with a knife
- Accounted for kerf in the dado
- Made a test cut
- Labeled every piece
Result?
The drawer slid in smooth as butter.
He said: “I thought I was bad at woodworking. Turns out, I was just bad at measuring.”
Before You Make Your Next Cut — Tune Your Saw
Here’s the truth no one tells you:
Your measuring system is only as good as your table saw.
If your blade isn’t parallel to the miter slot, your “perfect” measurement will still give you a crooked cut.
If your fence isn’t square, your joints won’t close.
That’s why I created the FREE “Dead-Square Every Time” Table Saw Tune-Up Checklist.
It’s a 15-minute guide to calibrating your saw for perfect 90° cuts — no dial indicator needed.
It’s the first step to accurate cuts every time — not just sometimes.
You’ve Got This
Precision isn’t about being perfect.
It’s about having a system you trust.
Use these 5 steps on your next project.
Watch your waste drop.
Watch your confidence rise.
Watch your projects come together like magic.
Because when your cuts are accurate, everything else gets easier.
Go build something great — and measure like you mean it.
— Daniel
HMZ Woodz