Table saw crosscut sled – these three words will revolutionize your woodworking game! Let’s talk about that little miter gauge that came with your table saw. You know the one – it wobbles around like it’s had too much coffee and gives you cuts that are “close enough” if you squint. If you’re tired of projects that don’t quite fit together and want dead-square cuts every single time, then buddy, it’s time to build yourself a table saw crosscut sled!
I’m gonna walk you through building the ultimate table saw crosscut sled that’ll make your table saw sing. Trust me, once you’ve got this crosscut sled up and running, you’ll wonder how you ever lived without it. These crosscut sled plans will transform your workshop forever!
Why Your Table Saw Needs a Crosscut Sled (It’s a Total Game-Changer!)
Look, if your table saw is the heart of your workshop (and let’s face it, it probably is), then a table saw crosscut sled is like giving it a steady pair of hands. Here’s why this crosscut sled is absolutely game-changing:
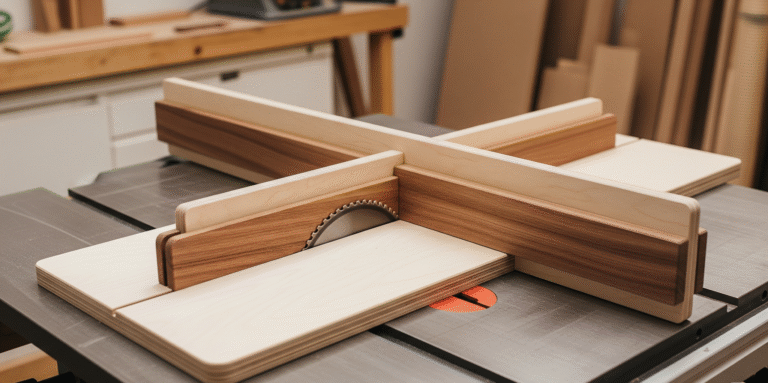
It’s Crazy Accurate: Unlike that wobbly miter gauge, a table saw crosscut sled rides in BOTH miter slots. That means zero wiggle, zero guesswork – just perfect 90-degree cuts that’ll make your joints fit like they were meant to be together.
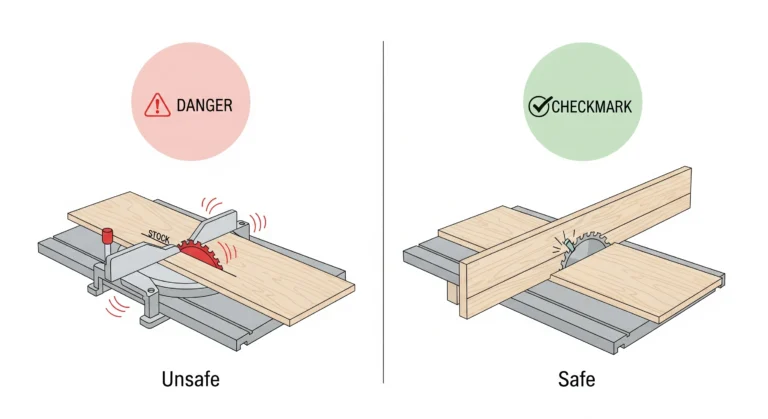
Safety First (Because We Like Our Fingers): Ever tried pushing a tiny piece of wood past a spinning blade? Yeah, that’s sketchy as heck. With a crosscut sled, your hands stay way back behind a tall fence while your workpiece gets full support. Way less nerve-wracking!
It’s a Repeat Performance Machine: Need 20 pieces cut to exactly the same length? Slap a stop block on this table saw crosscut sled and you’re golden. No more measuring each piece like some kind of medieval craftsman.
Goodbye, Tear-Out: That sacrificial fence gives you zero-clearance support right where the blade exits, which means clean cuts and way less sanding. Your future self will thank you.
Essential Materials for Your Table Saw Crosscut Sled Build
For the Base:
- One piece of plywood or MDF, about 24″ x 48″ (or whatever fits your needs)
- Baltic Birch plywood is the fancy choice, but MDF works great if you’re watching your wallet
For the Fences:
- A straight 2×4 or similar hardwood piece
- Make that rear fence nice and tall – safety and rigidity, my friend!
For the Runners (This is Where the Magic Happens):
- Some stable hardwood like maple, oak, or cherry
- About 3/4″ thick and 4″ wide
- This is where precision really matters, so don’t cheap out here
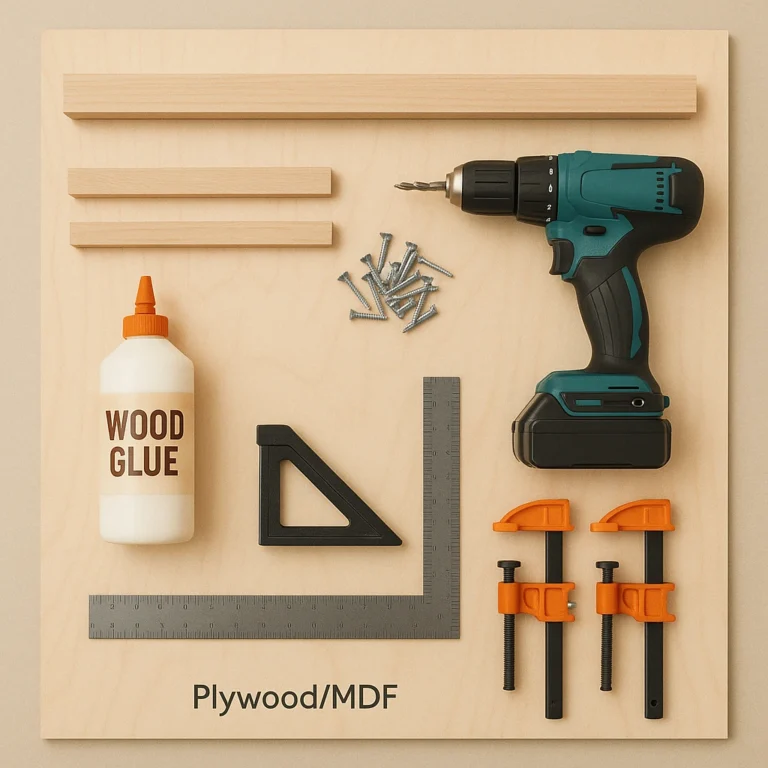
The Usual Suspects:
- Good wood glue
- CA glue (super glue) for a sneaky trick I’ll show you
- Various screws (1-1/4″ and 2″ should do it)
- Optional: T-track and stop blocks for future upgrades
Tools You’ll Need:
- Your trusty table saw (hopefully it’s tuned up – if not, that’s another conversation!)
- Tape measure and pencil
- A reliable square (seriously, don’t skimp here)
- Drill with bits
- Clamps (your extra set of hands)
- Calipers for measuring those miter slots precisely
- Safety gear (eyes and ears, people!)
Step-by-Step Crosscut Sled Plans: Let’s Make Some Sawdust!
Step 1: Crafting Runners for Your Table Saw Crosscut Sled
These runners are like the foundation of a house – get them wrong, and your entire crosscut sled goes sideways. They need to fit your miter slots like a glove.
First, grab your calipers and measure those miter slots at several points. They’re usually close to 3/4″, but don’t assume – measure! Now mill two strips of that stable hardwood, then carefully shave off tiny bits until they’re just a hair thicker than the slot. You want what I call a “piston-fit” – smooth but snug.
Step 2: Installing Crosscut Sled Runners (The Coin Trick)
Here’s where we get sneaky with these crosscut sled plans. Place a few pennies in each miter slot and lay your runners on top. This lifts them just enough for the magic to happen.
Apply a bead of CA glue along the top of each runner, then carefully lay your table saw crosscut sled base on top. Press down firmly for about a minute. The CA glue instantly tacks everything in place, perfectly aligned! Once you slide it off the saw, drive some countersunk screws through the base into the runners for a permanent bond. Just avoid putting screws where the blade’s gonna travel!
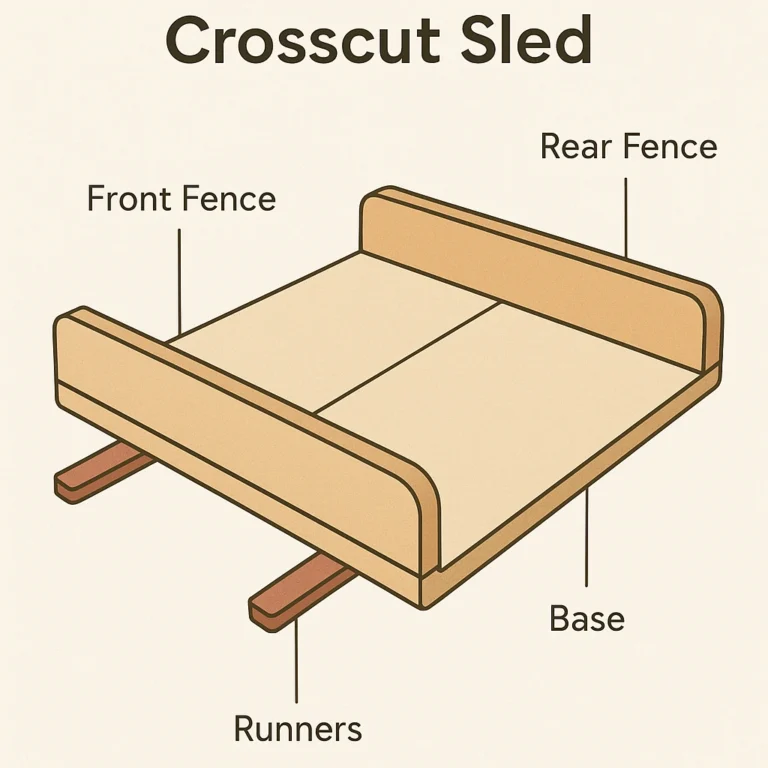
Step 3: Adding Fences to Your Table Saw Crosscut Sled
Mill your fence material so it’s nice and straight. Make that rear fence tall (around 3.5″) for safety and rigidity. The front fence can be shorter – it’s mostly there to support your crosscut sled structure.
Glue and screw the front fence to the front edge of your base. Now comes the moment of truth – put the crosscut sled back on the saw, fire it up, and slowly push forward, cutting about two-thirds through the base. That kerf line is now your perfect reference for where the blade travels.
Position your rear fence just behind the kerf, square it up as best you can with your square, and temporarily clamp it. Drive one screw on one side to create a pivot point.
Step 4: Calibrating Your Crosscut Sled for Perfect Accuracy
This is where we go from “pretty good” to “absolutely dead-on” with your table saw crosscut sled. The 5-cut method is like the secret handshake of precision woodworking. You’ll make five cuts on a piece of scrap, rotating it each time. Any tiny error gets magnified, making it super easy to measure and correct.
It sounds complicated, but it’s actually pretty straightforward once you get the hang of it. This method will guarantee your fence is perfectly square to the blade – and I mean PERFECTLY.
Step 5: Upgrading Your Table Saw Crosscut Sled
Once you’ve got the basics down with these crosscut sled plans, you can add some sweet upgrades to your DIY crosscut sled:
- Rout a T-track channel in your rear fence for a stop block system
- Add a safety block on the far side to remind you where not to put your hands
- Maybe even add some dust collection if you’re feeling fancy
Table Saw Crosscut Sled Pro Tips from Someone Who’s Been There
Take Your Time with Those Runners: Seriously, the fit of your runners makes or breaks this whole table saw crosscut sled project. A few extra minutes here saves hours of frustration later.
Don’t Cheap Out on Materials: Flat, stable plywood for the base and straight hardwood for the fences will make this crosscut sled last for years and perform like a champ.
Get a Good Square: This isn’t the place to use that bent combination square from your junk drawer. A reliable, accurate square is essential for building your table saw crosscut sled properly.
Test Everything: After calibration, make some test cuts on scrap with your new crosscut sled. Check for squareness, make sure everything feels smooth, and that you’re comfortable with the setup.
Safety Tips for Your Crosscut Sled
A table saw crosscut sled is definitely a safety upgrade, but let’s keep our wits about us:
- Always unplug your saw before making adjustments
- Wear your safety glasses and ear protection
- Keep those hands behind the fence
- Make sure your workpiece is firmly against the fence
- Never, ever reach over the blade
Why Every Woodworker Needs These Crosscut Sled Plans
Building a table saw crosscut sled is honestly one of those projects that’ll make you fall in love with woodworking all over again. It’s the difference between “good enough” and “holy cow, did I really make that?” The precision you’ll get from this simple crosscut sled will open up projects you never thought you could tackle.
Plus, there’s something deeply satisfying about building a tool that makes all your other tools work better. It’s like giving your table saw superpowers! These DIY crosscut sled plans are just the beginning of transforming your workshop.
Ready to take your woodworking to the next level? This table saw crosscut sled is just the beginning. Once you’ve got perfect crosscuts dialed in with these crosscut sled plans, you’ll wonder what other precision jigs you can build to make your shop even more capable.
Now go make some sawdust – the good kind that comes from perfect cuts!