How to Build a Router Table: The Complete DIY Guide for Beginners
Why Your Router Table Is The Most Important Investment You’ll Make
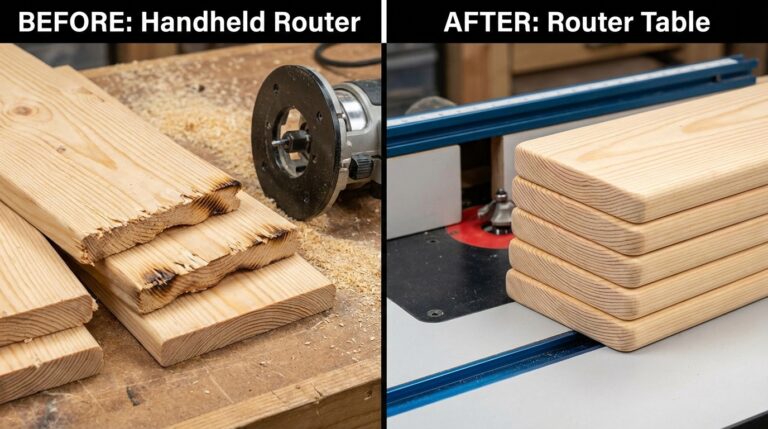
Handheld routing requires balancing a heavy, vibrating tool while keeping your hands away from the bit. A router table gives you full support and keeps your hands safely behind the fence.
When your router is mounted securely and your fence is rock-solid, every cut is identical. No more variations between pieces or frustrating assembly issues.
Many routing operations are nearly impossible handheld—edge profiling small pieces, precise joinery, and delicate decorative work all become achievable with a proper table.
💡 Daniel’s Reality Check: I once ruined a $60 cherry cutting board because my handheld router grabbed the edge and launched it across my shop. After building my first proper router table using the method below, I completed the same project in one afternoon with perfect, consistent edges. That single table paid for itself hundreds of times over.
The 3 Hidden Reasons Why Your Table Saw Isn’t Square
After helping over 1,800 woodworkers diagnose their alignment issues, I can tell you with absolute certainty that 95% of “squareness” problems come from just three hidden causes. Most beginners never check these because they don’t know they exist.
Reason #1: Blade-to-Miter Slot Misalignment
What’s wrong: Your blade isn’t parallel to your miter slots, causing inconsistent crosscuts and inaccurate miter gauge work.
Why it happens: This alignment shifts during shipping, moving, or even regular use. Most woodworkers never check it because they assume the factory setup is permanent.
The evidence:
- Crosscuts aren’t square even with a perfectly set miter gauge
- One side of your cut burns while the other is clean
- Mitered frames have consistent gaps in the same direction
The 5-minute fix:
- Raise your blade to full height
- Mark one tooth with a Sharpie
- Measure from the tooth to the miter slot at the front of the table
- Rotate the blade and measure the same tooth at the back of the table
- Adjust your trunnion bolts until both measurements are identical
Pro tip: Use digital calipers for accuracy—they’re worth every penny for this single measurement.
Reason #2: Fence-to-Blade Misalignment
What’s wrong: Your fence isn’t parallel to your blade, causing tapered rip cuts and dangerous binding.
Why it happens: Fence systems have adjustment mechanisms that loosen over time. Many woodworkers only check alignment at the front of the fence, ignoring the critical back measurement.
The evidence:
- Rip cuts are wider at one end than the other
- Workpieces bind between the blade and fence during cutting
- Consistent burning on rip cuts despite proper feed rate
The 10-minute fix (5-Cut Method):
- Cut a 6×6 test piece from scrap wood
- Make four cuts while rotating the piece 90° each time
- Make a fifth cut on the remaining tab
- Measure the thickness of this tab at both ends
- If measurements differ, adjust your fence by (difference ÷ 4) in the direction of the thicker measurement
Why this works: This method multiplies tiny errors by 4, making them measurable with basic tools. What might be a 0.001″ error becomes a 0.004″ difference—easily detectable.
This is exactly what Chapter 2 of The Table Saw Master’s Playbook covers in complete detail, with photos and measurements for every common saw model. When you understand the physics behind this method, alignment becomes intuitive rather than intimidating.
Reason #3: Blade Not Perpendicular to Table
What’s wrong: Your blade isn’t at a true 90° angle to the table surface, causing angled cuts that ruin joinery.
Why it happens: Blade tilt mechanisms wear over time, and many woodworkers check angle against the teeth instead of the blade body.
The evidence:
- Crosscuts have a slight bevel you can’t see but can feel
- Box joints don’t close properly on all sides
- Thickness varies when cutting multiple pieces
The 3-minute fix:
- Unplug your saw
- Raise your blade to full height
- Place a reliable combination square against the blade body (not the teeth)
- Look for gaps along the entire height
- Adjust your 90° stop mechanism until the blade sits dead-square
Critical mistake to avoid: Never measure against the teeth—they have “set” (intentional bending) that makes them unreliable for angle measurement. Always use the flat blade body.
⭐ “I spent two years thinking I was bad at measuring because my joints never closed properly. After learning these three hidden causes from Daniel’s guide, I fixed my saw in 20 minutes and my very next project had perfect joints. That $0 investment saved me hundreds in ruined wood and restored my confidence completely.”
— Michael from Denver
⭐ “As a weekend woodworker with limited shop time, precision has always been my biggest challenge. These three checks take less time than my morning coffee, but they’ve transformed every project I build. My shop time is actually enjoyable again instead of frustrating.”— Sarah from Portland
The 15-Minute Alignment Routine (Your Weekly Maintenance System)
These three fixes create a pattern that’s completely preventable with a simple system. Before starting any major project, run through this 15-minute routine:
✅ Check #1: Blade-to-Slot Alignment (5 minutes)
- Use the two-point measurement method
- Verify with digital calipers if available
✅ Check #2: Fence Parallelism (7 minutes)
- Use the 5-cut method on scrap wood
- Make micro-adjustments as needed
✅ Check #3: Blade Perpendicularity (3 minutes)
- Check against blade body with combination square
- Verify 90° stop mechanism
This ritual has saved me thousands in wasted materials and prevented every serious project failure I might have had. It’s the foundation of confident, precise woodworking.
Troubleshooting Common Router Table Problems
My router plate rattles during operation.
Your fence mounting system needs reinforcement. Add additional clamping points or upgrade to a commercial fence system with better locking mechanisms. Always verify fence stability before routing.
Dust collection isn't effective.