Inside was a single photograph and a handwritten note from a woodworker named Tom I’d never met. The photo showed a walnut jewelry box with impossibly tight box joints—no gaps, no glue squeeze-out, edges so crisp they looked machined. The note read: “Built this using your crosscut sled method. My wife cried when I gave it to her. Thank you for giving me back my confidence.”
I sat there staring at that photo for twenty minutes, remembering my own lowest point just eighteen months earlier. I’d been attempting the exact same project—a small keepsake box for my daughter’s graduation—and failed three times in a row. The joints gapped. The miters wouldn’t close. Each failure cost me $40 in beautiful walnut and another piece of my self-belief.
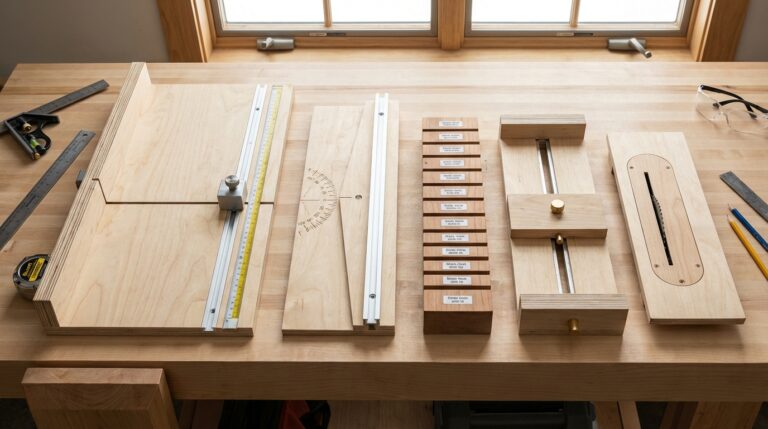
What Tom and I both discovered—the secret nobody tells beginners—is this: precision woodworking isn’t about talent. It’s about jigs. Professional woodworkers don’t have steadier hands or better eyesight. They have better setups. And those setups start with five essential jigs that transform your table saw from a dangerous power tool into a precision instrument.
If you’ve ever abandoned a project because your cuts weren’t accurate enough, wasted expensive wood on misaligned joints, or avoided complex techniques because you lacked confidence—this guide is your breakthrough. These five DIY table saw jigs for precise cuts will give you the repeatable accuracy that skill alone cannot provide.
Let’s build the precision system that separates frustrating failures from flawless craftsmanship—starting today.
🎯 Stop. Get the Foundation First.
Before you build any jigs, understand this fundamental truth: precision starts with a properly tuned foundation—not just tools, but systematic setup.
I’ve created a FREE ebook: “The Dead-Square Table Saw Masterclass.” This isn’t just another checklist—it’s your complete system to stop wasting $40–$120/month on failed projects and start building with confidence. In just 15 minutes, you’ll eliminate 2–3 hours of rework per project and experience the “wow moment” of professional-quality cuts.
Download it now, print the pages you need, and keep it in your shop. It’s the same system I use before every major project—and it ensures every cut you make starts with precision, not frustration.
Why DIY Table Saw Jigs for Precise Cuts Matter More Than You Think
Most beginners think jigs are fancy accessories for advanced woodworkers. What they don’t realize is that jigs are the great equalizer—they allow hobbyists to achieve professional results with basic tools.
Here’s why these DIY table saw jigs for precise cuts are essential:
They eliminate human error
Even the steadiest hands can’t match the consistency of a well-designed jig. When your setup is repeatable, your results become predictable—no more hoping your next cut will be better than the last.
Even the steadiest hands can’t match the consistency of a well-designed jig. When your setup is repeatable, your results become predictable—no more hoping your next cut will be better than the last.
They save expensive materials
One misaligned cut can ruin a $50 piece of hardwood. Jigs ensure your first cut is your final cut—no test pieces, no wasted lumber, no second-guessing.
One misaligned cut can ruin a $50 piece of hardwood. Jigs ensure your first cut is your final cut—no test pieces, no wasted lumber, no second-guessing.
They unlock advanced techniques
Many joinery methods are nearly impossible to execute consistently without proper jigs. Once you have the right setup, dovetails, box joints, and tapered cuts become achievable—even for beginners.
Many joinery methods are nearly impossible to execute consistently without proper jigs. Once you have the right setup, dovetails, box joints, and tapered cuts become achievable—even for beginners.
💡 Daniel’s Reality Check: I spent $320 on exotic mahogany for a dining table, only to discover my freehand taper cuts were inconsistent. After building a simple taper jig using the method below, I completed the same project in two weekends with zero material waste. That single jig paid for itself hundreds of times over.
Essential Materials and Tools for All Five Jigs
Common Materials (Total Cost: $85-120)
For Jig Bases:
- 1/2″ Baltic birch plywood (24″x36″) – $42.99
(Critical: Use Baltic birch—its cross-banded plies prevent warping. Avoid MDF—it swells with humidity) - 3/4″ maple hardwood (2 pieces, 1″x2″x36″) for fences – $35.75
- Wood glue (Titebond III recommended) – $6.99
- 1-1/4″ pocket hole screws (25 pack) – $8.99
- Sandpaper assortment (120, 180, 220 grit) – $8.25
For Hardware:
- 1/4″ hardwood dowels (for indexing pins) – $4.99
- Rare earth magnets (4 pack, 1/4″ diameter) – $9.99
- T-track (18″ length) and matching bolts – $15.99
- Toggle clamps (2 pack, 2″ size) – $18.50
Tools Required (The Minimal Setup)
- Drill/driver with pocket hole jig (Kreg K3 or equivalent)
- Combination square (Starrett 12″ or equivalent quality)
- Digital calipers (Harbor Freight $15 model works fine)
- Clamps (4 minimum: 2 small bar clamps, 2 spring clamps)
- Safety glasses and hearing protection
- Table saw with freshly tuned blade (use my table saw tune-up guide first)
⭐ “I built all five jigs in one weekend and immediately noticed the difference in my projects. My box joints that used to require excessive clamping now close perfectly without force. The investment in quality materials was worth every penny—these jigs have survived two years of heavy shop use and still deliver precision results.”
— Mike from Boston
⭐ “As someone working in a small garage workshop, I thought precision joinery was impossible without expensive equipment. These DIY jigs proved me wrong. Last month, I built a complete dining set using these exact setups, and every joint was tight enough to make my father-in-law nod in approval.”— Sarah from Portland
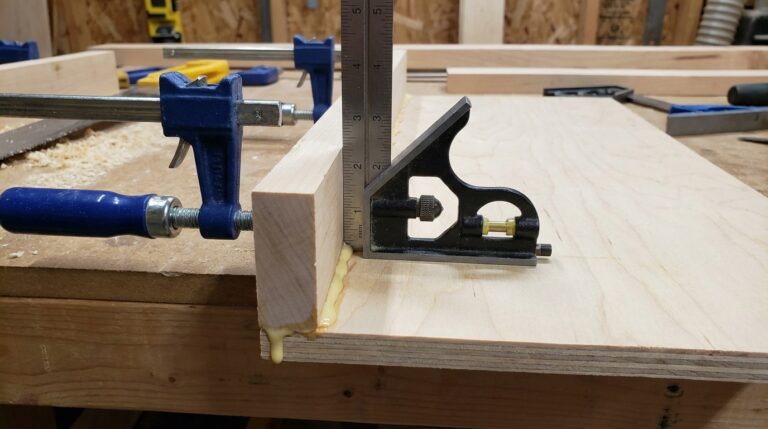
DIY Table Saw Jig #1: Precision Crosscut Sled (Your Foundation Jig)
This is your most important jig—the one you’ll use for 80% of precision crosscuts. Build it first, and everything else becomes easier.
Materials Needed (Total Cost: $65)
- 1/2″ Baltic birch plywood (24″x30″)
- 3/4″ maple (2 pieces, 3″x24″ for fences)
- 3/4″ maple (2 pieces, 3/4″x24″ for runners)
- 1-1/4″ pocket hole screws (12)
- Paste wax
Step-by-Step Build (90 minutes)
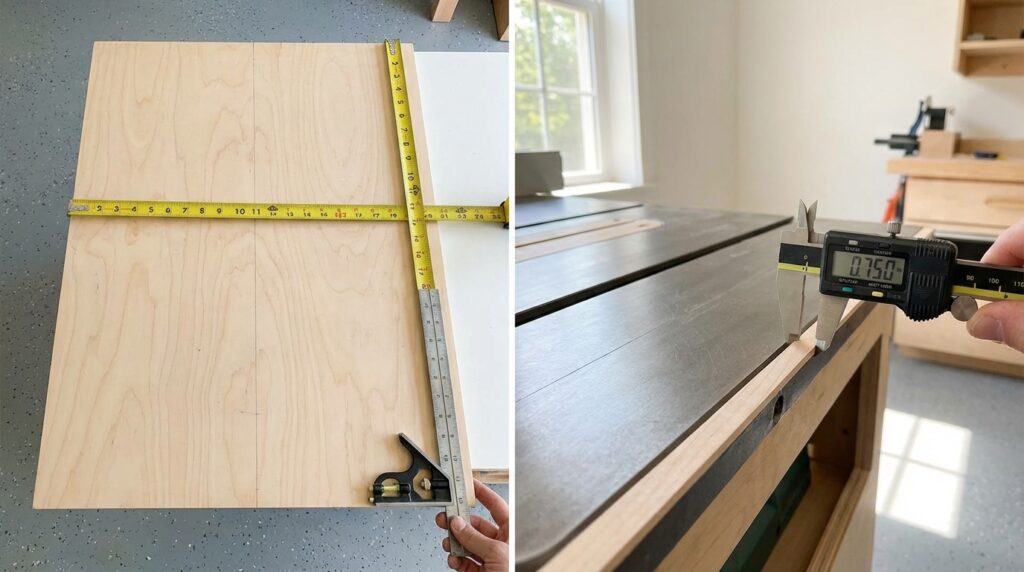
Step 1: Cut and Prepare the Base
- Cut plywood to 24″x30″ using your table saw’s rip fence
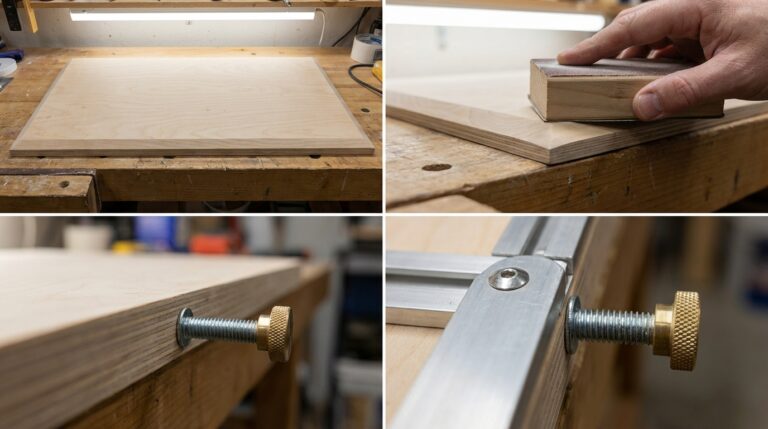
- Sand bottom surface with 220 grit until smooth (prevents binding)
- Mark centerline lengthwise with pencil using combination square
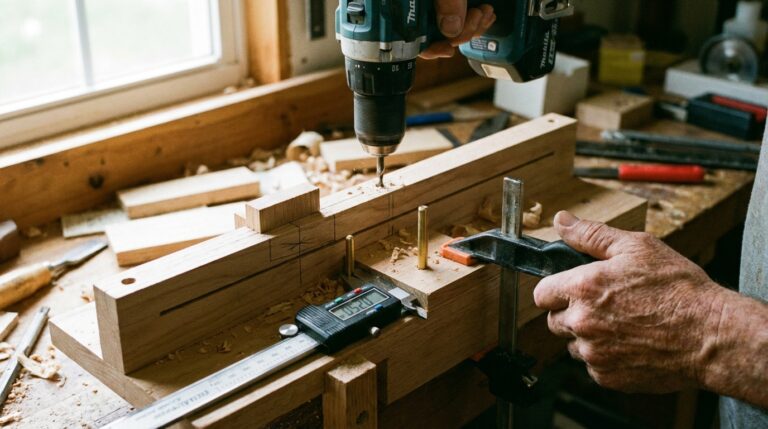
Step 2: Install Runners (Critical Step)
- Measure your miter slot width at three points with calipers
- Mill maple runners to exactly 0.001″ wider than your narrowest measurement
- Position runners parallel to centerline using combination square
- Drill pocket holes on underside, attach with screws
- Test fit: Should slide smoothly without side-to-side play
- Apply thin coat of paste wax to runners before final installation
Step 3: Build Front Fence
- Cut maple to 3″x24″
- Sand one edge perfectly straight with hand plane
- Position 2″ from front edge of base
- Clamp and verify 90° to runners with combination square
- Attach from underneath with 6 pocket hole screws
Step 4: Cut the Kerf
- Unplug saw, position sled on table
- Plug in saw, slowly push sled until blade barely scores base
- Unplug saw, draw line along score mark
- Replug saw, complete cut following your line (cut 2/3 through base)
Step 5: Build and Calibrate Rear Fence
- Cut second maple piece to 3″x24″
- Sand one edge perfectly straight
- Position behind kerf line with 1/8″ gap for blade clearance
- Clamp temporarily—DO NOT attach permanently yet
- Perform 5-cut calibration method (see below)
- Once calibrated, drill clearance holes and attach with brass screws
The 5-Cut Calibration Method:
- Cut 6″x6″ scrap piece from same wood species as project
- Make cut #1 along one edge
- Rotate piece 90° clockwise, make cut #2
- Repeat for cuts #3 and #4
- Make cut #5 on remaining tab
- Measure tab thickness at both ends with calipers
- If measurements differ by X inches, move fence by (X ÷ 4) toward thicker measurement
Pro Tip: For even faster, more precise calibration, grab my complete Crosscut Sled Builder’s Guide—it includes life-size printable templates, a calibration calculator, and video walkthroughs that cut your build time in half while guaranteeing dead-square accuracy every time.
DIY Table Saw Jig #2: Adjustable Taper Jig (Perfect Angles Every Time)
Stop struggling with inconsistent taper cuts on table legs, drawer sides, or decorative elements.
Materials Needed (Total Cost: $28)
- 1/2″ Baltic birch plywood (12″x24″)
- 1″x2″ maple (36″ length)
- 3/8″ x 4″ hanger bolt
- Knurled knob
- Wood glue and screws
Step-by-Step Build (45 minutes)
Step 1: Create the Base
- Cut plywood to 12″x24″
- Sand edges smooth with 180 grit
Step 2: Install Fixed Fence
- Attach 1″x2″ maple along one long edge
- Verify perfectly straight with combination square
- Secure with wood glue and 4 screws from underneath
Step 3: Build Adjustable Fence System
- Drill 3/8″ hole 4″ from end of base for hanger bolt
- Thread hanger bolt through hole from underneath
- Attach knurled knob to exposed end
- Position second 1″x2″ maple piece against bolt head
Step 4: Add Angle Reference Marks
- Using protractor, mark common angles on base:
- 0° (parallel to fixed fence)
- 2° (subtle taper for furniture legs)
- 5° (standard taper for drawer sides)
- 10° (dramatic taper for decorative pieces)
- Label each mark clearly with permanent marker
Step 5: Install Workpiece Clamp
- Position small toggle clamp 6″ from front edge
- Ensure clamp pressure is perpendicular to adjustable fence
- Test with scrap wood to verify secure hold without shifting
Critical Detail: Always test your taper angle on scrap wood first. The physics of taper cutting means small setup errors create large result differences at the workpiece’s full length.
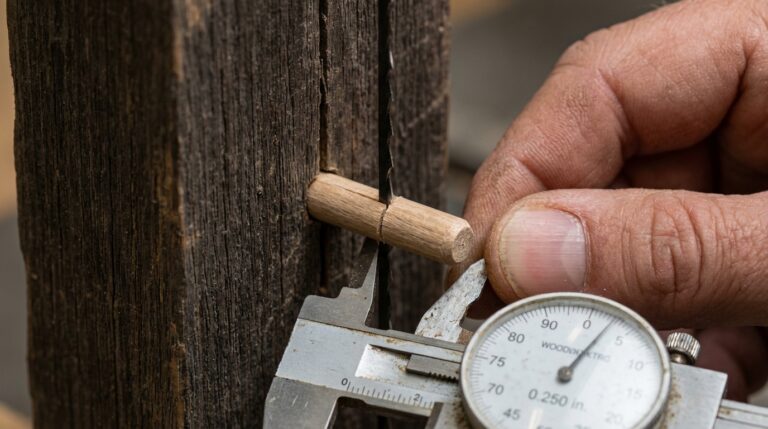
DIY Table Saw Jig #3: Dado Stack Calibration Jig (Perfect Grooves)
Dado cuts that are even 0.002″ off can cause assembly problems. This jig eliminates guesswork.
Materials Needed (Total Cost: $15)
- 1/2″ Baltic birch plywood (8″x12″)
- 1″x2″ maple (12″ length)
- 1/4″ hardwood dowel (2″ length)
- Wood glue and screws
Step-by-Step Build (30 minutes)
Step 1: Create the Base
- Cut plywood to 8″x12″
- Sand smooth with 220 grit
Step 2: Install Reference Fence
- Attach 1″x2″ maple along one long edge
- Verify 90° to base with combination square
- Secure with wood glue and 3 screws
Step 3: Add Width Measurement System
- Drill 1/4″ hole 1″ from fence edge
- Insert hardwood dowel as width stop
- Create additional holes at 1/4″, 3/8″, 1/2″, and 3/4″ intervals
- Label each hole with corresponding dado width
Step 4: Depth Control Feature
- Attach small block of wood to base edge as depth stop
- Position so workpiece rests against it during cuts
- Ensures consistent groove depth across multiple pieces
Why This Matters: When cutting dados for shelf pins or drawer bottoms, consistency is everything. This jig ensures every groove is identical—no more forcing shelves into slightly mismatched slots.
DIY Table Saw Jig #4: Box Joint Jig (Professional Joinery Made Simple)
Box joints separate hobbyists from professionals. This jig makes them achievable for everyone.
Materials Needed (Total Cost: $32)
- 1/2″ Baltic birch plywood (10″x16″)
- 3/4″ maple runners (2 pieces, 3/4″x10″)
- 1/4″ hardwood dowel (3″ length)
- Toggle clamp (2″ size)
- Wood glue and screws
Step-by-Step Build (60 minutes)
Step 1: Prepare the Base
- Cut plywood to 10″x16″
- Sand bottom surface smooth with 220 grit
- Install maple runners in miter slots (same method as crosscut sled)
Step 2: Create the Indexing System (The Magic)
- Drill 1/4″ hole through fence at exact center of blade kerf
- Insert 1/4″ hardwood dowel as indexing pin
- Ensure pin protrudes 1/2″ beyond fence face
- Sand pin smooth to prevent workpiece binding
Step 3: Install Workpiece Clamp
- Position toggle clamp 4″ from indexing pin
- Orient clamp so pressure is parallel to fence
- Test with scrap wood to verify secure hold without shifting
Step 4: Calibrate for Perfect Fit
- Cut test box joint in scrap wood
- Assemble fingers—if too tight, move fence 0.005″ away from blade
- If too loose, move fence 0.005″ toward blade
- Repeat until fingers slide together with firm hand pressure
Pro Insight: The key to perfect box joints is consistency—not perfection. This jig ensures every finger is identical, creating tight joints that close without force or glue starvation.
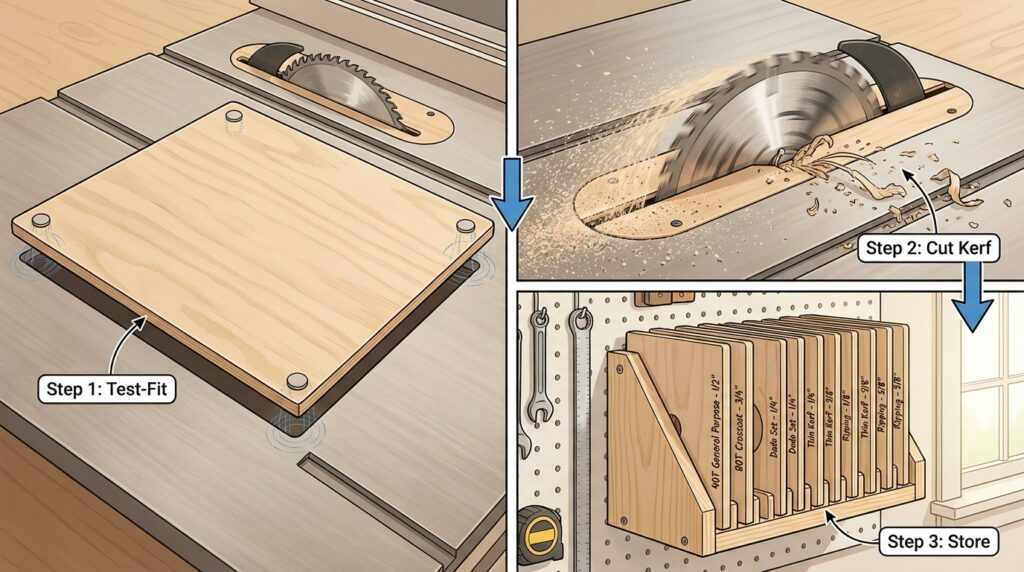
DIY Table Saw Jig #5: Zero-Clearance Insert System (Eliminate Tear-Out)
Support wood fibers right up to the cutting edge to prevent tear-out on delicate materials.
Materials Needed (Total Cost: $12)
- 1/4″ Baltic birch plywood (3 pieces, 10″x12″ each)
- Wood glue
- Rare earth magnets (4)
Step-by-Step Build (20 minutes)
Step 1: Create Base Insert
- Cut plywood to match your saw’s throat plate opening
- Test fit in opening—should sit flush with table surface
- Glue rare earth magnets to underside corners
Step 2: Make Blade-Specific Inserts
- Place base insert in saw
- Position blade at desired height
- Turn on saw briefly to cut kerf through insert
- Turn off saw, remove insert
- Repeat for crosscut blade, dado stack, and molding bit
Step 3: Create Storage System
- Cut small wooden rack to hold inserts vertically
- Label each insert with blade type and height
- Mount rack near saw for quick access
Critical Benefit: Zero-clearance inserts support wood fibers right up to the cutting edge, preventing tear-out on delicate materials like veneers, end grain, and thin stock.
Advanced Jig Building Techniques for Professional Results
Once you’ve mastered the basic five jigs, these pro techniques will elevate your precision even further:
The Modular Jig System
Instead of building separate jigs for every task, create a modular base system (12″x18″ Baltic birch) that accepts different fence attachments. This saves space in small shops and reduces build time for new jigs—you only build the specialized parts, not the entire base.
The Calibration Verification Method
Every jig needs periodic verification. Create simple test pieces for each jig:
- Crosscut sled: Cut 12″ square, flip and join edges—should form straight line
- Taper jig: Cut two identical tapers, flip one—should align perfectly
- Box joint jig: Cut test joint monthly to verify finger fit
The Dust Collection Integration
Drill 1-1/4″ holes through jig bases behind the blade area. Connect flexible hoses to pull sawdust away from your cut line. This improves visibility and prevents buildup that affects accuracy.
How These DIY Table Saw Jigs Fit Into Your Complete Workshop System
Your DIY table saw jigs for precise cuts aren’t just standalone tools—they’re the foundation of a comprehensive precision system that transforms your entire workshop.
When you combine these jigs with proper small workshop organization and regular blade maintenance, you create a space where every tool has a purpose and every cut serves your vision.
This is exactly what The Table Saw Master’s Playbook covers in complete detail—how to build a comprehensive jig system that includes specialized attachments, calibration procedures, and workflow optimization. When your jigs work together as a system, your creativity can flourish without limitation.
Frequently Asked Questions About DIY Table Saw Jigs
Can I build these jigs with basic tools?
Absolutely. The only specialized tool you need is a drill/driver. Everything else can be done with basic hand tools and your table saw. The key is taking your time with measurements and assembly—rushing creates errors that compound through every project.
What if I use MDF instead of Baltic birch?
For frequently used jigs like your crosscut sled, monthly verification is ideal. For occasional-use jigs like your taper jig, verify before each major project. Temperature changes and regular use can affect jig accuracy over time—wood expands and contracts with humidity.
What if I don't have Baltic birch plywood?
You can substitute other stable plywood, but avoid MDF or particle board—they lack the dimensional stability needed for precision jigs. If you must use alternatives, seal all edges with wood glue to prevent moisture absorption and warping.
Ready to Transform Your Precision Woodworking?
Perfect DIY table saw jigs for precise cuts aren’t about having expensive materials or fancy tools. They’re about understanding that the simplest solutions are often the most effective. When your setups are repeatable and your results are consistent, everything becomes easier: projects flow smoothly, materials aren’t wasted, and your confidence soars.
I used to dread complex joinery because of inconsistent results. Now, with these five jigs as my foundation, I actually look forward to tackling challenging projects. The difference isn’t better equipment—it’s better systems.
Remember that $320 mahogany dining table that taught me this lesson? Last month, I built a complete bedroom set using the exact jigs in this guide. Every joint closed perfectly. Every assembly was smooth. Every project was completed with the confidence that comes from knowing my setups were dialed in.
And if you want to skip the trial-and-error on your crosscut sled—the jig that makes or breaks your entire workshop precision—grab my complete Crosscut Sled Builder’s Guide. It includes everything you need to build a professional-grade sled in one afternoon, guaranteed dead-square every time.
The Dead-Square Table Saw Masterclass
Stop wasting $40–$120/month on failed projects. Eliminate 2–3 hours of rework per project. Build with the confidence of a craftsperson—not the frustration of an amateur.
I’ve condensed years of trial-and-error into a complete, printable ebook that shows you exactly what to check and how to check it. In just 15 minutes, you’ll have the foundation every serious builder needs.
It’s the same guide I use in my shop every single week.
Download it today, print the pages you need, and keep it in your shop. By this weekend, you’ll see the difference.
Because you didn’t get into woodworking to fight your tools. You got into it to build something beautiful.
Let’s make sure your tools help—not hinder—that mission.
Provide more information on how to build the km gs, better pictures and more details. The beginning woodwork could not follow these instructions
Thanks a lot for the honest feedback, that’s really helpful. You’re right – for a true beginner some of these jigs and build steps could use more step‑by‑step detail and closer photos, especially around the measurements and assembly order.
I’m going to update this guide with clearer build diagrams and more process pictures so it’s easier to follow from start to finish. In the meantime, if you tell me which jig you were most interested in building, I can break that one down for you first and send you a simplified step list.
hi, please add pictures, I got lot on the first jig when attaching the hinge to the base. what side does it go on, right or left. how does a hinge allow for angle cuts when it is at 90 or 180 degrees? Very confusing directions.
Thanks so much for pointing this out – you’re right, that section needs to be clearer and photos would help a lot.
On your questions:
On this jig, the hinge goes on the left side of the base when you’re standing at the front of the saw, with the hinge pins facing up, so the two parts can open and close like a book.
The hinge itself is mounted at 90°, but it’s there as a pivot point, not to “lock” the angle. You fix one end of the jig at a known reference, then swing the other side around that hinge to set different angles. The jig rotates around the hinge, which is how you get angle cuts instead of being stuck at only 90° or 180°.
I’m going to update this article with step‑by‑step photos and a simple diagram of the hinge placement and how the angle adjustment works, so it’s much easier to follow. Thanks again for the honest feedback – it really helps me improve these guides for beginners.
A picture is worth a thousand words. Without some good pictures it can be confusing.
100% agreed — we’ve updated the guide with better visuals based on feedback like yours. Thanks for taking the time to comment!