I’ll never forget the first time I tried to build DIY floating shelves.
I watched a 5-minute YouTube video, grabbed some wood, and thought: “How hard can it be?”
Turns out — pretty hard.
My shelves sagged after a week. One even pulled a stud anchor right out of the wall. My wife’s favorite plant hit the floor. Soil everywhere.
I was embarrassed. And frustrated.
But I didn’t give up. I went back to the drawing board, studied how real cabinetmakers do it, and built a system that actually works.
Now, I’ve installed dozens of DIY floating shelves — in my home, my friends’ homes, even my mom’s kitchen. Not a single one has failed.
And today, I’m giving you the exact method — simple, safe, and strong enough to hold your heaviest books.
No fancy tools. No guesswork. Just a weekend and a little patience.
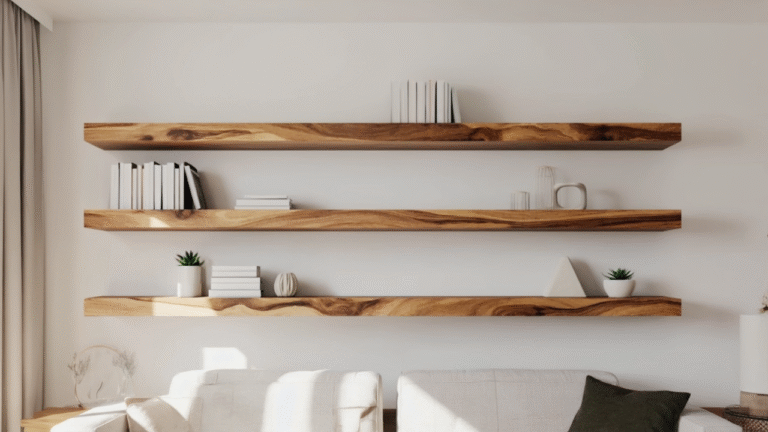
Why DIY Floating Shelves Beat Store-Bought Every Time
Store-bought “floating” shelves? Most are just cheap MDF with fake fronts and weak brackets. They look great for a month… then they sag, wobble, or fall.
But real DIY floating shelves are different.
You’re building a hollow box that slides over a hidden, wall-mounted support. The weight transfers directly into your studs — not drywall anchors.
Result?
- Zero visible hardware
- Rock-solid stability
- Custom size, wood, and finish
- Costs 1/3 of store-bought versions
This isn’t just storage. It’s a statement.
And once you master this method, you’ll want to build DIY floating shelves for every room in your house.
What You’ll Need (Mostly Tools You Already Own)
🛠️ Tools:
- Tape measure & pencil
- Stud finder (non-negotiable — more on this soon)
- Level (get a 48” one — short levels lie)
- Drill + wood bits
- Saw (circular, miter, or even a handsaw)
- Clamps
- Sandpaper (80 → 220 grit)
- Safety glasses (always)
🪵 Materials:
- Shelf wood: ¾” hardwood (oak, maple, walnut) or pine if painting
- Support lumber: 2×2 or 2×3 kiln-dried pine (this is your hidden backbone)
- Wood glue (Titebond III for strength)
- 2½” or 3” wood screws (for studs)
- Finish: Stain, paint, or clear coat
Pro Tip: Use your table saw for clean, straight cuts. If your saw isn’t tuned, your DIY floating shelves won’t be square — and that shows.
Step 1: Plan Like a Pro (Don’t Skip This!)
Before you cut a single board:
- Decide size: Length, depth, thickness.
→ Standard depth: 8–10” for books, 6” for decor. - Find your studs: Use your stud finder. Mark them with painter’s tape.
→ Critical: Your support must screw into at least 2 studs. Drywall anchors will fail. - Check level: Walls aren’t always straight. Measure from floor to ceiling at multiple points.
🧑🔧 Daniel’s Story: I once skipped the stud finder because “it’s just a small shelf.” It held for 3 days. Then my coffee mug went flying. Lesson learned: studs are non-negotiable.
Step 2: Build the Hidden Support (Your Secret Weapon)
This is the part no one sees — but it’s what makes your DIY floating shelves actually float.
- Cut your 2×2 support to the exact length of your shelf.
- Hold it against the wall, aligned with your stud marks.
- Pre-drill holes every 16” (on stud centers).
- Screw it directly into the studs with 3” wood screws.
- Double-check level — front-to-back AND side-to-side.
This support carries 100% of the weight. Make it solid.
Step 3: Build the Hollow Shelf Box
You’re not just nailing boards together. You’re building a precision box that slides over the support.
Cut these pieces (for a 36” long, 8” deep shelf):
- Top: 36” x 8”
- Bottom: 36” x 8”
- Front: 36” x ¾”
- Ends: 7¼” x ¾” (accounts for top/bottom thickness)
Assembly:
- Glue and clamp the front to the top and bottom.
- Add the end pieces.
- Use a square to ensure 90° corners.
- Let glue dry overnight.
📌 If your cuts aren’t square, your box won’t fit. Make sure your table saw is dialed in first — see our Table Saw Blade Alignment Guide .
Step 4: Sand, Finish, and Slide Into Place
- Sand all surfaces: 120 → 180 → 220 grit.
- Apply your finish (2–3 coats, light sanding between).
- Once dry, slide the box over the wall support.
- Optional: Add 1–2 small screws from the top (countersink and fill if you want true “floating” look).
Step back. Admire your work.
You’ve just built DIY floating shelves that look like they cost $200… for under $40.
Pro Tips That Make You Look Like a Pro
- Always hit studs — no exceptions.
- Pre-finish all parts before assembly (hard to reach inside later).
- Test-fit the box on the support before gluing.
- Use a router to round the front edge — instant upgrade.
- Level in 3 directions: left-right, front-back, and shelf-to-shelf.
📌 Want more ways to elevate simple builds? Check out our Weekend Wood Projects for beginner-friendly ideas that impress.
Before You Cut Your First Board — Tune Your Saw
Here’s the truth no one tells you:
Your DIY floating shelves are only as good as your cuts.
A misaligned table saw = crooked shelves = gaps, wobble, and frustration.
I used to blame my wood. My clamps. My glue.
Then I realized: my saw was off by 1/32”. That’s all it took to ruin the fit.
That’s why I created the FREE “Dead-Square Every Time” Table Saw Tune-Up Checklist.
It’s a 15-minute guide to calibrating your saw for perfect 90° cuts — no dial indicator needed.
You’ve Got This
Building DIY floating shelves isn’t about fancy tools or years of experience.
It’s about planning, precision, and respect for the craft.
Do it right — and you’ll have shelves that look like they cost $200… for under $40.
Plus, that “Did you really make these?” look from your friends? Priceless.
Go build something beautiful.
— Daniel
HMZ Woodz