5 Easy DIY Patriotic Wood Projects for Your 4th of July Weekend

I’ll never forget the summer I built my first American flag display.
It was 2018. My daughter was 6. She’d just learned the Pledge of Allegiance at school and came home asking, “Daddy, can we have a flag that’s really ours?”
So I grabbed some scrap cedar, cut 13 stripes, added a star field, and mounted it on a simple stand.
It wasn’t perfect. The stars were a little crooked. The finish was uneven.
But every July 4th since, we take it out, dust it off, and set it by the porch.
That’s the thing about patriotic woodworking projects:
They’re not just decorations.
They’re heirlooms in the making.
And this year, I’m giving you 5 simple, meaningful builds you can finish in a weekend — using wood, not plastic, and pride, not mass production.
No cheap plywood cutouts. No flimsy yard signs.
Just honest, hand-built pieces that honor the day — and last for years.
Why Build Patriotic Projects (Instead of Buying That Plastic Yard Sign)
Look, I get it. It’s easier to grab a $12 flag from the big box store.
But here’s why building your own patriotic woodworking projects matters:
- They last — Not one season, but decades.
- They’re personal — Made with your hands, for your family.
- They teach — Your kids see craftsmanship, history, and care in action.
- They stand out — In a sea of plastic, wood says, “This matters.”
And the best part?
You don’t need fancy tools or skills.
Just a saw, some wood, and a little heart.
📌 If you’re new to woodworking, start with our Weekend Wood Projects — perfect for building confidence before tacklingthese.
The 5 Best Patriotic Woodworking Projects (That Won’t Fall Apart by August)
These builds are designed for real weekends — simple cuts, minimal tools, and maximum meaning.
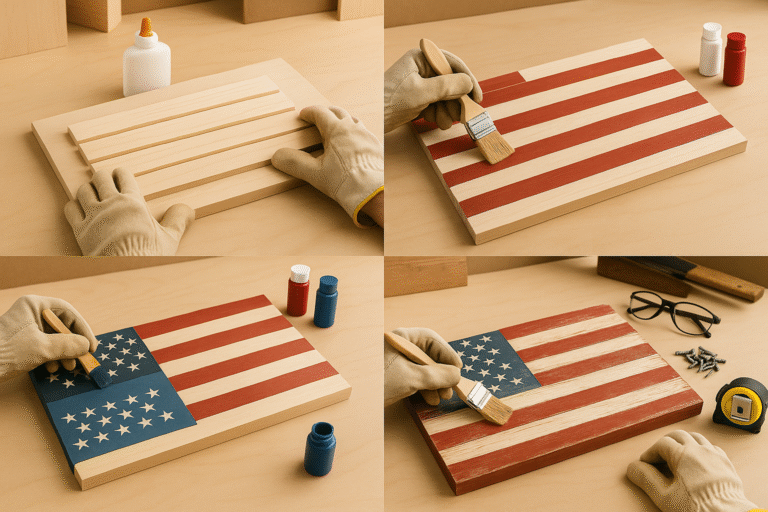
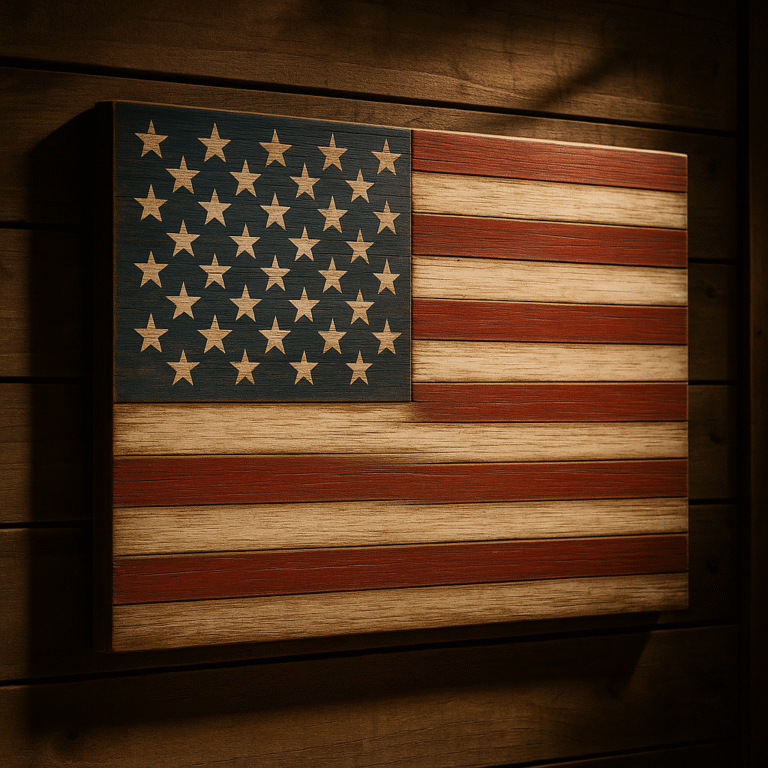
1. American Flag Wall Display
- Why it works: Honors tradition, fits any porch or wall
- Wood: Cedar (red/white stripes) + pine (blue field)
- Time: 1 weekend
- Pro Tip: Use wood burning or paint for stars — no vinyl stickers
What You’ll Need:
- 5 pieces of 2x4x8′ pine boards – $32.50
- Wood glue – $4.99
- Wood screws – $8.99
- Red, white, and blue paint – $12.97
- Star stencil – $3.99
- Sandpaper – $6.99
Total Damage: $69.43 (Worth every penny!)
How to Build It:
Step 1: Prep Your Wood Cut those 2x4s into seven 24″ pieces. Sand ’em down nice and smooth – start with 120-grit, then finish with 220-grit. Trust me, this step makes all the difference between “meh” and “WOW!”
Step 2: Layout Time Arrange your boards with alternating red and white stripes (just like the real deal). Pro tip: Make sure the top and bottom are red – that’s proper flag etiquette, folks!
Step 3: Stick ‘Em Together Glue and clamp those boards together, then secure with screws from the back. Let it cure for a couple hours (perfect time for a cold one).
Step 4: Paint Party Prime everything white first, then tape off your red stripes. For the blue star field, measure out a 10″x7″ rectangle in the upper left.
Step 5: Star Power Use that stencil to add 13 stars representing the original colonies. Simple but historically accurate!
Pro Tips:
- Use outdoor paint if it’s going on the porch
- Distress the edges a bit for that authentic rustic vibe
- Clear coat for extra protection
Project 2: Dimensional Star Wall Art – The Eye-Catcher (1-2 Hours)
These 3D wooden stars are absolute conversation starters and work year-round (not just patriotic holidays).
Cost: Around $40.94 Skill Level: Beginner
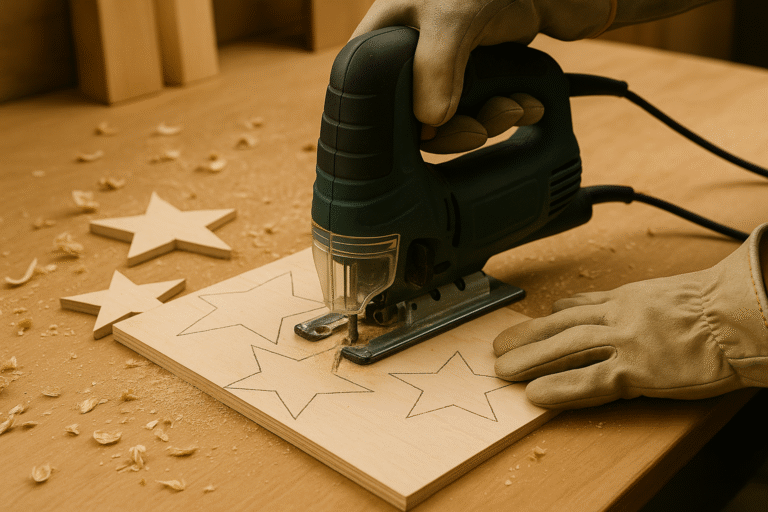
Materials:
- 3/4″ plywood sheet (2’x2′) – $18.99
- Paint trio (red, white, blue) – $12.97
- Wood screws – $3.99
- Sandpaper – $4.99
Cut three different sized stars (12″, 8″, and 6″), paint each a different patriotic color, and mount ’em on your wall. Boom – instant patriotic art gallery!
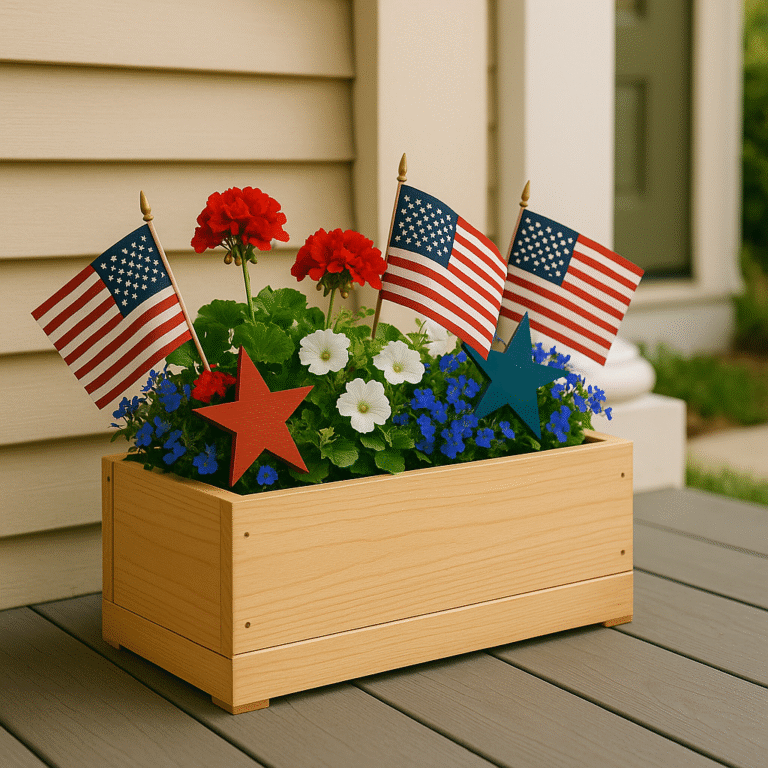
Project 3: Patriotic Planter Box – The Functional Beauty (2-3 Hours)
Perfect for showing off red, white, and blue flowers or small flags. This one’s got both looks and brains!
Cost: $68.96 Skill Level: Beginner to intermediate
Key Features:
- Drainage holes (because nobody likes soggy plants)
- Removable liner for easy cleaning
- Cedar bottom that laughs at rot
- Perfect size: 24″L x 8″W x 8″H
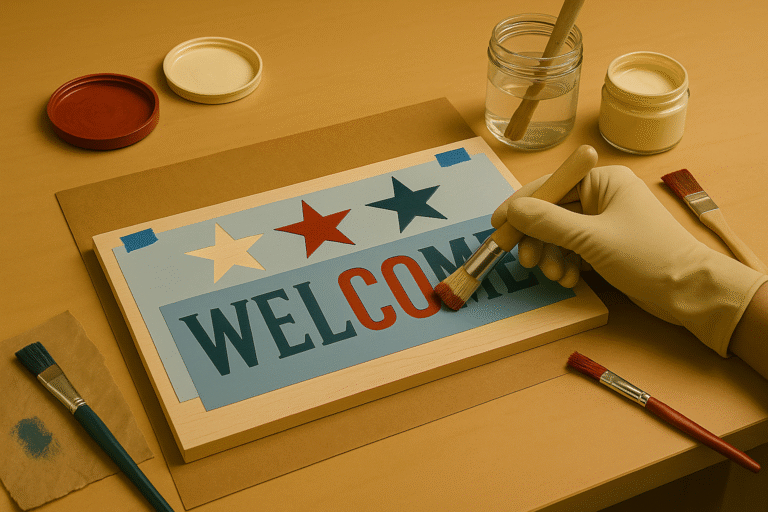
Project 4: Patriotic Welcome Sign – The Greeter (1.5-2 Hours)
Cost: $41.94 Skill Level: Super beginner friendly
This versatile sign works for any patriotic occasion. Choose from classics like “Welcome,” “God Bless America,” or “Land of the Free.” Simple, effective, and guaranteed to make guests smile.
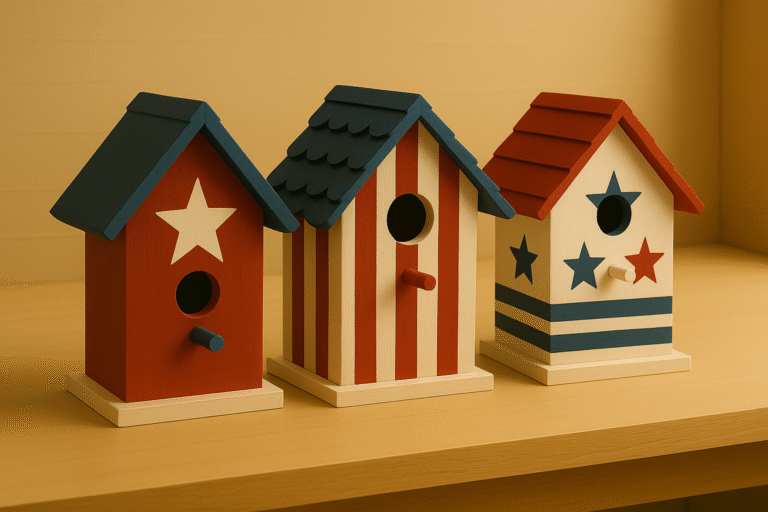
Project 5: Mini Patriotic Birdhouse Village – The Charmer (2-4 Hours)
Cost: $61.92 Skill Level: Beginner to intermediate
Create an adorable village of three small birdhouses, each with its own patriotic personality. These little guys add serious charm to any display, whether inside or out.
Essential Tools for Your Patriotic Woodworking Projects Arsenal
Must-Have Power Tools (In Order of Importance):
- Circular Saw ($89-149) – Your best friend for cutting everything
- Power Drill ($49-99) – Essential for screws and holes
- Random Orbital Sander ($39-79) – Makes everything silky smooth
- Miter Saw ($179-299) – Optional but oh-so-nice for perfect cuts
Hand Tools You Actually Need:
- Speed square, tape measure, combination square
- Basic chisel set
- Various clamps (you can never have too many)
- Safety gear (glasses, ear protection, dust mask)
Safety First – Because Accidents Aren’t Patriotic
Let’s keep it real – woodworking should be fun, not a trip to the ER. Here’s the essential safety gear for your patriotic woodworking projects:

Personal Protective Equipment:
- Safety glasses (protect those peepers from flying wood chips)
- Hearing protection (power tools are LOUD)
- Dust mask (nobody wants sawdust lungs)
- Work gloves (remove when using power tools though!)
Workshop Safety Rules:
- Keep it clean – sawdust everywhere is accident waiting to happen
- Sharp tools are safe tools – dull ones require too much force
- Always clamp your workpiece before cutting
- Read the manual (I know, I know, but seriously)
Money-Saving Tips for Your Patriotic Woodworking Projects
- Buy in bulk – Get materials for multiple projects at once
- Shop the sales – Memorial Day through 4th of July paint sales are epic
- Use scrap wood – Ask construction sites nicely for 2×4 cutoffs
- Share tools – Team up with neighbors to split costs
- Start simple – Master the basics before splurging on fancy tools
Current Lumber Reality Check (June 2025)
Good news! Lumber prices have finally chilled out after those crazy volatile years. 2×4 framing lumber is averaging $424 per 1,000 board feet, which is pretty sweet for small projects like ours. Plywood runs $15-50 for 4×8 sheets depending on what grade you need.
📌 For outdoor durability, see our guide to the 5 Best Wood Types for Outdoor Furniture .
Finishing Techniques That Actually Work
Paint Like a Pro:
Indoor Projects: High-quality acrylic latex paint with primer is your friend Outdoor/Covered Areas: 100% acrylic exterior paint with semi-gloss finish
Want That Vintage Look?
- Light sanding on edges and high-wear spots
- Dry brushing with contrasting paint
- Tea staining (yes, actual tea!) for aging effects
Display Ideas That’ll Wow Everyone
4th of July Showcase:
Group all five patriotic woodworking projects together for maximum impact. Add some battery-powered string lights for evening magic, and incorporate fresh red, white, and blue flowers.
Year-Round Patriotic Pride:
These pieces work from Memorial Day through Labor Day, plus Veterans Day and Flag Day. Mix in seasonal greenery for autumn displays.
Troubleshooting Common Newbie Mistakes
Cuts Aren’t Square? Always use a speed square and measure twice, cut once (seriously, this old saying exists for a reason).
Wood Splits When Screwing? Pre-drill pilot holes, especially near board ends.
Paint Bleeding Under Stencils? Seal those stencil edges with clear coat first.
Brush Marks in Your Finish? Use a foam roller for smooth surfaces, then lightly brush.
Before You Cut Your First Board — Tune Your Saw
Here’s something no one tells you:
Your patriotic woodworking projects are only as good as your cuts.
A misaligned table saw = crooked stars = uneven stripes = frustration.
I used to blame the wood. The paint. The heat.
Then I realized: my saw was off by 1/32”. That’s all it took to ruin the symmetry.
That’s why I created the FREE “Dead-Square Every Time” Table Saw Tune-Up Checklist.
It’s a 15-minute guide to calibrating your saw for perfect 90° cuts — no dial indicator needed.
What patriotic project are you most excited to tackle? Drop a comment and let me know – I love seeing what fellow builders create!