Router Bits for Beginners: The Only 5 Bits You Actually Need to Get Started (2025 Guide)
You know that feeling?
You walk into the store — or click open that Amazon page — and you’re staring at a 50-piece router bit set.
Chrome-plated. Fancy case. “Professional Grade.” Only $89.99.
And you think: “Well… I might need them all someday, right?”
I did that.
In 2016. Spent $90 on a “complete” set.
Know how many of those bits I’ve used in 8 years?
Five.
Just five.
The rest? Still in the case. Some never even opened. Others chipped on first use because they were cheap, brittle steel.
I’m not telling you this to make you feel bad.
I’m telling you this so you don’t make the same mistake.
You don’t need 50 bits. You don’t need “someday” bits. You need the core foundation—the essential ones that handle a vast array of woodworking projects.
You need the specific bits that will cover 90% of what you’ll ever build—from shelves and table tops to picture frames and decorative boxes. You need tools that are durable, precise, and, most importantly, operated at the correct safety speeds.
That’s exactly why I created The Essential Router Bit Guide. I wanted to cut through the noise and show you the “Big 3” starter bits that form the foundation of countless projects, along with the master speed charts you need to stay safe.
No fluff. No upsell. No “you’ll need this exotic bit for that one weird joint.” Just the essential router bits for beginners that actually matter and the protocols to ensure every cut is precise and clean.
Let’s get you set up—the smart way.
Why This Matters (More Than You Think)
Before we jump into the list, let’s talk about why choosing the right bits — not the most bits — is so important.
First — safety. Cheap, poorly made bits can shatter at high speed. That’s not just a ruined project — it’s a trip to the ER.
Second — precision. A dull or wobbly bit leaves burn marks, tear-out, and uneven profiles. That kills your confidence — and your project.
Third — cost. You’re not saving money by buying a 50-bit set. You’re wasting it. Most of those bits will never see daylight.
Fourth — simplicity. The fewer bits you own, the more you’ll use them. And the more you use them, the better you’ll get.
This isn’t about limiting you.
It’s about focusing you.
On the tools that matter.
On the skills that build real projects.
On the confidence that comes from knowing exactly what to reach for — every time.
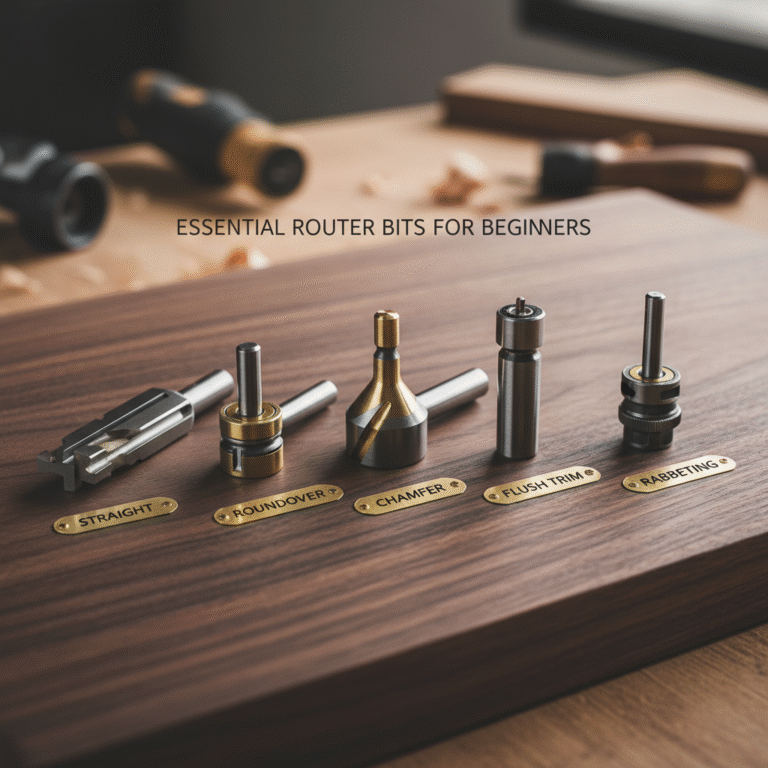
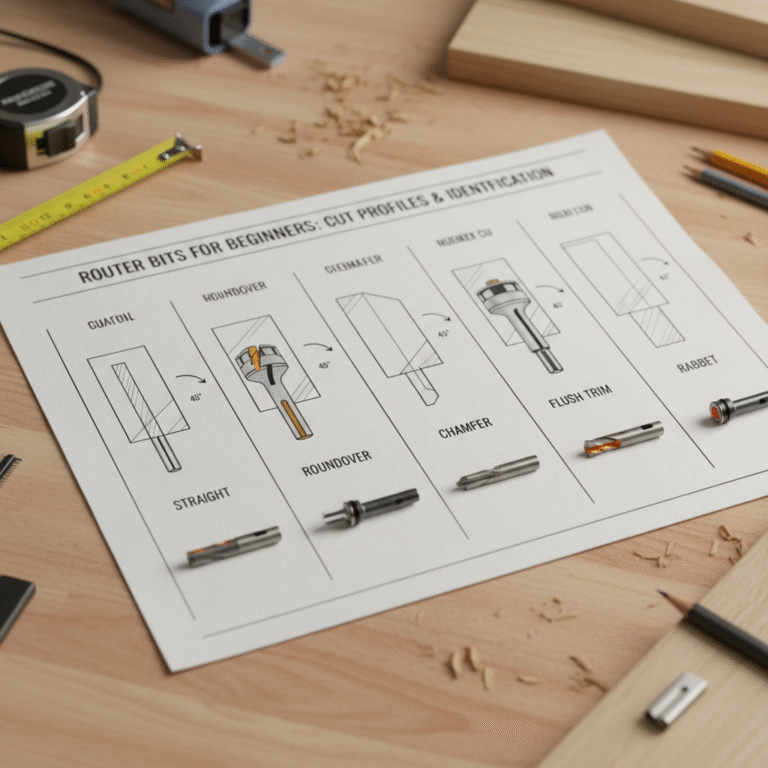
The 5 Router Bits for Beginners (That Actually Get Used)
These five bits aren’t theoretical.
They’re the ones I keep on my bench.
The ones my students use in their first year.
The ones that show up in 9 out of 10 beginner projects.
Let’s break them down — one by one.
1. The Straight Bit (Your New Best Friend)
What it does:
Cuts straight grooves (dadoes), rabbets (with a bearing or edge guide), and mortises (with a jig).
Why you need it:
It’s the most versatile bit in your kit. Need to recess a panel? Straight bit. Need to join two boards? Straight bit. Need to clean up an edge? Straight bit.
What to look for:
- ½” shank for stability (more on shanks below)
- 2-flute carbide for clean cuts
- Common sizes: ¼”, ⅜”, ½” (start with ½” — it’s the most useful)
🧑🔧 Daniel’s Story: I bought a ¼” straight bit first. It wobbled like crazy in hardwood. Ruined a bookshelf side panel. I upgraded to a ½” shank bit — problem solved. Don’t cheap out on your straight bit. It’s your workhorse.
2. The Roundover Bit (For Soft, Beautiful Edges)
What it does:
Rounds over sharp edges — on shelves, table tops, drawer fronts, anything you don’t want to slice your hand on.
Why you need it:
It transforms “homemade” into “handcrafted.” A simple roundover makes your project look intentional, professional, and safe.
What to look for:
- Pilot bearing (so you don’t need a fence)
- Common radius: ⅛”, ¼”, ½” (start with ¼” — it’s the sweet spot)
- ½” shank if possible
Pro Tip: Run this bit with the grain — or you’ll get tear-out. Go slow, take light passes.
3. The Chamfer Bit (Clean, Sharp Angles)
What it does:
Cuts a clean 45-degree bevel on edges — perfect for picture frames, tabletops, or decorative accents.
Why you need it:
It’s faster and more precise than sanding or planing an angle. And it adds a subtle, professional touch to any project.
What to look for:
- Adjustable angle (some go from 15°–45°)
- Pilot bearing
- ½” shank
Common Mistake: Forgetting to adjust your router’s depth. Start shallow — you can always go deeper.
4. The Flush Trim Bit (For Perfect Templates & Patterns)
What it does:
Trims one piece of wood flush with another — perfect for duplicating shapes, cleaning up veneers, or following a template.
Why you need it:
You’ll use this for sign-making, inlay work, curved cuts — anything where you need to copy a shape exactly.
What to look for:
- Top-bearing or bottom-bearing (top-bearing is easier for beginners)
- ½” shank
- Carbide tipped
🧑🔧 Daniel’s Story: I tried to freehand a curved shelf bracket. It looked like a toddler drew it. I made a template from MDF, grabbed my flush trim bit, and — boom — perfect symmetry. Game over.
5. The Rabbeting Bit (For Strong, Hidden Joints)
What it does:
Cuts a step (rabbet) along the edge of a board — perfect for back panels, drawer bottoms, or cabinet sides.
Why you need it:
It’s the easiest way to create strong, hidden joints. No glue squeeze-out. No clamps needed. Just slide and screw.
What to look for:
- Interchangeable bearings (so you can cut different rabbet widths)
- ½” shank
- Pilot bearing
Pro Tip: Use a straight edge or fence with this bit for perfect alignment. Don’t rely on the bearing alone for critical joints.
Shank Size: ¼” vs ½” — What Beginners Need to Know

This is where most beginners get tripped up.
Your router probably came with a ¼” collet. Maybe it has a ½” collet too.
Here’s the rule:
Always choose ½” shank bits when possible.
Why?
- Less vibration = cleaner cuts
- More stability = safer operation
- Less flex = longer bit life
¼” shank bits aren’t “bad” — they’re just for lighter work. If you’re cutting hardwoods, making deep passes, or using large-diameter bits — ½” is non-negotiable.
Pro Tip: Buy a ½” collet for your router if it doesn’t have one. Worth every penny.
My Recommended Starter Set (No Fluff, Just Value)
You don’t need to buy bits individually.
After testing dozens of sets, this is the one I keep recommending to students:
MLCS 8388 5-Piece Carbide Router Bit Set
- Includes all 5 essential bits: straight, roundover, chamfer, flush trim, rabbeting
- ½” shank for rock-solid stability (no wobble, no tear-out)
- Industrial-grade carbide — lasts 3x longer than cheap bits
- Under $50 — less than buying them individually
👉 Disclosure: I earn a small commission if you buy through this link — at no extra cost to you. I only recommend tools I’ve used and trust.
Common Mistakes Beginners Make (And How to Avoid Them)
Even with the right bits, it’s easy to mess up. Avoid these:
❌ Using dull bits → Clean cuts start with sharp bits. Replace or sharpen when you see burn marks or tear-out.
❌ Going too fast → Let the bit do the work. Feed slowly, especially in hardwoods.
❌ Ignoring grain direction → Always cut with the grain. Against the grain = tear-out city.
❌ Skipping the test cut → Always test on scrap wood first. Depth, speed, feed rate — dial it in before touching your project.
❌ Forgetting safety gear → Eye protection. Hearing protection. Push sticks. No exceptions.
Wrapping It Up: Less Is More (Seriously)
I know it’s tempting to buy the big set.
I know it feels like you’re “preparing for the future.”
But here’s the truth:
The future isn’t in the bits you might use.
It’s in the skills you will build — with the bits you actually use.
Start with these five.
Master them.
Build projects with them.
Then — and only then — add more.
Because confidence doesn’t come from a full case.
It comes from knowing exactly which bit to grab — and exactly how to use it.
That’s where real woodworking begins.
🛠️ Ready to Build? Start With a Tuned-Up Table Saw.
No matter how sharp your router bits are, if your table saw isn’t running perfectly, you’re setting yourself up for frustration.
That’s why I created the free “Dead-Square Every Time” Table Saw Tune-Up Checklist — a simple, 15-minute guide to calibrating your saw for perfect accuracy, smoother cuts, and safer operation.
It’s the first step to a better shop — and better projects.
Let’s build something great,