
Hey there, fellow wood enthusiast!
You know that moment, right? You’re scrolling through Pinterest (maybe even checking out some killer router techniques!), and you see this absolutely jaw-dropping piece of furniture. The joints are so tight, the edges so buttery smooth—it’s like straight-up wizardry. And you’re thinking, “How in the sawdust-filled world do they DO that?”
Plot twist: A lot of that magic probably came from a tool that might be sitting in your workshop right now, giving you major side-eye—the router.
For tons of us newer woodworkers, the router can feel a bit… intimidating. It’s loud, it spins like crazy, and it’s easy to get overwhelmed by all the different bits and RPM settings. Honestly? It might be collecting dust in its case right now (no judgment here!).
But trust me, once you get cozy with this whirling wonder, it’s gonna become your absolute favorite tool for creating perfect wood joints and making your projects look way more professional. That’s exactly why I put together The Essential Router Bit Guide—to take the guesswork out of the “Big 3” bits and provide the master speed charts you need to work with total confidence.
Today, we’re pulling back the curtain on router techniques for beginners. No fancy jargon, no PhD required—just simple, straightforward methods and a non-negotiable safety checklist that’ll have you crafting clean lines and rock-solid joints like you’ve been doing this for years. Ready to become the router whisperer? Let’s dive in!
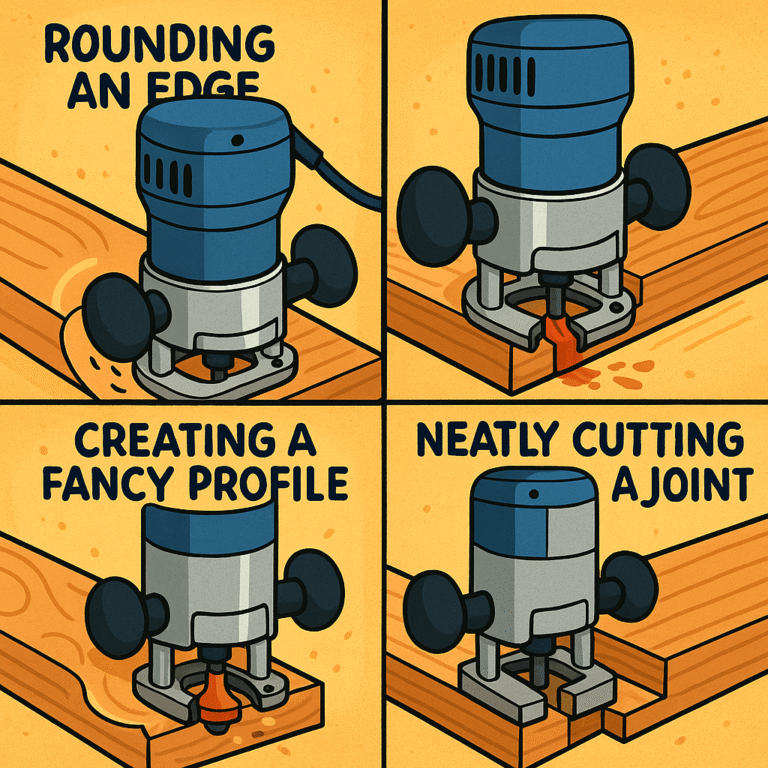
Yeah, sure, routers make beautiful rounded edges – that’s like their signature party trick. But that’s just the warm-up act! This bad boy is a complete powerhouse, ready to transform your regular old lumber into something absolutely stunning.
The Precision Boss
Think of your router as a surgeon, but for wood. It cuts incredibly specific shapes and depths, making sure your pieces fit together like they were born to be buddies. This is where those perfect wood joints happen, and honestly, it’s pretty satisfying to watch.
The Swiss Army Knife of Your Shop
Seriously, this tool wears more hats than a theater actor:
- Need straight grooves (dados) for shelves? Router’s got your back.
- Want recesses (rabbets) for cabinet backs? Piece of cake.
- Fancy decorative edges that make people go “Whoa, did you really make this?” Yep, it does that too.
- Even traditional, super-strong wood joinery like mortise and tenons can be knocked out faster with your router. It’s like having five tools rolled into one!
Instant Pro Vibes
Want your project to look like you snagged it from some fancy boutique instead of cobbling it together in your garage? A router’s clean, consistent cuts give you that polished, smooth-as-butter finish that screams “I know what I’m doing,” even if you literally just started yesterday.
Your Router’s Dream Team: Essential Tools & Bits
Alright, what do you actually need to get this precision party started? Good news – it’s probably less than you think, and way more fun than you’d expect!

1. The Router Itself (Your New Best Friend)
Fixed-Base vs. Plunge Router: Think of it like this – a fixed-base router is awesome for consistent edge work or when you flip it upside down in a router table. A plunge router lets you dive that bit right into the middle of your wood, which is super handy for cutting holes or starting grooves mid-piece. Pro tip: Many kits come with both bases. Score!
Collet Size: This is just the part that grabs your bit. If you can swing it, get one that takes 1/2″ bits – they’re beefier and handle bigger jobs like absolute champs.
2. Router Bits (Your Magic Wands)
These little guys are where the real magic happens! Each one sculpts wood differently, and collecting them becomes oddly addictive.
Straight Bit: Your bread-and-butter bit. Perfect for cutting all those straight grooves, recesses, and rectangular holes for wood joinery. Seriously can’t live without this one.
Round-Over Bit: Your “smooth operator.” Takes those sharp, unfriendly edges and makes them beautifully curved. Instant furniture upgrade!
Chamfer Bit: Creates neat, angled edges that add a touch of sophistication to everything.
Rabbeting Bit: Specifically designed for cutting those handy rabbets along edges. Makes cabinet backs a total breeze.
Flush Trim Bit: Got a template? This bit, with its cute little roller bearing, lets you perfectly copy shapes. So satisfying you’ll want to do it all day.
Decorative Bits: These are where the real personality comes in! Cove, ogee, Roman ogee – they’ll make your tabletops look like they belong in a fancy showroom.
3. Essential Sidekicks (Your Precision Squad)
Edge Guide: Most routers come with this fence that bolts to your base, helping you cut perfectly straight lines. It’s like training wheels, but way cooler.
Router Table (Seriously, Get One!): This is a total game-changer. Mount your router underneath, feed the wood over the bit, and boom – instant control boost! Especially clutch for smaller pieces and perfect wood joints.
Featherboards: These genius accessories hold your wood firmly against the fence. They’re like having an extra set of incredibly patient hands that never get tired.
Push Sticks/Push Blocks: Your fingers are precious cargo! Always use these to keep your digits safely away from that spinning bit. No exceptions, no excuses.
Mastering Simple Router Techniques That’ll Blow Your Mind
Let’s break down some core router techniques for beginners that’ll make your wood joinery absolutely sing. Remember – practice on scrap wood first. It’s your no-pressure rehearsal space!
1. The Dado Joint: Your Shelf’s Happy Home
What it is: Picture a neat, flat-bottomed groove cut across the grain. Perfect for shelves sliding into cabinet sides like they were meant to be there.
How to nail it: Use a straight bit with either an edge guide or a clamped straight-edge. The secret sauce? Multiple shallow passes! Don’t try to hog it all out in one go. Little by little, go deeper. This gives you cleaner cuts, less strain on your router, and prevents nasty tear-out. Your shelf will slide in like butter!
2. The Rabbet Joint: Box Builder’s BFF
What it is: A rectangular recess cut along the edge of a board. Fantastic for cabinet backs or strong corners when building boxes.
How to crush it: A rabbeting bit with its handy bearing guide makes this super easy. Or use a straight bit with a fence on your router table. Again, shallow passes are your friend here. This joint is absolutely fundamental for boxes that actually stay together!
3. Mortise and Tenon (Router Style): The Power Couple
What it is: The granddaddy of strong joints! A projecting piece (tenon) from one board fits snugly into a rectangular hole (mortise) in another. Think bulletproof chair legs and table frames.
How to dominate it: While old-school methods rely on chisels, your router can cut those mortises with incredible speed and consistency. Use a straight bit with a mortising jig, and you’ll wonder why anyone does it the hard way!
4. Edge Treatments (Because Plain Edges Are Boring)
What it is: Beyond just rounding corners, your router can sculpt decorative profiles like ogees and coves onto tabletops, shelves, or cabinet doors.
How to ace it: For the best control, use your router in a table. Set your bit depth, guide the wood smoothly, and watch ordinary lumber transform into something genuinely elegant.
Pro Tips That’ll Make You Look Like a Router Wizard
Climb Cut (Advanced Move Alert!)
For ridiculously clean cuts on tricky grain, try a very shallow “climb cut” (moving against the bit’s rotation). BUT – and this is a big but – this requires serious control and is best done on a router table with featherboards. Advanced move only!
Slow & Steady Always Wins
Never try to cut deep dados or rabbets in one screaming pass. Multiple shallow passes are safer, prevent burning, save your motor, and give cleaner cuts. Patience is your actual superpower here.
Sharp Bits = Happy Everything
Dull bits burn wood (leaving gross black marks) and give you fuzzy cuts. Keep ’em clean and replace when dull. Trust me, sharp bits make all the difference for perfect wood joints.
Dust Collection is Life
Routers are basically sawdust cannons. Always connect your shop vac if your router has a dust port. Cleaner shop, happier lungs, better visibility!
Test on Scrap (Your Safety Net)
Before any cut on your actual project, ALWAYS test on scrap wood first. This lets you dial in bit depth, fence settings, and feed rate perfectly. No costly mistakes!
Safety First (Because ER Visits Aren’t Fun)
Your router packs serious power, so let’s keep things safe and enjoyable:
- Always wear safety glasses and hearing protection (these babies are LOUD)
- Unplug before touching bits or making adjustments – no exceptions!
- Secure your workpiece before every cut
- Use two hands, feed slowly and consistently
- Keep fingers miles away from spinning bits
- Sharp tools are safe tools – don’t fight dull bits
Ready to Become a Router Rock Star?
Mastering basic router techniques for beginners is seriously one of the most satisfying moments in any woodworker’s journey. It unlocks a new level of precision, strength, and beauty in your projects. Your router isn’t just a tool – it’s your gateway to more ambitious, professional-looking, and ultimately way more fun builds.
These router techniques will transform how you approach wood joinery and give your projects that polished, professional look that’ll have everyone asking where you bought them!
Want to make sure every cut in your router techniques arsenal comes out perfect? The secret starts with having a perfectly tuned table saw as your foundation. Grab our FREE “THE ‘DEAD-SQUARE EVERY TIME’ Table Saw Tune-Up Checklist” and ensure every piece you feed to your router is already dead-square and ready for precision work!
What router technique are you most excited to try? Drop a comment and let me know – I love hearing about fellow woodworkers’ adventures!