Small Workshop Organization: 12 Space-Saving Solutions That Actually Work
I’ll never forget the night I spilled coffee all over a half-finished cutting board.
Why? Because my table saw was parked sideways in the only clear spot on the floor. My workbench was buried under router bits, clamps, and a half-eaten sandwich. And when I turned to grab a rag, I kicked over a bucket of offcuts.
That’s when it hit me:
My shop wasn’t small. It was chaotic.
And chaos doesn’t come from square footage.
It comes from not having a system.
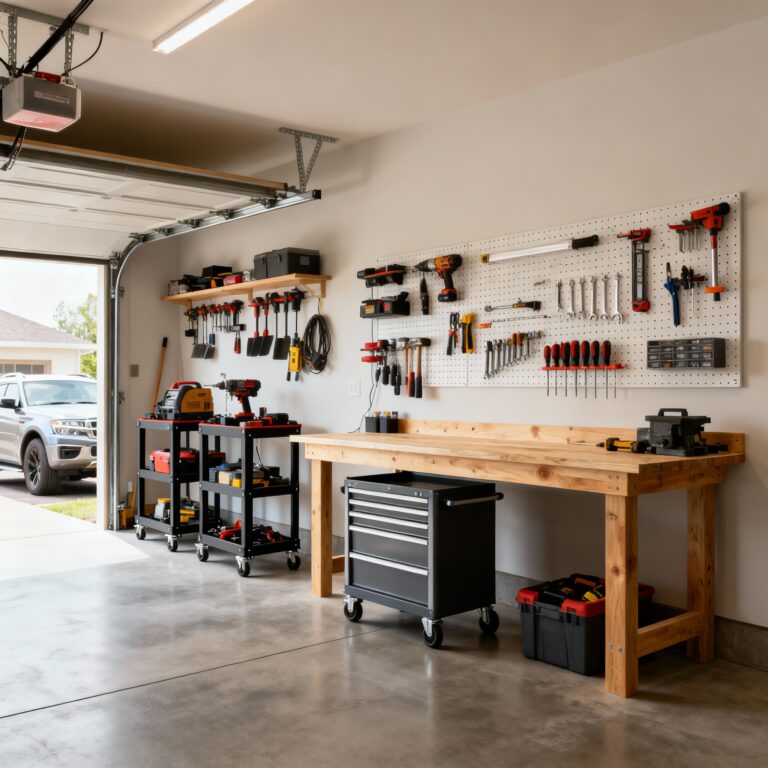
Since then, I’ve worked in a 6-foot-wide garage bay, a basement corner next to a water heater, and even a shed with a leaky roof. And in every one, I’ve used the same 12 space-saving tricks to keep things calm, functional, and — dare I say — enjoyable.
This isn’t about fancy cabinets or $500 storage units.
It’s about working smarter in the space you’ve got.
If you’re tired of tripping over your own tools, or putting off projects because your shop feels like a storage unit… this is your reset button.
The Real Problem Isn’t Space — It’s Overlap
Most “small shop” advice misses the point.
It’s not that you don’t have room.
It’s that your work zone, storage zone, and movement zone are all fighting for the same 3 square feet.
Fix that — and everything changes.
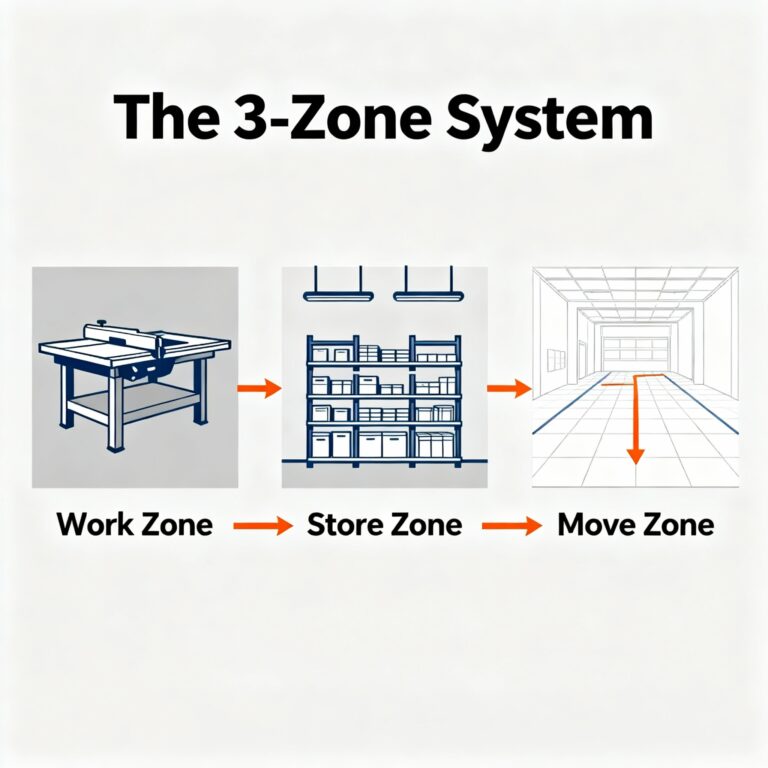
So before we jump into jigs or wall racks, let’s get your zones right.
- Work Zone: Where you actually do the work (table saw, bench, router). Keep this clear while you’re working.
- Store Zone: Where everything lives when it’s not in use (walls, ceiling, mobile carts).
- Move Zone: A clear path to walk, pivot, and bring in materials. Never sacrifice this.
Once these zones are defined — even with tape on the floor — your shop instantly feels bigger.
And if you’re still setting up your core tools, start with our Ultimate Table Saw Guide for Beginners — it’ll help you place your saw in the right spot from day one.
Wall Storage That Doesn’t Look Like a Hardware Store
Your walls are your secret weapon. But skip the pegboard with 100 tiny holes that strip out after a month.
Here’s what actually works:
1. French Cleat Wall System
I built mine from scrap plywood. A 30-degree bevel on a strip, screwed to the wall. Anything with a matching bevel locks in — and can be moved in seconds.
I’ve got holders for clamps, chisels, sandpaper, even my coffee mug. When I moved shops last year? I just unhooked everything and rehung it in the new place.
2. Pegboard 2.0
If you love pegboard, upgrade it: use ½” plywood with routed slots or J-hooks. Stronger. Cleaner. Holds your heavy stuff without sagging.
3. Magnetic Tool Bar
A strip of hardwood with rare earth magnets. Hang your chisels, squares, marking knives. They snap into place. Instant access. Zero clutter.
4. Overhead Rails
Mount aluminum rails near the ceiling. Hang long levels, extra clamps, or your dust collection hose. Out of the way, but still reachable with a step stool.
Pro tip: Paint the back of your wall system a bright color (I use HMZ orange). It makes tools pop — and makes the whole shop feel more intentional.
Stop Ignoring Your Ceiling (Yes, Really)
Your ceiling isn’t just for cobwebs. It’s free real estate.
5. Plywood Hoist
I rigged a $12 pulley system from Amazon. Now my sheet goods live overhead. Frees up 32 sq ft of floor space. Game over.
6. Lumber Rack on Joists
Mount vertical racks directly to ceiling joists. Boards stand on edge — takes up almost no depth. No more leaning plywood against the wall like a Jenga tower.
7. Fold-Down Bench
For apartment dwellers or multi-use spaces: build a hinged work surface that folds up to the ceiling. Unfold it when you need it. Tuck it away when you don’t.
Put Everything on Wheels (Seriously, Everything)
If it doesn’t move, it’s in your way.
8. Flip-Top Tool Cart
Planer on one side, sander on the other. Flip the top to switch. Tuck it against the wall when not in use. I built mine in a Saturday morning with scrap plywood.
9. Rolling Scrap Cart
Three shelves. Labeled: “<6””, “6-12””, “>12””. Locking casters. Lives under my bench. Turns “junk” into a resource — and keeps my floor clear.
10. Mobile Base for Your Table Saw
I used to bolt my saw to the floor. Big mistake. Once I put it on a mobile base, I could roll it to the center for sheet goods, then tuck it back against the wall. My shop felt twice as big overnight.
And if you’re building your own mobile base, pair it with these 5 essential table saw jigs — they’re designed to work on a movable setup.
Make Your Workbench Do Double Duty
Your bench doesn’t have to be just a bench.
11. Router Table Combo
Make your router table insert removable. When it’s off, you’ve got a full surface for clamping, sanding, or lunch (no judgment).
12. Fold-Out Wings
Add hinged side tables that fold down when not in use. Instant extra surface for big glue-ups or cutting panels.
Real Talk: Maria’s Basement Transformation
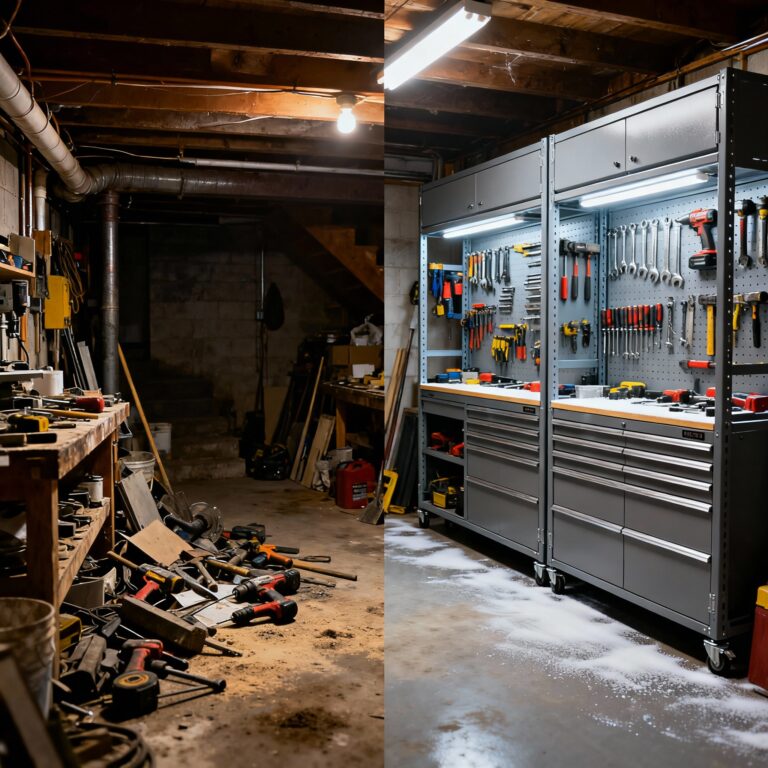
Maria, one of my students, worked in a 10×12 basement corner. Tools everywhere. No room to swing a cat — let alone a push stick.
We spent one Sunday:
- Defined her 3 zones with painter’s tape
- Built a French cleat wall from scrap
- Put her table saw on a mobile base
- Hung a plywood hoist for her sheet goods
Total cost? $87.
Two weeks later, she texted me a photo of her first commissioned piece — a live-edge dining table.
Caption: “I finally feel like a woodworker.”
Don’t Do What I Did: 3 Mistakes to Avoid
- Trying to organize everything at once → Start with your Work Zone. Add storage as you go.
- Buying storage before planning → Build your own. It’s cheaper, better, and fits your space.
- Forgetting the Move Zone → You need space to step back, think, and breathe. Leave it clear.
our Shop Doesn’t Need to Be Big — It Needs to Be Yours
Some of my best work came from that half-garage with the Honda Civic parked next to my saw.
The limits forced me to be smarter. To plan better. To respect the craft.
You don’t need 1,000 square feet. You just need a system that works for you.
Pick one of these 12 ideas. Build it this weekend. Then come back for the next one.
Because a calm shop isn’t a luxury. It’s where good work begins.
🛠️ One Last Tip Before You Start
No matter how clever your layout is, if your table saw isn’t tuned up, your cuts won’t be square — and your projects won’t fit together.
That’s why I always start with a 15-minute tune-up.
It’s the first step to a better shop — and better projects.
Let’s build something great — together.
— Daniel
HMZ Woodz