Small Workshop Table Saw Setup: DIY Jigs for Tight Spaces
Last winter, I hit a wall—literally.
I was trying to cut a simple 24-inch board on my table saw, but my outfeed support kept bumping into my workbench. To make room, I moved the bench… which blocked my dust collection hose. To fix that, I rerouted the hose… which tangled around my lumber rack. Within minutes, I’d turned a 5-minute cut into a 45-minute logistics puzzle—and I hadn’t even started sanding.
That’s when it hit me: my workshop wasn’t set up to build—it was set up to fight itself.
I didn’t need more square footage. I needed smarter systems. So I spent a weekend rethinking everything—not based on what looked good on Pinterest, but on how I actually worked in my 6×8 foot corner of the garage.
The result? Three compact, multi-functional jigs that fold, roll, or mount vertically. A layout that keeps every tool within arm’s reach. And most importantly—a sense of calm every time I walk into my shop.
If you’re working in a cramped garage, apartment workshop, or shared space—you don’t need more room. You need a small workshop table saw setup designed for real life, not magazine spreads.
Let’s build a system that works with your constraints—not against them.
🎯 Stop. Get the Foundation First.
Before you redesign your small workshop, understand this fundamental truth: precision starts with a properly tuned saw—even in tight spaces.
I’ve created a FREE ebook: “The Dead-Square Every Time Table Saw Tune-Up Guide.” It’s a complete, step-by-step resource that walks you through every critical alignment check, calibration method, and safety verification in just 15 minutes.
Download it now, print the pages you need, and keep it in your shop. It’s the same guide I use before every major project—and it ensures every cut you make starts with confidence, not guesswork.
Why Your Small Workshop Table Saw Setup Matters More Than You Think
Most woodworkers assume they need a massive space to build quality projects. What I discovered is that constraint breeds creativity—and small shops often produce better results because every tool must earn its place.
The truth is, your small workshop table saw setup directly determines your project success rate:
Space limitations force better decisions
When you can’t afford to keep every tool, you focus on the essentials that actually get used. This eliminates clutter and improves efficiency.
Compact setups reduce movement waste
In a small shop, everything is within arm’s reach. No more walking 20 feet to grab your measuring tape or returning to your bench to check a measurement.
Tight spaces demand precision
When you can’t hide sloppy cuts behind extra material, you learn to get it right the first time. Small shops create better woodworkers.
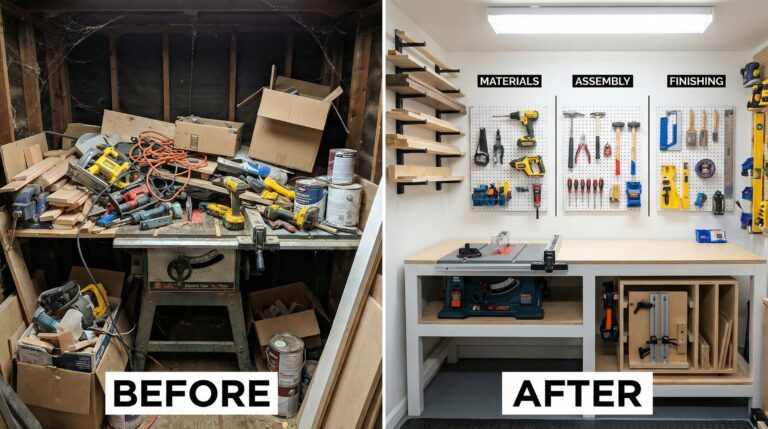
💡 Daniel’s Reality Check: I spent six months wishing for a bigger shop while my 6×8 foot corner gathered dust. Once I embraced the constraints and built jigs specifically for my space, I completed more projects in three months than I had in the previous year. Sometimes the best solution isn’t more space—it’s better design.
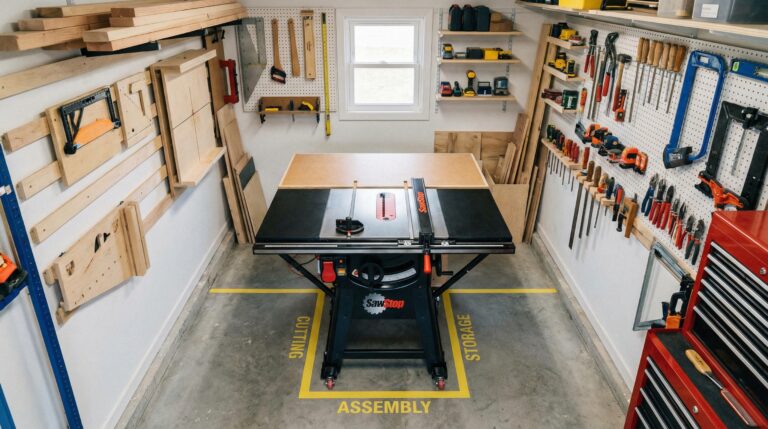
Essential Layout Strategy for 6×8 Foot Workshops
Before building any jigs, you need a layout that maximizes your limited space. Here’s the system that works for sub-50 sq ft workshops:
The Three-Zone Layout
Zone 1: Cutting Station (40% of space)
- Table saw positioned against the longest wall
- 36″ clear space on feed side, 24″ on outfeed
- Wall-mounted blade storage within arm’s reach
Zone 2: Assembly Station (35% of space)
- Fold-down workbench mounted on wall opposite saw
- Magnetic tool strips at waist-to-shoulder height
- Clamps stored in wall-mounted rack
Zone 3: Storage Station (25% of space)
- Vertical lumber storage on remaining wall
- Pegboard for hand tools above assembly zone
- Mobile cart for power tools that rolls under bench
Pro Tip: Leave a 3-foot wide “main aisle” that runs the length of your shop. This creates clear workflow paths and prevents the claustrophobic feeling that kills small-shop productivity.
⭐ “I thought my 7×9 foot garage was too small for serious woodworking until I implemented Daniel’s three-zone layout. Now I can build complete furniture pieces without ever feeling cramped. The fold-down workbench alone freed up 12 square feet of floor space!”
— Mike from Boston
⭐ “As someone working in a converted closet workshop, I was ready to give up on furniture projects entirely. These space-saving jigs proved that size doesn’t matter—design does. Last month, I built a complete dining set in my 5×8 foot space using these exact techniques.”— Laylah from Portland
DIY Jig #1: Compact Folding Crosscut Sled
This isn’t your standard bulky crosscut sled—it’s designed specifically for small shops where every inch counts.
Materials Needed (Total Cost: $42)
- 1/2″ Baltic birch plywood (18″x24″) – $28.99
- 3/4″ maple hardwood (2 pieces, 2″x18″) – $18.50
- 1-1/4″ pocket hole screws – $8.99
- Heavy-duty hinges (2) – $12.50
- Rare earth magnets (4) – $9.99
Step-by-Step Build (45 minutes)
Step 1: Design the Folding Mechanism
Cut your plywood base to 18″x24″ instead of the standard 24″x30″. This smaller footprint fits in tight spaces while still providing adequate support for most cuts.
Step 2: Install the Hinge System
Mount heavy-duty hinges along the centerline of your sled base. When folded, the sled becomes 18″x12″—small enough to store vertically on a wall hook.
Step 3: Build the Fence System
Construct your front and rear fences as usual, but add rare earth magnets to the bottom edges. When folded for storage, these magnets hold the halves together securely.
Step 4: Create the Kerf and Calibrate
Follow the standard 5-cut method for calibration, but be extra careful with measurements since your smaller sled has less margin for error.
Pro Tip: Add a wall-mounted storage hook near your table saw so your folded sled is always within arm’s reach but doesn’t take up valuable floor space.
DIY Jig #2: Wall-Mounted Fence Storage System
Instead of letting your fence sit on your already-crowded table, store it vertically on the wall.
Materials Needed (Total Cost: $28)
- 1×4 pine board (36″ length) – $6.99
- Heavy-duty shelf brackets (2) – $15.99
- Rubber padding strips – $8.99
- Mounting hardware – $6.49
Step-by-Step Build (20 minutes)
Step 1: Create the Mounting Rail
Mount a 1×4 pine board horizontally on your wall at comfortable working height (typically 36-42″ from floor).
Step 2: Install Support Brackets
Add heavy-duty shelf brackets every 12″ along the mounting rail to support the weight of your fence.
Step 3: Add Protective Padding
Line the brackets with rubber padding strips to prevent scratches on your fence and reduce vibration noise.
Step 4: Create Fence Hooks
Install simple hooks or clips that allow you to hang your fence vertically, keeping it accessible but off your work surface.
Critical Detail: Position this storage system within 3 feet of your table saw so you can grab your fence without disrupting your workflow.
DIY Jig #3: Rolling Outfeed Support
Small shops can’t afford dedicated outfeed tables, but you still need support for longer cuts.
Materials Needed (Total Cost: $35)
- 2×4 lumber (48″ length) – $8.99
- Plywood top (12″x48″) – $18.99
- Locking casters (4) – $24.99
- Wood glue and screws – $8.75
Step-by-Step Build (30 minutes)
Step 1: Build the Base Frame
Construct a simple rectangular frame from 2×4 lumber that matches your table saw’s height exactly.
Step 2: Add the Support Surface
Attach a 12″x48″ plywood top to your frame. The narrow width prevents it from taking up excessive floor space.
Step 3: Install Locking Casters
Mount locking casters on all four corners. When you need outfeed support, roll it into position and lock the wheels. When not in use, tuck it under your workbench or against a wall.
Step 4: Add Height Adjustment
Include threaded leveling feet on each corner so you can fine-tune the height to match your table saw perfectly.
Pro Insight: This rolling support serves double duty as a mobile assembly station when you need extra workspace for gluing or clamping.
Advanced Space-Saving Techniques for Professional Results
Once you’ve mastered the basic jigs, these pro techniques will elevate your small-shop efficiency even further:
The Vertical Tool Storage System
Instead of traditional tool cabinets that consume floor space, mount all your frequently used tools on vertical panels. Use French cleats for heavy items and magnetic strips for hand tools. This keeps everything visible and accessible while freeing up your precious floor area.
The Multi-Function Workbench
Build your workbench with fold-down extensions that provide extra surface area when needed but tuck away when not in use. Include built-in storage underneath for clamps, sandpaper, and small tools. This single piece of furniture serves as your assembly station, finishing area, and tool storage.
The Mobile Dust Collection Cart
Mount your dust collection system on a rolling cart that can be positioned next to whichever tool you’re using. This eliminates the need for permanent ductwork and allows you to maintain clean air quality throughout your small space.
How This Small Workshop Setup Fits Into Your Complete Woodworking Journey
Your small workshop table saw setup isn’t just about fitting tools into tight spaces—it’s about creating a system that enhances your precision and workflow. When every tool has a purpose and every inch serves your craft, you’ll find that constraint actually improves your results.
This is exactly what Chapter 4 of The Table Saw Master’s Playbook covers in complete detail—how to build a comprehensive small-shop system that includes space-saving jigs, efficient layouts, and workflow optimization. When your space works with you instead of against you, your creativity can flourish without limitation.
Frequently Asked Questions About Small Workshop Setups
Can I really build furniture in a 6x8 foot space?
What if I can't mount anything on my garage walls?
How do I handle long boards in a small shop?
Should I invest in smaller tools for my small shop?
Ready to Transform Your Small Workshop?
Perfect small workshop table saw setup isn’t about having more space—it’s about working smarter with what you have. When your jigs are designed for your actual constraints, every project becomes an opportunity for creativity instead of frustration.
I used to dread opening my shop door because of the overwhelming clutter. Now, with these space-saving solutions as my foundation, I actually look forward to turning on my saw. The difference isn’t better equipment—it’s better design.
Remember that 6×8 foot corner that felt like a storage unit? Last month, I built a complete dining set using the exact jigs and layout in this guide. Every cut was precise. Every assembly was smooth. Every project was completed with the confidence that comes from knowing my space works with me—not against me.
The Dead-Square Every Time Table Saw Tune-Up Checklist
The real secret to small-shop success isn’t luck—it’s system.
I’ve condensed years of trial-and-error into a single, printable ebook that shows you exactly what to check and how to check it. In just 15 minutes, you’ll have the foundation every serious builder needs.
It’s the same ebook I use in my shop every single week.
Download it today, print it out, and tape it to your shop wall. By this weekend, you’ll see the difference.
Because you didn’t get into woodworking to fight your space. You got into it to build something beautiful.
Let’s make sure your workshop helps—not hinders—that mission.