Table Saw Fence Micro-Adjust Jig: The Hanger Bolt Method for Perfect Alignment
I still remember the frustration of my third failed fence alignment.
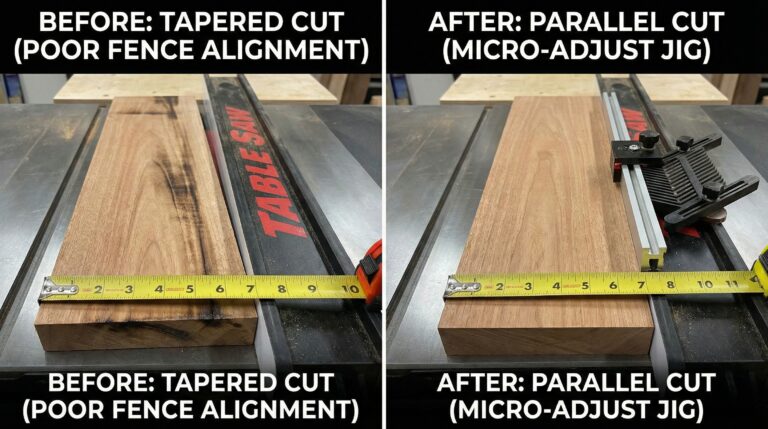
I’d spent 45 minutes shimming my fence with business cards, feeler gauges, and even aluminum foil—anything to get that perfect parallel alignment with my blade. Each time I thought I had it dialed in, I’d make a test cut and discover it was still slightly off. My rip cuts were consistently tapered by 1/32″, and no amount of clamping or forcing could make my projects come together properly.
Then I met Carlos, a retired cabinetmaker who’d built his entire business on a $200 contractor saw. He watched me struggle with my shims and simply asked, “Why are you making this so hard?”
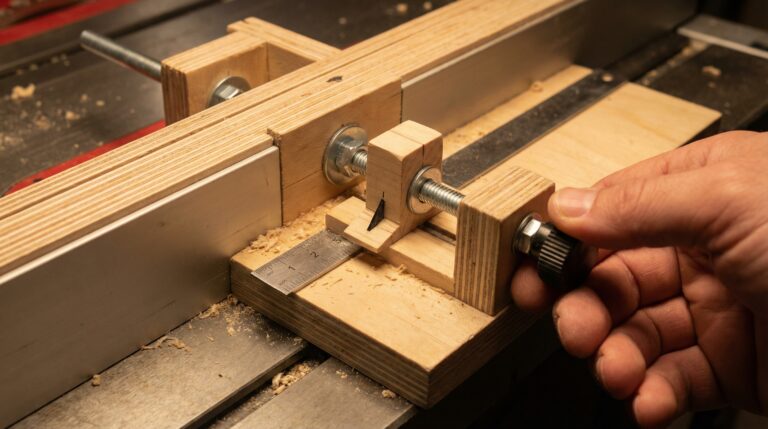
He pulled out a simple jig from his toolbox—a piece of hardwood with a single hanger bolt and a knurled knob. “This,” he said with a smile, “cost me $3.75 and takes 20 minutes to build. It’s been on my saw for 12 years.”
That moment changed everything. Instead of fighting with shims and guesswork, I could make micro-adjustments with the turn of a knob. Perfect fence alignment went from a frustrating hour-long ordeal to a 5-minute precision task.
If you’re tired of inconsistent rip cuts, dangerous binding, or wasting expensive lumber on tapered pieces—you need a proper micro-adjust system. Not expensive commercial hardware. A real, shop-built solution that delivers professional results every single time.
This isn’t just another woodworking accessory—it’s the key to unlocking consistent, precise cuts that make your projects look professionally made.
Let’s build the micro-adjust jig that will transform your fence alignment forever.
🎯 Stop. Get the Foundation First.
Before you build your micro-adjust jig, understand this fundamental truth: perfect alignment starts with understanding your actual setup—not expensive tools.
I’ve created a FREE ebook: “The Dead-Square Table Saw Masterclass.” This isn’t just another checklist—it’s your complete system to stop wasting $40–$120/month on failed projects and start building with confidence. In just 15 minutes, you’ll eliminate 2–3 hours of rework per project and experience the “wow moment” of professional-quality cuts.
Download it now, print the pages you need, and keep it in your shop. It’s the same system I use before every major project—and it ensures every cut you make starts with precision, not frustration.
Why Your Table Saw Fence Micro-Adjust Jig Matters More Than You Think
Most woodworkers assume that if their fence has locking mechanisms, it’s properly aligned. What they don’t realize is that even the best fences need fine-tuning capabilities to achieve true precision.
Here’s why this matters:
It eliminates the shim guessing game
Instead of layering business cards and hoping for the best, you can make precise, measurable adjustments with the turn of a knob.
Instead of layering business cards and hoping for the best, you can make precise, measurable adjustments with the turn of a knob.
It saves expensive materials
One tapered rip cut can ruin a $50 piece of hardwood. With micro-adjust capability, your first cut is your final cut—no test pieces, no wasted lumber.
One tapered rip cut can ruin a $50 piece of hardwood. With micro-adjust capability, your first cut is your final cut—no test pieces, no wasted lumber.
It transforms dangerous situations into safe operations
A fence that’s even slightly misaligned creates binding that can lead to kickback. Perfect parallelism ensures smooth, safe cutting every time.
A fence that’s even slightly misaligned creates binding that can lead to kickback. Perfect parallelism ensures smooth, safe cutting every time.
💡 Daniel’s Reality Check: I once ruined three consecutive cherry boards trying to get my fence aligned with shims. After building Carlos’s hanger bolt jig, I achieved perfect alignment in under 10 minutes and haven’t had a single tapered cut since. That $3.75 investment saved me hundreds in ruined wood.
Essential Materials and Tools for Your Micro-Adjust Jig
Materials Needed (Total Cost: $8.75)
For the Jig Body:
- Hardwood scrap (2″x3″x6″) – Use what you have
- 3/8″ hanger bolt (6″ length) – $3.99
- Knurled knob or wing nut – $2.49
- Machine screw (1/4″-20, 2″ length) – $1.29
- Wood glue – Already in your shop
Optional Upgrades:
- Brass threaded insert – $4.99
- Spring tension mechanism – $6.75
Tools Required (The Minimal Setup)
- Drill/driver with Forstner bits
- Tap and die set (for threading)
- Clamps (2 minimum)
- Combination square and measuring tape
- Safety glasses and hearing protection
How to Build a Table Saw Fence Micro-Adjust Jig: 5 Steps to Perfect Alignment
Step 1: Design Your Jig Body (15 minutes)
Start with your hardwood scrap. Cut to 2″x3″x6″ using your table saw’s rip fence.
Critical dimensions:
- Length: 6″ provides adequate leverage for adjustments
- Width: 3″ gives stability against your fence rail
- Thickness: 2″ provides strength to resist cutting forces
Pro tip: Use a dense hardwood like maple or oak—softwoods can compress under adjustment pressure and lose accuracy.
Step 2: Install the Hanger Bolt (20 minutes)
This is the heart of your micro-adjust system.
- Mark the center point on one end of your jig body
- Drill a pilot hole using a 3/16″ drill bit
- Thread the hanger bolt into the pilot hole using a wrench
- Ensure the bolt extends at least 2″ beyond the jig body
- Test the threading—it should turn smoothly without binding
Critical detail: The hanger bolt must be perfectly perpendicular to your jig body. Any angle will create inconsistent adjustments.
Step 3: Create the Adjustment Mechanism (15 minutes)
This transforms your hanger bolt into a precision adjustment tool.
- Attach your knurled knob or wing nut to the exposed end of the hanger bolt
- If using a machine screw instead of a hanger bolt, install a brass threaded insert in your fence rail
- Ensure the adjustment mechanism turns freely without excessive play
- Test the range of motion—you should have at least 1/8″ of total adjustment
Why this works: Each full turn of a standard hanger bolt provides approximately 0.0625″ of movement. Fine threads provide even more precise control.
Step 4: Mount the Jig to Your Fence (10 minutes)
Proper mounting ensures your adjustments translate directly to fence movement.
- Position your jig body against your fence rail
- Clamp it temporarily and verify alignment with your table surface
- Drill pilot holes through the jig body into the fence rail
- Secure with wood screws, ensuring no gaps or wobble
- Test the adjustment mechanism—it should move the entire fence smoothly
Pro insight: Always mount your micro-adjust jig at the rear of your fence rail. This provides maximum leverage and prevents the front of your fence from lifting during adjustments.
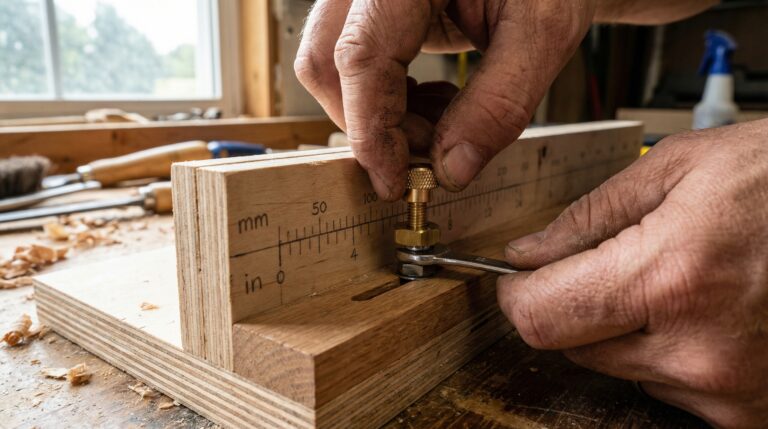
Step 5: Calibrate and Test (10 minutes)
Transform your jig from functional to precision.
- Use the fence parallelism method to verify your starting point
- Make a small adjustment (1/4 turn) and re-measure
- Create an adjustment chart showing turns vs. measurement changes
- Test with actual rip cuts on scrap wood
- Verify consistency across multiple cuts
These five steps might seem simple, but they’re what separate a “good enough” fence from a professional-grade precision system. For advanced calibration procedures and troubleshooting guides, my Table Saw Master’s Playbook includes complete micro-adjustment systems for every common fence type.
Troubleshooting Common Micro-Adjust Jig Problems
My adjustment mechanism binds or sticks during use.
This indicates improper threading or excessive friction. Disassemble and apply light machine oil to the threads. Ensure your hanger bolt is perfectly straight and not cross-threaded.
My fence moves too much with each adjustment turn.
Standard hanger bolts provide coarse adjustment. For finer control, use fine-thread machine screws (1/4"-28 instead of 1/4"-20) or add a reduction gear mechanism using small pulleys.
My jig body flexes during cutting operations.
This indicates insufficient material thickness or softwood selection. Replace your jig body with 2" thick hardwood or add a reinforcing plate to the back side.
Advanced Micro-Adjust Techniques for Professional Results
Once you’ve mastered the basic hanger bolt method, these pro techniques will elevate your precision even further:
The Dual-Point Adjustment System
Instead of adjusting only at the rear of your fence, install micro-adjust mechanisms at both front and rear points. This allows you to correct both parallelism and potential fence curvature simultaneously.
The Spring-Tension Method
Add a spring mechanism opposite your hanger bolt to maintain constant pressure and eliminate backlash. This ensures your fence stays precisely positioned even during heavy cutting operations.
The Digital Readout Integration
For ultimate precision, integrate a digital caliper or dial indicator with your micro-adjust system. This provides visual feedback on exact movement amounts and eliminates guesswork entirely.
How This Micro-Adjust Jig Fits Into Your Complete Workshop System
Your table saw fence micro-adjust jig isn’t just a standalone tool—it’s the foundation of a comprehensive precision system that transforms your entire workshop.
When you combine this jig with proper fence alignment procedures and regular blade maintenance, you create a space where every cut is consistent, safe, and professional.
This is exactly what The Table Saw Master’s Playbook covers in complete detail—how to build a comprehensive alignment system that includes micro-adjustment jigs, calibration procedures, and precision testing. When your fence moves with the turn of a knob, your creativity can flourish without limitation.
Ready to Transform Your Fence Alignment Forever?
Perfect table saw fence micro adjust jig understanding isn’t a luxury—it’s the foundation of every great woodworking project you’ll ever build. When your fence is properly aligned, everything becomes easier: cuts are consistent, safety is guaranteed, and your confidence soars.
I used to dread fence alignment sessions because of that one frustrating afternoon with shims. Now, with this five-step system as my foundation, I actually look forward to making precision adjustments. The difference isn’t better equipment—it’s better systems.
Remember those three ruined cherry boards that taught me this lesson? Last month, I built a complete dining set using the exact methods in this guide. Every rip cut was identical. Every assembly was smooth. Every project was completed with the confidence that comes from knowing my setup was dialed in.
The Dead-Square Table Saw Masterclass
Stop wasting $40–$120/month on failed projects. Eliminate 2–3 hours of rework per project. Build with the confidence of a craftsperson—not the frustration of an amateur.
I’ve condensed years of trial-and-error into a complete, printable ebook that shows you exactly what to check and how to check it. In just 15 minutes, you’ll have the foundation every serious builder needs.
It’s the same guide I use in my shop every single week.
Download it today, print the pages you need, and keep it in your shop. By this weekend, you’ll see the difference.
Because you didn’t get into woodworking to fight your tools. You got into it to build something beautiful.
Let’s make sure your tools help—not hinder—that mission.