The Complete Table Saw Mastery Guide: Build Precision Into Every Cut

This table saw guide is everything you need to transform your cutting accuracy from “close enough” to dead-square perfect. That tiny gap where two corners are supposed to meet? That wobbly cut that ruins a perfect piece of oak?
You’ve been blaming yourself. But here’s the truth: It’s not you. It’s your system.
This table saw guide will show you exactly how to build that system—the same one professionals use to guarantee precision on every single cut.
I remember it clearly. I’d spent months dreaming about building beautiful furniture, but I was spending more time searching for my tools than actually using them. My table saw was “fine,” I thought. It came from the factory tuned, right?
Wrong.
One day, I built a simple box. I did everything right—measured carefully, used good materials, took my time. When I brought the corners together, there it was: that tiny, infuriating gap that screamed “amateur.”
I was furious. I thought woodworking just wasn’t for me.
Then I realized the real problem: I didn’t have a system.
Here’s What You’ll Discover on This Page
By the time you finish reading, you’ll understand:
✅ Why accuracy matters more than you think (and how it compounds)
✅ What a truly tuned table saw actually feels like (versus “close enough”)
✅ Which jigs separate professionals from beginners (and why they’re non-negotiable)
✅ How to select the right blade for your work (not just use whatever came with the saw)
✅ What professional joinery actually requires (and how to know if you’re ready)
✅ How to troubleshoot when things go wrong (so frustration stops)
This isn’t a list of random tips. This is a comprehensive guide to understanding your table saw as a precision instrument.
Get Your Free Checklist Right Now
Before you read further, grab our free “Dead-Square Every Time” Table Saw Tune-Up Checklist. It’s a 15-minute reference guide you can print and tape to your shop wall.

This guide pairs perfectly with that checklist. Use them together, and by the end of this week, you’ll have the foundation every serious woodworker needs.
SECTION 2: TABLE SAW FUNDAMENTALS

Why This Table Saw Guide Matters for Your Accuracy
Your table saw is only as good as its accuracy. But here’s the problem: most woodworkers don’t realize they’re working with a saw that’s slowly drifting out of alignment.
You make a cut. It looks fine. You make another. Still fine. But over time, that 1/32″ variation compounds. Your corners don’t meet. Your joints are loose. Your beautiful project looks amateur.
Here’s what you need to know:
The Compound Problem
Every woodworking project depends on accuracy. When your cuts are off by just 1/64″, the problem multiplies across:
Multiple cuts on the same board
Assembled joints (where tolerances matter)
Final finishing (gaps become obvious)
One bad cut on a single board? Not a big deal. But when you’re making 20+ cuts to build a cabinet, and each one is slightly off? The errors accumulate. That’s when you see the results: poor-fitting joints, visible gaps, a finished piece that looks handmade instead of crafted.
Why Alignment Differs From “Sharpness”
Most beginners think: “If my blade is sharp, my cuts will be good.”
Wrong. A sharp blade won’t help if your fence is 1/8″ out, or your blade is tilted at 89.5° instead of 90°.
Sharpness is about edge quality. A sharp blade will cut cleanly through wood fiber.
Alignment is about precision. An aligned blade will cut exactly where you intended, at exactly the angle you specified.
You need both. But most woodworkers focus only on sharpness and ignore alignment.
The Three Components That Matter Most
Professional woodworkers know there are three specific things that determine whether your table saw delivers precision or frustration:
Blade Positioning — How square your blade sits relative to the table (0° or 90°, exactly)
Fence Calibration — Whether your fence is truly parallel to the blade (not drifting at an angle)
Measurement Consistency — Your ability to replicate the same cut repeatedly (muscle memory + tools)
When these three are right, something magical happens. Every cut is exactly what you intended. Every joint fits perfectly. Your work looks professional.
The Real Secret That Separates Professionals
Here’s what separates woodworkers who make beautiful furniture from those who struggle: They have a system for verifying and maintaining accuracy.
It’s not guesswork. It’s not “close enough.” It’s measurable, repeatable, and built into their workflow.
If you’re getting inconsistent results, it’s not because you lack skill. It’s because your saw isn’t set up with a system for precision.
The good news? You can build that system this weekend.
SECTION 3: TABLE SAW SETUP & TUNING

Your table saw probably came from the factory “mostly aligned.” But “mostly” isn’t good enough for precision work.
Here’s the disconnect: Most woodworkers never take the time to truly tune their saw because they don’t know what “truly tuned” actually feels like.
What Happens When A Saw Is Barely Aligned
Your crosscuts are rough (tearout instead of clean edge)
Your rip cuts wander slightly (forcing you to sand edges)
Your miters don’t meet (tiny gaps appear in corners)
Your joinery feels loose (and looks sloppy)
These problems feel like your fault. They’re not. They’re alignment issues.
What Changes When A Saw IS Properly Aligned
Crosscuts are mirror-smooth (no sanding required)
Rip cuts are perfectly parallel (less material waste)
Miter corners meet perfectly (satisfaction guaranteed)
Joinery fits tight (professional results)
The difference is night and day. Once you experience truly aligned cuts, you’ll never go back.
The Three Things That Drift Over Time
If you’ve had your saw for 6+ months, it’s probably out of alignment in at least one of these areas:
Blade Runout — The blade wobbling slightly as it spins (caused by dust, use, or manufacturing tolerance)
Fence Alignment — The fence no longer parallel to the blade (from bumps or adjustments)
Miter Gauge Slot — The slot shifting relative to the blade (from stress or use)
Each of these seems small. Each of these compounds into frustration.
How Professionals Know Their Saw Is Ready
You might think professionals have expensive equipment or magic tricks. They don’t.
They have a process. A specific sequence of measurements and adjustments that they follow. When they’re done, they know—not guess—that every cut will be accurate.
This isn’t complicated. But it IS systematic. And it’s the difference between “I hope this works” and “I know this will work.”
The Investment That Pays For Itself
Taking the time to properly tune your saw isn’t wasted effort. It’s the best investment in your woodworking because:
Every future project benefits from this accuracy
You waste less material (no more sanding bad edges)
Your frustration goes down instantly
Your results improve immediately
Spend 2-3 hours tuning your saw today, and you’ll get better cuts for the next 100 projects. That’s ROI on your time investment.
What You Need to Know Before You Start
Before you attempt any tuning, you need to understand what “right” looks like and how to measure it. Most woodworkers try random adjustments, make things worse, and give up.
Professionals follow a specific methodology. And that methodology works.
Your Setup & Tuning Action Plan
The foundation of everything that comes next is a properly tuned table saw. Without it, nothing else matters.This guide walks you through the verification process step-by-step. 15 minutes, and you’ll know exactly where your saw stands.
SECTION 4: ESSENTIAL TABLE SAW JIGS
Here’s a truth that separates frustrated woodworkers from confident builders: Your table saw alone isn’t enough.
It doesn’t matter how perfectly tuned your saw is. If you’re trying to make precision cuts with just the fence and miter gauge, you’re fighting an uphill battle.
The real secret? Jigs.
But not just any jigs. Specific jigs that solve specific problems.
Essential Table Saw Guide: Why Jigs Are The Real Secret
A good jig does three things:
Removes Guesswork — Measurement becomes automatic (no more “is this close enough?”)
Guarantees Repeatability — Every cut is identical (first cut = last cut)
Improves Safety — Hands stay away from the blade (confidence + protection)
Most beginners skip jigs because they think they’re “extra” or “advanced.” Wrong.
Jigs are foundational. They’re the difference between “almost good” and “professional.”
The Two Jigs That Matter Most
If you’re going to build jigs, there are two that will transform your work:
Jig #1: The Crosscut Solution
The #1 problem woodworkers face: crosscutting consistency.
When you need to crosscut a board perfectly square, the miter gauge doesn’t cut it. It flexes. It wobbles. It gives you “close enough.”
There IS a specific type of jig that professionals use that guarantees dead-square crosscuts every single time. It’s not complicated to build, but the design matters. A lot.
With this jig in place:
Every crosscut is dead-square
You don’t have to think about positioning
Repeatability is guaranteed
Long boards? Wide boards? No problem.
Jig #2: The Angle Solution
The #2 problem: perfect 45-degree angles.
This is where beautiful furniture comes from. Those mitered corners that look professional? That seamless joint? That requires dead-on 45° angles.
The miter gauge won’t do it. It’s not designed for that level of precision.
There’s a specific jig design that handles this. Build it once, use it for years.
With this jig:
Every 45° cut is perfect
No more gaps in mitered corners
Your joinery looks intentional and professional
You’ll actually want to make projects with mitered corners
Why DIY Jigs Matter More Than Pre-Made
You might think: “Why not just buy a commercial jig?”
Two reasons:
Custom Fit — A jig built for YOUR saw, YOUR blade height, YOUR fence position works better than a one-size-fits-all solution
Confidence — When you build your own jigs, you understand them. You trust them. You use them consistently.
Plus, building these jigs teaches you principles you’ll use for decades.
The Safety Bonus
Here’s something people don’t talk about: Jigs are safer.
When you’re using a proper jig:
Your hands are naturally positioned away from the blade
Your body mechanics are better
Your attention is on setup, not fighting the tool
You’re less likely to have a kickback situation
Jigs aren’t just about precision. They’re about working safely and confidently.
The Investment: Time vs. Benefit
Building good jigs takes a weekend. Using them takes a lifetime.
And the ROI is ridiculous. The accuracy improvements alone will save you material waste that costs more than the jigs would anyway.
What Makes a Jig “Good”
Not all jigs are created equal. Some designs work. Some don’t.
The difference between a jig that works and one that doesn’t:
Proper materials (not just whatever you have lying around)
Smart design choices (that most DIY jigs get wrong)
Fine-tuning and testing (to guarantee accuracy)
Maintenance understanding (so it stays accurate)
This is the kind of detail that separates builders who get consistent results from builders who struggle.
The Progression That Works
Here’s what I recommend:
First, make sure your saw is tuned (that foundation we talked about)
Second, build the first jig for crosscutting (this will blow your mind how much it improves your work)
Third, build the second jig for angles (now you can tackle any project confidently)
Then, continue building from there (advanced jigs for specific situations)
Ready to Build Your System?

This is where your table saw transforms from “a tool” into “a precision instrument.”
SECTION 5: BLADE SELECTION GUIDE
Table Saw Guide to Blade Selection: Why It Matters
Here’s something that surprises beginners: Your blade matters more than your saw.
A great blade on a mediocre saw beats a mediocre blade on a great saw. Every time.
But most woodworkers just use whatever blade came with their saw. That’s like cooking with dull knives. Technically possible, but unnecessarily difficult.
The Blade That Came With Your Saw
Let’s be honest: The factory blade is a compromise. It’s designed to be decent at everything and excellent at nothing.
It rips okay. It crosscuts okay. But “okay” isn’t what you need.
You need precision. You need clean edges. You need results that make your projects look professional.
That blade? It’s not going to get you there.
Why Blade Selection Matters
The tooth count on your blade determines:
Cut Speed (how fast the cut progresses through the wood)
Edge Quality (how smooth the cut is)
Tearout Risk (how likely splintering becomes)
Material Waste (how much dust vs. clean chips)
Get the blade wrong, and you’re working against yourself.
Get the blade right, and everything gets easier.
Blade Categories And When To Use Them
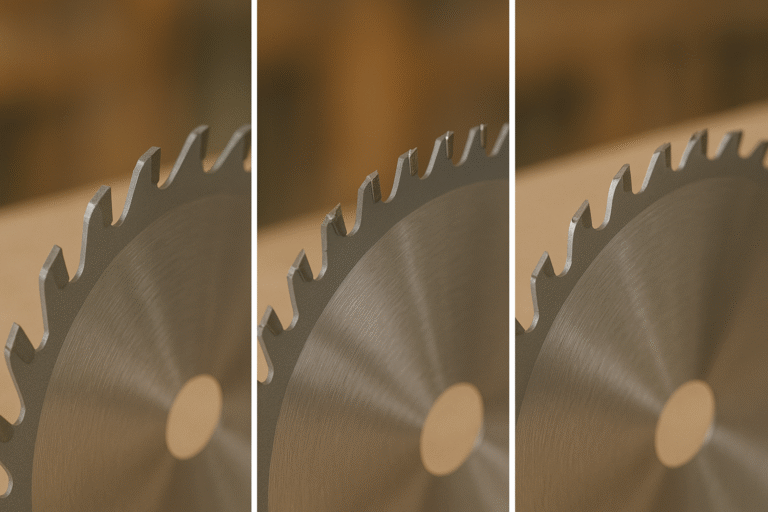
There are generally three blade types professionals rotate through:
Type 1: Ripping Blades
For cutting WITH the grain (along the length of the board). Lower tooth count for speed and aggressive cutting.
Type 2: Crosscut Blades
For cutting ACROSS the grain. Higher tooth count for clean results and minimal tearout.
Type 3: Combination Blades
The jack-of-all-trades that does both okay (but neither excellently).
The Real Cost of Blade Selection
Here’s what people don’t realize: Buying the right blade isn’t an expense. It’s an investment.
You’ll waste less material (better cuts = less sanding/fixing)
You’ll get frustrated less (good results immediately)
You’ll accomplish more (better efficiency)
Your projects look better (professional edge quality)
That blade costs $30-50. The material you waste with a bad blade costs $100+ on your first project.
When To Replace Your Blade
Most woodworkers use a blade until it’s completely dull. That’s wrong.
A blade loses sharpness gradually. After 50-100 cuts, it’s noticeably less sharp. After 200+ cuts, it’s causing tear-out.
When to replace:
When you see edge quality degrading
When you need more pressure (pushing harder = bad blade)
When tearout suddenly appears
When you’re unsure (better to replace)
A sharp blade is a cheap blade over time.
What This Means For Your Work
When you’re using the RIGHT blade for the RIGHT task:
Cuts are smooth (no sanding required)
Setup is easier (the blade does the work)
Your results look professional immediately
You actually WANT to use your saw
When you’re using the WRONG blade:
Everything feels like a struggle
Edge quality is always a problem
You waste material constantly
Your projects never look “quite right”
Your Blade Strategy
Going forward, here’s what I recommend:
Get a quality crosscut blade first (best all-around performer)
Get a ripping blade second (for stock prep)
Get a combination blade third (for projects that mix cuts)
Maintain them properly (keep them clean, replace when dull)
Rotate blades based on the work. Don’t try to make one blade do everything.
The Professional Advantage
Professionals don’t use whatever blade is handy. They select the RIGHT blade for the job, and the results show.
You can do the same.
SECTION 6: TABLE SAW JOINERY TECHNIQUES
Here’s where it gets exciting. This is where woodworking stops being “making boxes” and starts being “building furniture.”
Joinery is the craft. It’s the difference between a project and a work.
But joinery requires precision. And precision requires the foundation we’ve been building through this guide.
Why Joinery Matters
Beautiful furniture isn’t beautiful because of stain or finish. It’s beautiful because the joints are perfect.
When corners meet seamlessly. When strength and beauty are the same thing. When you can see the craftsmanship.
That’s joinery.
But here’s the barrier: Most woodworkers never attempt serious joinery because they think their table saw isn’t “accurate enough.”
Guess what? With proper setup, tuning, and the right jigs, your table saw IS accurate enough.
The Foundation Every Joint Requires
Before you even attempt joinery, you need:
A tuned table saw (we covered this)
The right jigs (we covered this)
Consistent technique (we’re covering this)
Quality measurement (we’ll cover this)
Miss any of these, and your joints won’t fit. Miss all of them, and you’ll be frustrated.
Get all of them right, and joinery stops being scary and starts being predictable.
The Four Joint Types That Define Professional Work
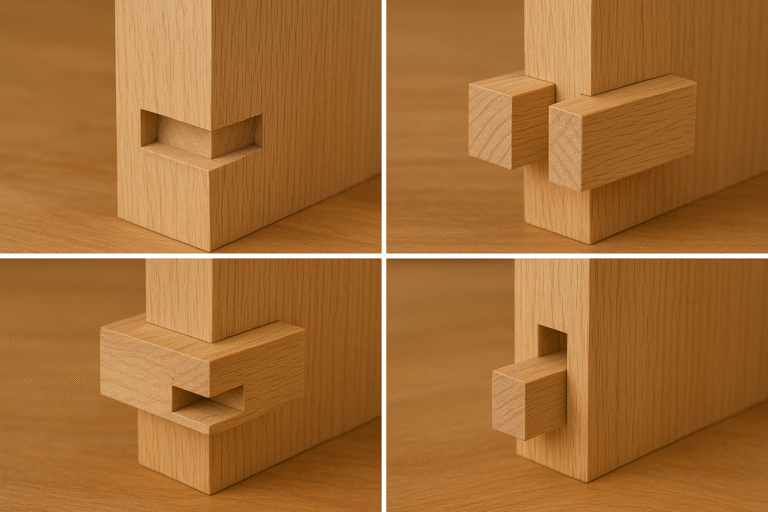
Joint #1: Dadoes
A groove cut across the grain to hold a shelf or divider. This technique requires precision in both width and depth.
When done right? Perfect fit, zero wobble.
Joint #2: Half-Laps
Two pieces overlap with rectangular notches that fit together perfectly. This joint combines strength with visual appeal.
When done right? Incredibly strong and looks purposeful.
Joint #3: Finger Joints
Interlocking rectangular fingers that create surface area and strength. This is the joint that catches people’s attention.
When done right? They look amazing AND are super strong.
Joint #4: Mortise-and-Tenon
The gold standard of joinery. A projecting piece (tenon) fits into a rectangular hole (mortise). This is the joint that defines traditional furniture-making.
When done right? It’s the joint that defines furniture-making as a craft.
What Separates Good Joints From Sloppy Ones
The difference is often 1/32″ or less.
A joint that’s 1/16″ too wide? It’s loose and looks sloppy. A joint that’s 1/32″ too wide? It fits perfectly, tightens with glue, and looks professional.
That’s the difference between “close enough” and “right.”
And that’s why your table saw setup, your jigs, and your technique all matter.
The Progression That Works
Don’t try to build a mortise-and-tenon joint on your first try.
Start with dadoes (straightforward, rewarding)
Move to half-laps (builds confidence)
Try finger joints (visually satisfying)
Graduate to mortise-and-tenon (the masterclass)
Each one teaches you principles you’ll use forever.
Table Saw Guide to Joinery: What Professionals Know
Once you can cut joints that actually FIT and LOOK professional:
You stop making boxes and start building furniture
Your projects become heirloom-quality
You understand why table saw precision matters
You see your table saw as a precision instrument (not just a tool)
Your confidence skyrockets
The Transformation
Here’s what happens when someone goes from “I can make boards fit with enough glue” to “I can cut joints that fit perfectly”:
Their entire relationship with woodworking changes.
They start designing projects around the joinery. They get excited about technique. They see themselves as a craftsperson, not just someone who builds things.
SECTION 7: COMMON MISTAKES & TROUBLESHOOTING
The Most Frustrating Problems (And How To Fix Them)
You’re going to make mistakes. Every woodworker does. The difference is that professionals know how to identify and fix them quickly.
Problem #1: Blade Burning
What it looks like: Dark char marks along the edge of your cut
What causes it:
Dull blade (most common)
Wrong blade for the material
Pushing the wood too slow
Fence out of alignment (wood binding against blade)
How to fix it:
Replace the blade (if it’s been used 100+ times)
Use the right blade for your material
Let the blade do the work (don’t force it)
Check fence alignment (ensure it’s parallel to blade)
This is usually a quick fix once you know what to look for.
Problem #2: Tearout
What it looks like: Rough, splintered edge on the opposite side of your cut
What causes it:
Wrong blade type (too few teeth)
Going with the grain instead of against
Dull blade
Pushing too fast
How to fix it:
Switch to a higher tooth-count blade (crosscut blade if ripping)
Make a shallow scoring pass first (defines the edge)
Ensure blade is sharp
Let the feed rate be natural (don’t rush)
This is prevention-focused. Once you understand the cause, you prevent it.
Problem #3: Inaccurate Cuts
What it looks like: Cuts that are slightly off dimension or not square
What causes it:
Table saw not tuned
Fence not parallel to blade
Jig not built correctly
Measurement error
How to fix it:
Verify your saw is tuned (use your free checklist)
Check fence alignment
Test your jigs against a known square reference
Double-check measurements before cutting
This is the most common frustration, and it’s usually fixable with proper setup.
YOUR NEXT STEPS
You Now Know What Precision Looks Like
You’ve learned why accuracy matters, what components affect precision, which jigs matter, how to select blades, and what professional joinery requires.
But knowledge without action is just theory.
The Path Forward
This Week:
Download your free checklist (15-minute tune-up verification)
Assess your current saw (follow the checklist)
Identify what needs attention (alignment, jigs, blade, etc.)
Next Week:
Make your first improvements (even small adjustments help)
Notice the difference (your cuts will improve immediately)
Build momentum (one improvement leads to another)
Three Ways To Go Deeper
Option 1: Get Your Free Checklist
Perfect if you want to DIY your saw tuning and diagnosis.
Option #2: Get The Table Saw Master’s Playbook
This guide gives you the knowledge. The Playbook gives you the system.
Inside, you’ll find:
- Step-by-step building instructions for both jigs (with full-size templates)
- Detailed calibration procedures with photos
- A complete project to practice your new skills
- Lifetime access to updates as techniques evolve
The Playbook transforms this knowledge into actual results. It’s the difference between reading about building furniture and actually building it.
It’s also just $37—less than a good saw blade.
If you don’t feel this system will save you at least 10 hours of frustration and $50 in wasted wood, you get a full refund. No questions asked.
The Real Transformation
Here’s what happens when you go from frustrated to confident:
You stop accepting “close enough” and start building “perfect.”
Your projects stop looking handmade and start looking crafted.
Your table saw stops being “a tool” and becomes an instrument of precision.
And most importantly: You stop dreading shop time and start living for it.
That’s the transformation waiting for you.
Let’s build something beautiful.
Daniel | HMZ Woodz
P.S. — If you have questions about any technique in this guide, reply to our email. I read every single one and answer personally. Your success matters to us.
About HMZ Woodz
HMZ Woodz was founded on a simple principle: precision is learnable.
For years, I struggled with “almost perfect” results until I figured out that the gap wasn’t between me and the material—it was between my knowledge and my system.
Now, I teach that system to builders just like you. Thousands of woodworkers have used our guides and playbooks to build furniture they’re genuinely proud of.
The goal is simple: take you from frustrated beginner to confident craftsperson in 30 days or less.
Everything we create is designed around that mission.
Table of Recommended Resources
-
5 DIY Table Saw Jigs That Make Complex Cuts Easy (Beginner's Step-by-Step Guide)
-
Build the Ultimate Table Saw Crosscut Sled (That'll Make Your Friends Jealous!)
-
The Ultimate Guide to Table Saw Jigs: Unlock Flawless Woodworking Results
-
Weekend Wood Projects: 5 Quick DIY Builds That'll Make Your Saturday Epic!
-
The 5 Best Wood Types for Outdoor Furniture (That Won't Fall Apart Next Season)