Table Saw Setup Guide: From Wobbly Mess to Precision Machine (Weekend Guide)

I’ll never forget the first time I blamed my wood.
I was cutting a simple shelf for my daughter’s room. Used expensive birch plywood. Measured twice. Cut once.
But the edge was burned, wavy, and not square.
I thought: “This plywood is junk.”
Turns out?
My saw was junk — not because it was cheap, but because it was untuned.
That’s the hard truth no one tells beginners:
Your table saw is only as good as its setup.
A $200 contractor saw with perfect alignment cuts better than a $2,000 cabinet saw that’s out of whack.
And the best part?
You can fix 95% of accuracy issues in one weekend — with tools you already own.
This isn’t theory.
It’s the exact system I teach my students on Day 1 of saw class.
And today, I’m giving it to you — step by step.
Why Most Table Saws Underperform (The Setup Problem)
Most beginners think:
- “My saw is cheap, so it’s inaccurate.”
- “I need a better fence.”
- “My blade is dull.”
But after 15 years of teaching, I can tell you this:
90% of “bad saws” are just bad setups.
Your saw left the factory aligned.
But shipping, moving, and daily use knock it out of whack.
The good news?
You can fix it yourself — no dial indicator needed.
The 5-Step Table Saw Setup Guide (Weekend Precision System)
Do this in order — each step builds on the last.
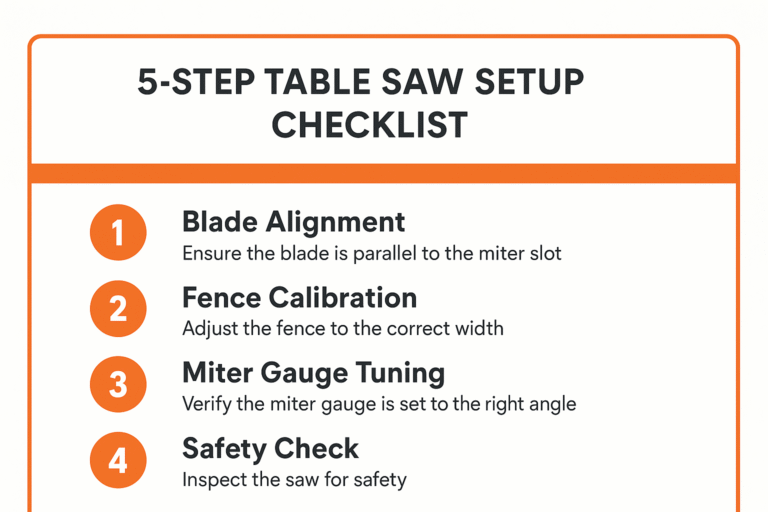
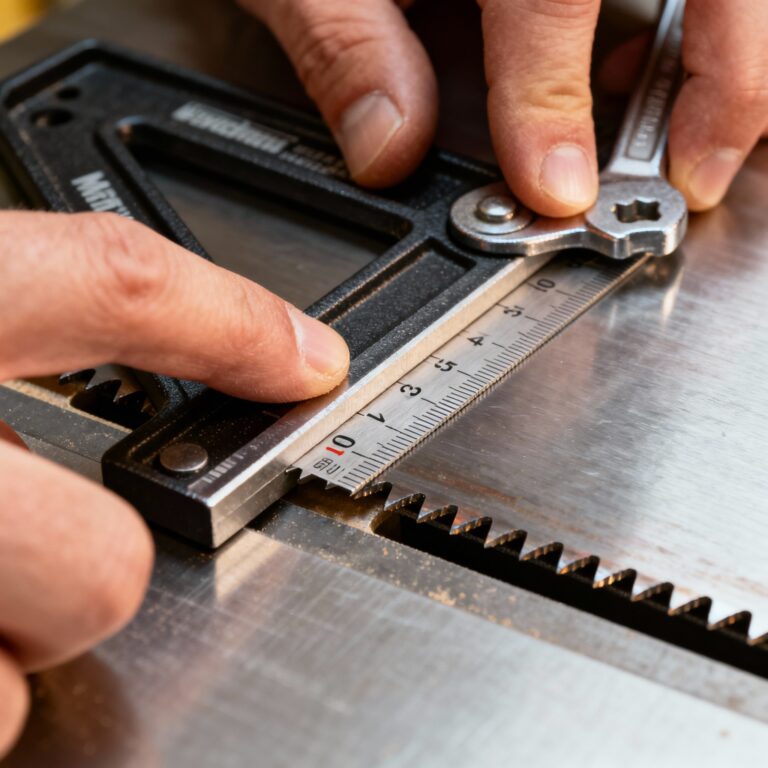
Step 1: Blade Alignment — The Foundation of Accuracy
Why it matters: If your blade isn’t parallel to the miter slot, your cuts will bind, burn, or kick back.
The “One-Wrench Method” (no dial indicator needed):
- Unplug your saw.
- Mark one tooth on your blade with a Sharpie.
- Place a combination square in the left miter slot.
- Rotate the blade so the marked tooth is at the front.
- Slide the square forward until the ruler just touches the marked tooth.
- Lock the square in place.
- Rotate the blade to the back.
- Check the gap between the tooth and the ruler.
- No gap? Perfect.
- Gap? Loosen the trunnion bolts and adjust until it’s consistent front-to-back.
🧑🔧 Daniel’s Story: I spent $80 on a dial indicator… then learned this method from an old-school cabinetmaker. It’s just as accurate — and costs nothing.
📌 For a full walkthrough, see our Table Saw Blade Alignment Without Dial Indicator guide.
Step 2: Fence Calibration — Parallel Cuts Every Time
Why it matters: A fence that’s not parallel to the blade causes binding, burning, and uneven cuts.
The “Paper Test”:
- Set your fence to 6”.
- Place a business card between the fence and the blade at the front.
- Slide the card along the blade to the back.
- You should feel consistent resistance the whole way.
- Tighter at back? Fence angles toward blade → dangerous.
- Looser at back? Fence angles away → inaccurate.
Fix it: Most fences have adjustment screws at the rear. Tweak until the paper slides evenly.
Pro Tip: Always lock your fence down before making a cut. A drifting fence ruins everything.
Step 3: Miter Gauge Tuning — Perfect Crosscuts
Why it matters: Your miter gauge should be exactly 90° to the blade.
The “Flip Test”:
- Cut a square piece of scrap.
- Flip it over and cut the same edge again.
- Hold the two cut edges together.
- Perfect gap? Your gauge is square.
- Gap at top or bottom? Adjust the gauge’s set screw until it’s flush.
📌 Pair this with our Accurate Cuts Every Time measuring system for flawless results.
Step 4: Zero-Clearance Insert — Stop Chip-Out
Why it matters: The stock throat plate leaves a gap that lets wood fibers splinter.
How to make one:
- Remove your existing insert.
- Place a piece of ¼” plywood over the opening.
- Turn on your saw and slowly raise the blade through the plywood.
- Turn off saw. Sand edges smooth. Drop it in.
Result: Clean, splinter-free cuts — even in plywood or veneer.
Step 5: Safety Features Check — Non-Negotiable
Before you cut:
- Riving knife installed? (Prevents kickback)
- Blade guard functional? (Use it!)
- Magnetic switch working? (Prevents surprise restarts)
- Dust collection connected? (Health + visibility)
Safety isn’t optional. It’s part of the setup.
Common Setup Mistakes (And How to Avoid Them)
❌ Skipping blade alignment → Everything else is wasted effort.
❌ Assuming the fence is square → Always test it.
❌ Using a warped insert → Causes uneven support.
❌ Ignoring trunnion bolts → They loosen over time — check them monthly.
❌ Rushing the process → Take your time. Precision is patience.
Real Results: Before and After
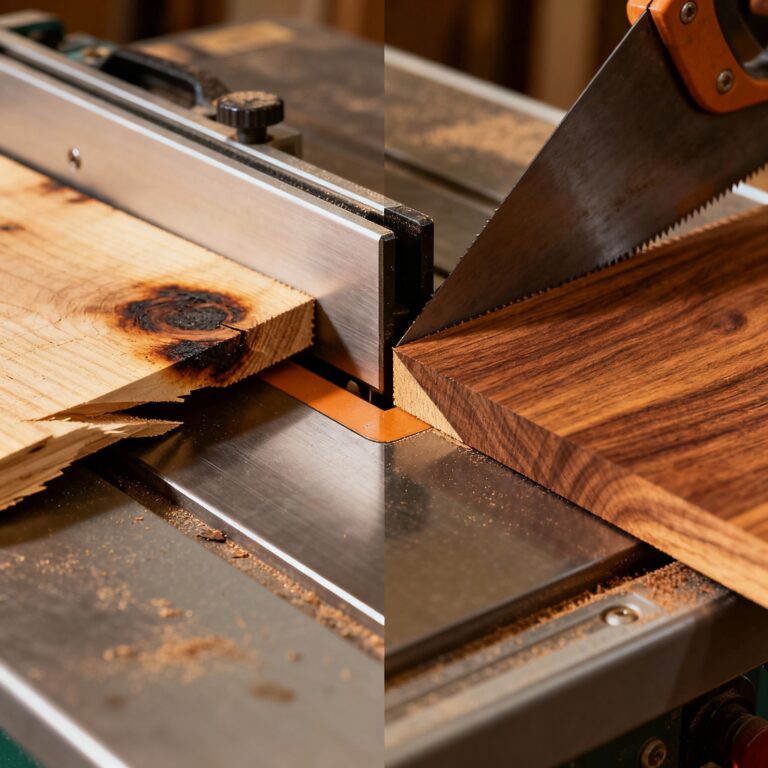
This is the same saw.
Same blade.
Same wood.
Left: Untuned — burned, wavy, unsafe.
Right: After the 5-step setup — clean, square, professional.
That’s the power of setup.
Maintenance Schedule (Keep It Precise)
- Weekly: Check fence lock, blade sharpness
- Monthly: Re-check blade alignment, trunnion bolts
- Seasonally: Deep clean, wax table surface
A well-maintained saw stays accurate for years.
Before You Make Your First Cut — Get the Checklist
Here’s the truth no one tells you:
You don’t need expensive tools to get professional precision.
You just need a system.
That’s why I created the FREE “Dead-Square Every Time” Table Saw Tune-Up Checklist.
It’s a 15-minute guide to calibrating your saw for perfect 90° cuts — no dial indicator needed.
It’s the first step to a better shop — and better projects.
You’ve Got This
Transforming your table saw isn’t about money.
It’s about respect for the craft.
Do it right — and you’ll get cabinet-level precision from any saw.
Go build something great — with confidence.
— Daniel
HMZ Woodz