Why Your Router Bit Burns Wood (And the 3 Fixes That Work)
Why Your Router Bit Burns Wood (The 3 Hidden Causes)
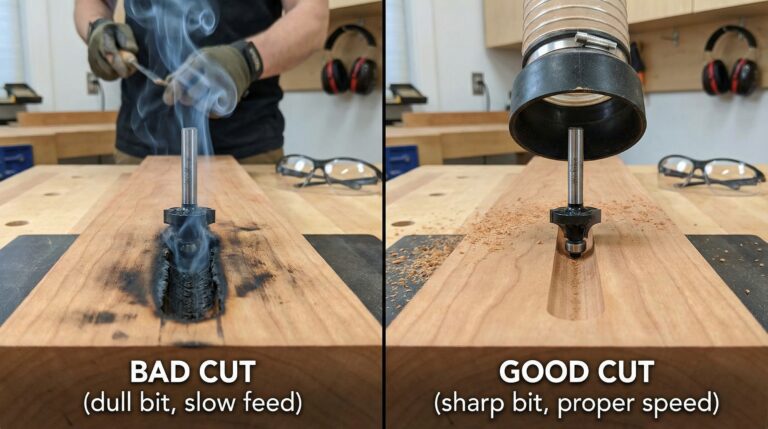
Big bits in hardwood at 24,000 RPM = instant burning. The friction generates heat faster than the chips can carry it away.
Going too slow = burning. Going too fast = chatter. There’s a sweet spot most beginners miss.
A loose collet creates wobble, which causes inconsistent cutting forces and localized heat buildup.
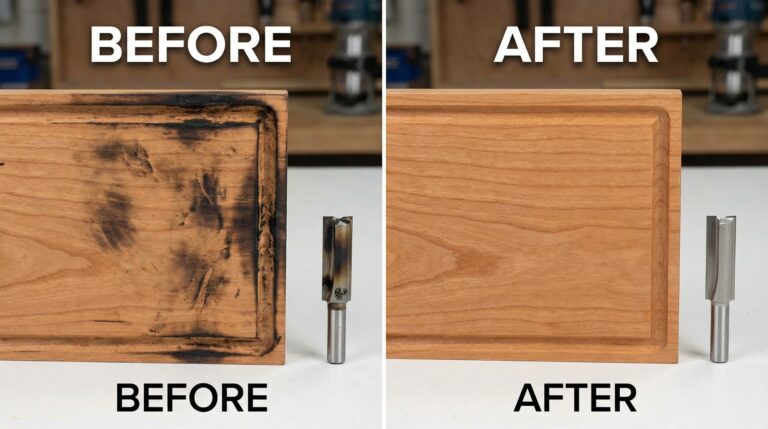
💡 Daniel’s Reality Check: That $40 cherry board taught me a brutal lesson: router success isn’t about power—it’s about precision. Since implementing the methods below, I haven’t had a single burned cut in over two years of daily routing.
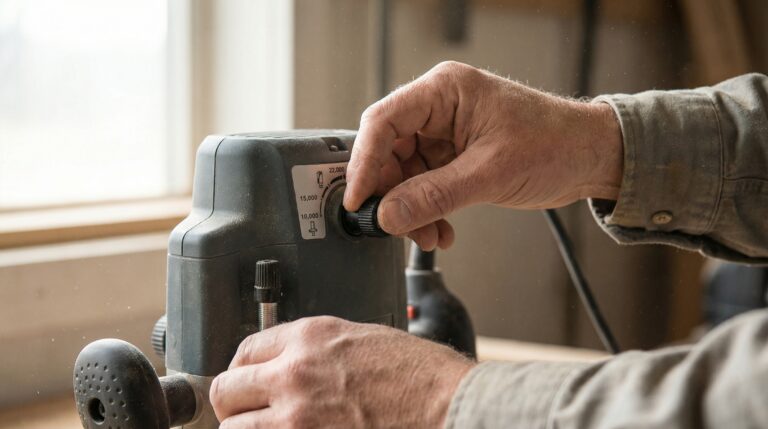
Fix #1: Set the Right Speed (Use This Exact Formula)
Router bits generate heat through friction. Larger bits have more surface area contacting the wood, creating more heat. Hardwoods resist cutting more than softwoods, generating even more heat. When heat builds faster than chips can carry it away, you get burning.
- Small bits (¼”): 18,000–24,000 RPM
- Medium bits (½”): 12,000–18,000 RPM
- Large bits (¾”+): 8,000–12,000 RPM
- Hardwood (cherry, maple, walnut): Use the lower end of the range
- Softwood (pine, poplar, cedar): You can go higher in the range
- Plywood/MDF: Stick to medium speeds (15,000–18,000 RPM) to avoid chipping
⭐ “I spent months thinking my router was defective because everything I routed burned. After learning the correct speed settings from Daniel’s guide, my very next project had clean, smooth cuts. That simple adjustment saved me hundreds in ruined wood and restored my confidence completely.”
— Michael from Denver
⭐ “As a weekend woodworker with a basic fixed-speed router, I thought burning was just part of routing. Learning that I needed to adjust my feed rate based on my router’s limitations completely transformed my results. Now I can achieve professional-looking edges without expensive equipment.”— Sarah from Portland
Fix #2: Master the Perfect Feed Rate
Your feed rate must match your router’s speed and bit size. Too slow, and the bit polishes the wood instead of cutting it—generating heat. Too fast, and the bit can’t remove material efficiently—causing chatter and tear-out.
- If you see burning → you’re going too slow. Increase your feed rate slightly.
- If you see chatter or rough cuts → you’re going too fast. Slow down your feed rate.
- Perfect cut → smooth, consistent motion with clean chips (not dust).
Think of your feed rate like stirring thick paint—smooth, consistent, and deliberate. Don’t rush, but don’t linger either.
- Edge routing: Move left to right (bit spins clockwise)
- Inside cuts (dadoes): Move right to left
Fix #3: Install Bits Correctly (Avoid These 3 Mistakes)
Oil, dust, or pitch on the collet or shank creates slippage, causing wobble and inconsistent cuts.
Inserting the bit all the way to the bottom of the collet creates stress points that can cause bit failure.
Using two wrenches or excessive force can strip the collet or damage the router shaft.
Troubleshooting Common Router Burning Problems
Symptom | Likely Cause | Quick Fix |
|---|---|---|
Consistent burning on all cuts | Speed too high for bit size | Lower RPM to match bit diameter |
Burning only on hardwood | Speed too high for wood type | Use lower end of RPM range for hardwoods |
Burning on inside cuts | Feed direction wrong | Reverse direction—move against bit rotation |
Intermittent burning | Feed rate inconsistent | Practice smooth, consistent motion |
Burning with new bits | Bit installation incorrect | Reinstall using 1/16″ gap rule |
Advanced Techniques for Professional Results
The Incremental Depth Method
- Pass 1: ¼” deep
- Pass 2: ½” deep
- Pass 3: Final depth
The Dust Collection Integration
The Test Cut Protocol
How This Router Setup System Fits Into Your Complete Workshop Journey
Frequently Asked Questions About Router Burning
Can I use a fixed-speed router without burning wood?
What if my router doesn't have variable speed?
Does bit sharpness affect burning?
How do I know if my collet is worn out?
Ready to Master Your Table Saw Like a Professional?
Perfect why your table saw isn’t square understanding isn’t a luxury—it’s the foundation of every great woodworking project you’ll ever build. When your saw cuts dead-square every time, everything else becomes easier: joinery fits perfectly, assembly goes smoothly, and finishing requires minimal correction.
I used to dread table saw sessions because of those frustrating gaps in my projects. Now, with these three fixes as my foundation, I actually look forward to turning on my saw. The difference isn’t better equipment—it’s better systems.
Remember that six-month break I took from woodworking? Last month, I rebuilt the exact same cherry bookshelf that drove me away—and when my father-in-law assembled it this time, he simply nodded and said, “Now that’s craftsmanship.”
he real secret to dead-square cuts isn’t luck—it’s system.
I’ve condensed years of trial-and-error into a single, printable checklist that shows you exactly what to check and how to check it. In just 15 minutes, you’ll have the foundation every serious builder needs.
It’s the same checklist I use in my shop every single week.