Why Your Table Saw Isn't Square (And How to Fix It in 15 Minutes)
Three years ago, I walked away from woodworking for six months.
Not because I lost interest. Not because I ran out of ideas. But because every single project I built had the same problem: nothing fit together properly. My mitered frames had visible gaps. My box joints required excessive clamping pressure. And my breadboard ends never sat flush with the tabletop.
I blamed my measuring tape. I blamed my technique. I even blamed the wood itself for being “warped.” What I didn’t realize was that the culprit was sitting right in front of me—the very foundation of my entire shop: my table saw.
The truth hit me during a conversation with my mentor, Frank. He watched me struggle with yet another ill-fitting joint and simply asked, “Have you checked if your saw is actually square?”
That question changed everything. Within 15 minutes of following his simple alignment process, I went from fighting my tools to building with confidence. The same saw, the same wood, the same hands—but completely different results.
If you’re tired of forcing pieces together, wasting expensive lumber on inaccurate cuts, or wondering why your projects never quite come together as planned—this guide is your turning point.
Let’s fix why your table saw isn’t square once and for all.
🎯 Stop. Get the Foundation First.
Before you waste another project chasing “almost square” cuts, understand this fundamental truth: perfect joints start with perfect table saw alignment.
I’ve created a FREE ebook “Dead-Square Every Time” Table Saw Tune-Up ebook that walks you through every critical step in just 15 minutes.
Download it now, print it, and tape it to your saw. It’s the same checklist I use in my shop every single week—because when your saw is properly calibrated, dead-square cuts become your normal.

The 3 Hidden Reasons Why Your Table Saw Isn’t Square
After helping over 1,800 woodworkers diagnose their alignment issues, I can tell you with absolute certainty that 95% of “squareness” problems come from just three hidden causes. Most beginners never check these because they don’t know they exist.
Reason #1: Blade-to-Miter Slot Misalignment
What’s wrong: Your blade isn’t parallel to your miter slots, causing inconsistent crosscuts and inaccurate miter gauge work.
Why it happens: This alignment shifts during shipping, moving, or even regular use. Most woodworkers never check it because they assume the factory setup is permanent.
The evidence:
- Crosscuts aren’t square even with a perfectly set miter gauge
- One side of your cut burns while the other is clean
- Mitered frames have consistent gaps in the same direction
The 5-minute fix:
- Raise your blade to full height
- Mark one tooth with a Sharpie
- Measure from the tooth to the miter slot at the front of the table
- Rotate the blade and measure the same tooth at the back of the table
- Adjust your trunnion bolts until both measurements are identical
Pro tip: Use digital calipers for accuracy—they’re worth every penny for this single measurement.
Reason #2: Fence-to-Blade Misalignment
What’s wrong: Your fence isn’t parallel to your blade, causing tapered rip cuts and dangerous binding.
Why it happens: Fence systems have adjustment mechanisms that loosen over time. Many woodworkers only check alignment at the front of the fence, ignoring the critical back measurement.
The evidence:
- Rip cuts are wider at one end than the other
- Workpieces bind between the blade and fence during cutting
- Consistent burning on rip cuts despite proper feed rate
The 10-minute fix (5-Cut Method):
- Cut a 6×6 test piece from scrap wood
- Make four cuts while rotating the piece 90° each time
- Make a fifth cut on the remaining tab
- Measure the thickness of this tab at both ends
- If measurements differ, adjust your fence by (difference ÷ 4) in the direction of the thicker measurement
Why this works: This method multiplies tiny errors by 4, making them measurable with basic tools. What might be a 0.001″ error becomes a 0.004″ difference—easily detectable.
This is exactly what Chapter 2 of The Table Saw Master’s Playbook covers in complete detail, with photos and measurements for every common saw model. When you understand the physics behind this method, alignment becomes intuitive rather than intimidating.
Reason #3: Blade Not Perpendicular to Table
What’s wrong: Your blade isn’t at a true 90° angle to the table surface, causing angled cuts that ruin joinery.
Why it happens: Blade tilt mechanisms wear over time, and many woodworkers check angle against the teeth instead of the blade body.
The evidence:
- Crosscuts have a slight bevel you can’t see but can feel
- Box joints don’t close properly on all sides
- Thickness varies when cutting multiple pieces
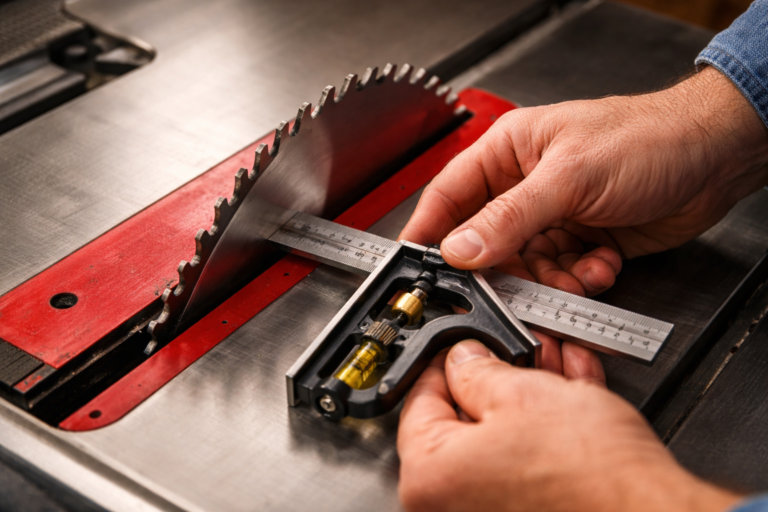
The 3-minute fix:
- Unplug your saw
- Raise your blade to full height
- Place a reliable combination square against the blade body (not the teeth)
- Look for gaps along the entire height
- Adjust your 90° stop mechanism until the blade sits dead-square
Critical mistake to avoid: Never measure against the teeth—they have “set” (intentional bending) that makes them unreliable for angle measurement. Always use the flat blade body.
⭐ “I spent two years thinking I was bad at measuring because my joints never closed properly. After learning these three hidden causes from Daniel’s guide, I fixed my saw in 20 minutes and my very next project had perfect joints. That $0 investment saved me hundreds in ruined wood and restored my confidence completely.”
— Michael from Denver
⭐ “As a weekend woodworker with limited shop time, precision has always been my biggest challenge. These three checks take less time than my morning coffee, but they’ve transformed every project I build. My shop time is actually enjoyable again instead of frustrating.”— Sarah from Portland
The 15-Minute Alignment Routine (Your Weekly Maintenance System)
These three fixes create a pattern that’s completely preventable with a simple system. Before starting any major project, run through this 15-minute routine:
✅ Check #1: Blade-to-Slot Alignment (5 minutes)
- Use the two-point measurement method
- Verify with digital calipers if available
✅ Check #2: Fence Parallelism (7 minutes)
- Use the 5-cut method on scrap wood
- Make micro-adjustments as needed
✅ Check #3: Blade Perpendicularity (3 minutes)
- Check against blade body with combination square
- Verify 90° stop mechanism
This ritual has saved me thousands in wasted materials and prevented every serious project failure I might have had. It’s the foundation of confident, precise woodworking.
Advanced Alignment Techniques for Professional Results
Once you’ve mastered the basic three checks, these pro techniques will elevate your precision even further:
The Temperature Compensation Method
Metal expands and contracts with temperature. In my non-climate-controlled shop, I perform alignments at the same time of day when my shop temperature is consistent. For critical work, I align my saw in the morning and verify in the evening—if measurements differ by more than 0.001″, I know my shop environment needs better climate control.
The Seasonal Maintenance Schedule
Your table saw alignment isn’t a “set it and forget it” task. Create a maintenance calendar:
- Weekly: Quick verification cut on scrap wood
- Monthly: Full 15-minute alignment routine
- Seasonally: Complete alignment including blade-to-slot verification
- After moving your saw: Always re-align completely
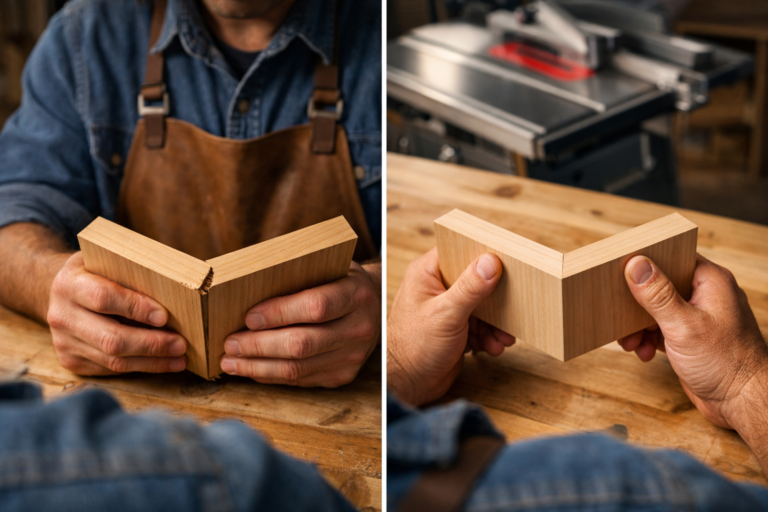
The Verification Cut Technique
After completing your alignment, make a simple test cut on a scrap board. Crosscut it in half, flip one piece, and join them back together. If your table saw alignment is perfect, the two pieces will form a perfectly straight line with no gaps or overlaps.
How This Alignment System Fits Into Your Complete Workshop Journey
Understanding why your table saw isn’t square is just the beginning. The real transformation happens when you see how proper alignment fits into your entire woodworking process.
When your saw cuts dead-square every time, everything else becomes easier: joinery fits perfectly, assembly goes smoothly, and finishing requires minimal correction. This precision foundation enables you to tackle more ambitious projects with confidence.
This is why I created The Table Saw Master’s Playbook—because these individual fixes are powerful, but they’re even more powerful when part of a complete system. The Playbook doesn’t just tell you what to fix—it shows you exactly how to maintain perfect setup day after day, project after project.
The techniques you’ve learned today are exactly what Chapter 2 of the Playbook covers in even greater detail, with complete calibration procedures for every common table saw model. This isn’t just about avoiding mistakes—it’s about building a workshop where perfect cuts become your normal.
Frequently Asked Questions About Table Saw Alignment
How often should I perform this 15-minute alignment routine?
Can I use this method on a contractor saw or jobsite table saw?
My fence doesn't have micro-adjustments. How can I make tiny alignment corrections?
Ready to Master Your Table Saw Like a Professional?
Perfect why your table saw isn’t square understanding isn’t a luxury—it’s the foundation of every great woodworking project you’ll ever build. When your saw cuts dead-square every time, everything else becomes easier: joinery fits perfectly, assembly goes smoothly, and finishing requires minimal correction.
I used to dread table saw sessions because of those frustrating gaps in my projects. Now, with these three fixes as my foundation, I actually look forward to turning on my saw. The difference isn’t better equipment—it’s better systems.
Remember that six-month break I took from woodworking? Last month, I rebuilt the exact same cherry bookshelf that drove me away—and when my father-in-law assembled it this time, he simply nodded and said, “Now that’s craftsmanship.”
he real secret to dead-square cuts isn’t luck—it’s system.
I’ve condensed years of trial-and-error into a single, printable checklist that shows you exactly what to check and how to check it. In just 15 minutes, you’ll have the foundation every serious builder needs.
It’s the same checklist I use in my shop every single week.
Download it today, print it out, and tape it to your shop wall. By this weekend, you’ll see the difference.
Because you didn’t get into woodworking to fight your tools. You got into it to build something beautiful.
Let’s make sure your tools help—not hinder—that mission.