Three years into my woodworking journey, I built what I thought was going to be my masterpiece—a beautiful cherry bookshelf for my wife’s office. The boards were smooth, the finish was perfect, and I felt like I’d finally “made it” as a woodworker. But here’s the thing about wood joinery for beginners that nobody tells you upfront: all that surface beauty means nothing if your joints can’t hold the weight of what you’re building.
Two months later, that bookshelf was sagging worse than an old barn roof. My wife diplomatically suggested we “maybe get something from the store next time,” and I realized I’d been approaching woodworking completely backwards. I was focusing on the finish while completely ignoring the foundation that holds everything together.
That’s when everything changed for me. I stopped trying to build furniture and started learning how to create connections that would last generations.
Why Wood Joinery for Beginners Changes Everything
Here’s what I wish someone had told me when I started: wood joinery for beginners isn’t just about making things stick together. It’s about creating connections that are stronger than the wood itself, joints that actually improve with age, and projects that your grandchildren will fight over someday.
When you understand these five essential joints I’m about to share, you’ll stop making furniture and start building heirlooms. Every project becomes an opportunity to show off your skills rather than cross your fingers and hope for the best.
I’ve taught hundreds of woodworkers over the years, and I can tell you that mastering these fundamental joints is what separates the hobbyists from the craftspeople. Once you’ve got these down, that confidence you feel when you know your project isn’t going to fall apart the first time someone actually uses it—that’s the real reward.
The 5 Essential Wood Joinery for Beginners Techniques
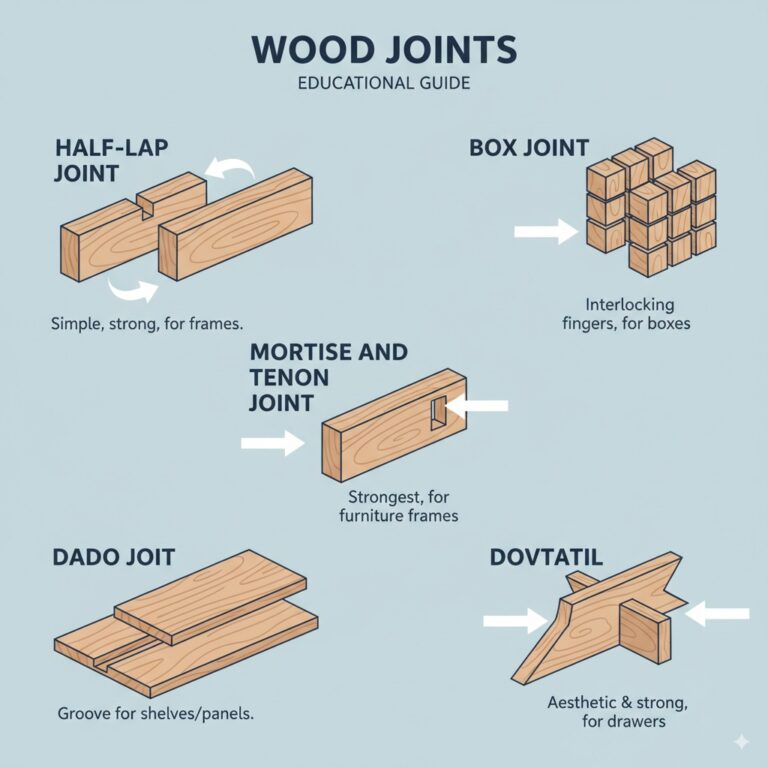
1. The Half-Lap Joint: Your Gateway to Strong Wood Joinery for Beginners
The half-lap joint is like the reliable pickup truck of wood joinery—it’s not fancy, but it gets the job done every single time. I always start beginners here because it teaches you the fundamental principle of joinery: removing material strategically to create interlocking strength.
When to Use It:
- Cross-bracing in frames
- Simple boxes and cabinets
- Garden structures and outdoor projects
- Any time you need two pieces to cross at the same level
Step-by-Step Process:
- Mark Your Layout: Place the two pieces exactly where they’ll intersect. Use the actual wood pieces as templates—this is more accurate than measuring.
- Set Your Depth: The secret to a perfect half-lap is cutting exactly half the thickness of your material. If you’re working with 3/4″ boards, you’ll cut 3/8″ deep. I use a combination square to mark this depth on both pieces.
- Make the Shoulder Cuts: Using a back saw or fine-toothed hand saw, cut straight down on your marked lines. Don’t rush this—accuracy here determines how tight your joint will be.
- Remove the Waste: You can chisel this out by hand (great for building skills) or use a router with a straight bit. If chiseling, work from both sides toward the middle to prevent tear-out.
- Test and Adjust: Your joint should slide together with just hand pressure. If it’s too tight, pare away thin shavings with a sharp chisel. Too loose? That’s harder to fix, so err on the tight side.
Pro Tip: I always cut the joint slightly tight, then use 220-grit sandpaper wrapped around a block to fine-tune the fit. This gives you incredible control over the final result.
2. The Mortise and Tenon: The King of Wood Joinery for Beginners
If the half-lap is your pickup truck, the mortise and tenon is your luxury sedan—sophisticated, strong, and impressive once you learn to drive it. This joint has been holding furniture together for thousands of years, and there’s a reason why.
When to Use It:
- Table and chair legs
- Cabinet doors and face frames
- Any joint that needs to handle significant stress
- Traditional furniture construction
Understanding the Anatomy:
- Mortise: The square or rectangular hole
- Tenon: The matching projection that fits into the mortise
- Shoulder: The flat surface that butts against the mortised piece
Step-by-Step Process:
Creating the Mortise:
- Layout is Everything: Mark your mortise location carefully. I use a mortise gauge for this—it keeps both lines parallel and exactly the right distance apart.
- Drill Out the Waste: Use a drill bit slightly smaller than your mortise width to remove most of the material. This saves time and energy.
- Square the Sides: Use a sharp mortise chisel to clean up the walls. Work from both ends toward the center, and keep your chisel perfectly vertical.
- Test with a Story Stick: I always make a wooden gauge block the exact size of my finished mortise to test the fit.
Cutting the Tenon:
- Mark the Shoulders: Use your mortise piece as a template to mark exactly where the shoulders should be.
- Cut the Cheeks: I prefer using a tenon saw for this, but a table saw works great too. The key is making these cuts perfectly parallel.
- Cut the Shoulders: These cuts determine how tight your joint will close up, so take your time.
- Fine-Tune the Fit: The tenon should slide into the mortise with firm hand pressure. You want it snug but not requiring hammer blows.
Common Beginner Mistake I Made: I used to make my tenons too thin, thinking it would be easier. Wrong! A thin tenon in a sloppy mortise is weaker than both pieces were separately. Aim for about 1/3 the thickness of your material.
3. The Dovetail Joint: Your Wood Joinery for Beginners Signature Move
Okay, I’ll level with you—dovetails aren’t the strongest joint on this list. But they’re the most beautiful, and they’re like a signature that says “a real craftsperson made this.” Plus, once you understand the geometry, they’re actually easier than people think.

When to Use It:
- Drawer construction (where they truly shine)
- Small boxes and jewelry cases
- Any time you want to show off your skills
- Situations where the joint itself is part of the design
Understanding Dovetail Geometry: The magic angle for dovetails is about 8:1 for hardwoods and 6:1 for softwoods. This creates just enough mechanical lock without making the joint fragile.
Step-by-Step Process:
Cutting the Tails First (My Preferred Method):
- Layout the Tails: I start with odd-sized tails (narrower at the bottom) because they look more handmade and are actually stronger.
- Cut the Tail Angles: Use a dovetail saw and cut just outside your marked lines. Consistency matters more than perfection here.
- Remove the Waste: A coping saw followed by careful chisel work gets you clean, sharp corners.
Transferring to the Pin Board:
- Use the Tails as a Template: Place your tail board exactly where it will sit and trace around each tail with a sharp knife.
- Cut the Pins: Again, cut just outside your lines and chisel to the knife marks.
- Test and Adjust: Your first dovetail probably won’t go together perfectly. That’s normal! Use a sharp chisel to make tiny adjustments until it fits.
The Secret I Wish Someone Had Told Me: Don’t try to cut dovetails perfectly the first time. Cut them close, then fine-tune with sharp chisels. This approach will save you hours of frustration.
4. The Rabbet Joint: Simple but Mighty
The rabbet joint is probably the most underrated joint in woodworking. It’s basically an L-shaped groove that creates a perfect corner connection, and it’s incredibly versatile once you understand its potential.
When to Use It:
- Cabinet backs and bottoms
- Picture frames
- Drawer bottoms
- Any time you need a clean, flush corner
Step-by-Step Process:
- Set Up Your Cut: Whether you’re using a table saw, router, or rabbet plane, the setup is crucial. The rabbet should be about 1/3 to 1/2 the thickness of your material.
- Cut the Rabbet: If using a table saw, I prefer making this in two passes—one vertical cut, then flip the board for the horizontal cut. This prevents tear-out.
- Test the Fit: Your mating piece should sit flush in the rabbet with no gaps.
- Assembly: Apply glue to both surfaces of the rabbet before clamping. This joint relies on glue surface area for its strength.
Pro Tip: I always cut my rabbets about 1/32″ deeper than the thickness of the mating piece. This ensures a tight fit at the visible corner even if my lumber isn’t perfectly dimensioned.
5. The Dado Joint: Perfect for Shelves and Dividers
A dado is essentially a groove cut across the grain of the wood, and it’s perfect for creating strong, clean connections for shelves, dividers, and any situation where you need something to sit precisely in place.
When to Use It:
- Bookshelf construction
- Cabinet dividers
- Drawer bottoms
- Any time you need precise, repeatable positioning
Types of Wood Joints in the Dado Family:
- Through Dado: Goes all the way across the board (visible from both edges)
- Stopped Dado: Stops short of one or both edges (cleaner appearance)
- Rabbet Dado: Combines both cuts for even stronger connections
Step-by-Step Process:
- Layout Your Dados: Use the actual shelf or divider as a template. Mark both sides of where it will sit.
- Set Your Depth: Generally, 1/3 the thickness of the material being dadoed is perfect. Deeper isn’t necessarily stronger.
- Cut the Dado: I prefer using a router with a straight bit and a guide fence. Multiple light passes give cleaner results than trying to hog out all the material at once.
- Test the Fit: Your shelf should slide in with gentle tapping. Too loose and you lose strength; too tight and you risk splitting the wood.
- Assembly: Apply glue to the dado walls and the mating surfaces. Clamp until the joint closes completely.
Game-Changing Technique: When cutting multiple dados for shelves, I make a simple plywood jig with stops positioned exactly where each shelf goes. This guarantees all your dados are identical and perfectly positioned.
Common Mistakes That Used to Drive Me Crazy (And How to Avoid Them)
Mistake #1: Rushing the Layout
I used to think the measuring and marking was the boring part—just something to get through before the “real” work started. Wrong! Your joint is only as good as your layout. Take time here, use sharp pencils, and double-check everything before making your first cut.
Solution: Measure twice, cut once isn’t just a cliché—it’s the difference between tight joints and loose ones.
Mistake #2: Dull Tools
Nothing will make you hate learning wood joinery for beginners more than trying to cut precise joints with dull tools. Dull chisels tear wood instead of slicing it, dull saws wander off your lines, and dull router bits burn rather than cut.
Solution: Learn to sharpen your tools properly, or find a local sharpening service. Sharp tools aren’t just easier to use—they’re actually safer because they require less force.
Mistake #3: Ignoring Wood Movement
Wood is always moving—expanding and contracting with changes in humidity. I used to make joints so tight that they’d crack when the seasons changed.
Solution: Understand which way your wood will move and plan accordingly. Joints across the grain need to accommodate movement; joints with the grain can be tighter.
Mistake #4: Poor Grain Orientation
The strongest wood joints aren’t just about the joint itself—they’re about how the grain of both pieces works together. Putting end grain against side grain creates a weak glue joint.
Solution: Whenever possible, orient your grain so you’re gluing long grain to long grain. When that’s not possible (like with dovetails), the mechanical connection of the joint carries the load.
Mistake #5: Inadequate Clamping
I used to think that if a joint went together by hand, it was good to go. But proper clamping pressure ensures the glue forms a strong bond and keeps everything aligned while it cures.
Solution: Use enough clamps to close the joint completely, but not so much pressure that you squeeze out all the glue. A thin, even glue line along the entire joint is what you’re after.
Taking Your Skills to the Next Level
Now that you understand these five fundamental joints, you’re ready to start building projects that will actually last. But remember—reading about these techniques is just the beginning. The real learning happens when you’re standing at your workbench, chisel in hand, working through the challenges that every piece of wood presents.
Start with simple projects that let you practice these joints without the pressure of creating something perfect. Make some small boxes using dovetails, build a simple frame with half-laps, or create a small shelf unit with dados. Each project will teach you something new about how wood behaves and how these joints work in the real world.
The strongest wood joints aren’t just about following techniques—they’re about understanding the wood you’re working with and adapting these methods to match. Every species cuts differently, every board has its own personality, and every project teaches you something that no book or video can capture.
Remember that feeling I described at the beginning—when my bookshelf sagged because I didn’t understand proper joinery? Last month, I helped my neighbor move that same cherry bookshelf (which I rebuilt properly three years ago), and it’s still rock solid. That’s the difference these joints make, and that’s the confidence you’ll feel once you master them.
Your woodworking journey is just beginning, and these five joints are your foundation. Build on them, practice them, and most importantly—don’t be afraid to make mistakes. Every gap you have to fill, every joint you have to remake, and every project that doesn’t turn out quite right is teaching you something valuable.
The craftspeople who built furniture centuries ago didn’t have YouTube or fancy jigs—they had sharp tools, solid techniques, and the patience to learn from their mistakes. You have all those same advantages, plus access to better information and tools than they could have dreamed of.
Ready to Ensure Your Projects Are Built on a Solid Foundation?
Before you start cutting your first mortise or laying out those dovetails, there’s one crucial step that many woodworkers overlook—making sure your table saw is perfectly tuned. Even the most precisely cut joints won’t fit properly if your saw isn’t cutting true, and nothing is more frustrating than having a beautiful project ruined by inaccurate cuts.
That’s why I’ve created a comprehensive “Table Saw Tune-Up Checklist” that walks you through every adjustment and calibration your saw needs to deliver precision cuts every time. This step-by-step guide ensures your workshop’s most important tool is ready to help you create those perfect joints we’ve been talking about.