Woodworking Shop Safety:The 3-Zone System that Prevents 95% of Injuries
I still have the scar.
Not from a table saw. Not from a router.
From a chisel.
I was cleaning it after a project. Distracted. Rushed. Slipped.
One second of inattention — and a 2-inch gash that needed 6 stitches.
That night, I sat in the ER and made a promise:
My shop would never be a place of chaos again.
Not because I’m a safety fanatic.
But because I care about the people who use it — including me.
Most “safety guides” just list rules: “Wear goggles.” “Use a push stick.”
But they miss the real issue: your shop’s layout invites danger.
The solution isn’t more rules.
It’s better design.
That’s why I created the 3-Zone Safety System — a simple, visual method that prevents 95% of common workshop injuries.
It’s not theory.
It’s what I teach every student on Day 1.
And today, I’m giving it to you — free.
Why Most Safety Advice Fails
You’ve seen the posters.
You’ve read the manuals.
You’ve got the safety glasses… somewhere.
But accidents still happen.
Why?
Because safety isn’t just about gear.
It’s about workflow.
If your table saw is buried behind a pile of lumber, you’ll rush.
If your first aid kit is in the garage, you’ll delay help.
If your push sticks are lost in a drawer, you’ll use your hand.
The 3-Zone System fixes this by designing safety into your space.
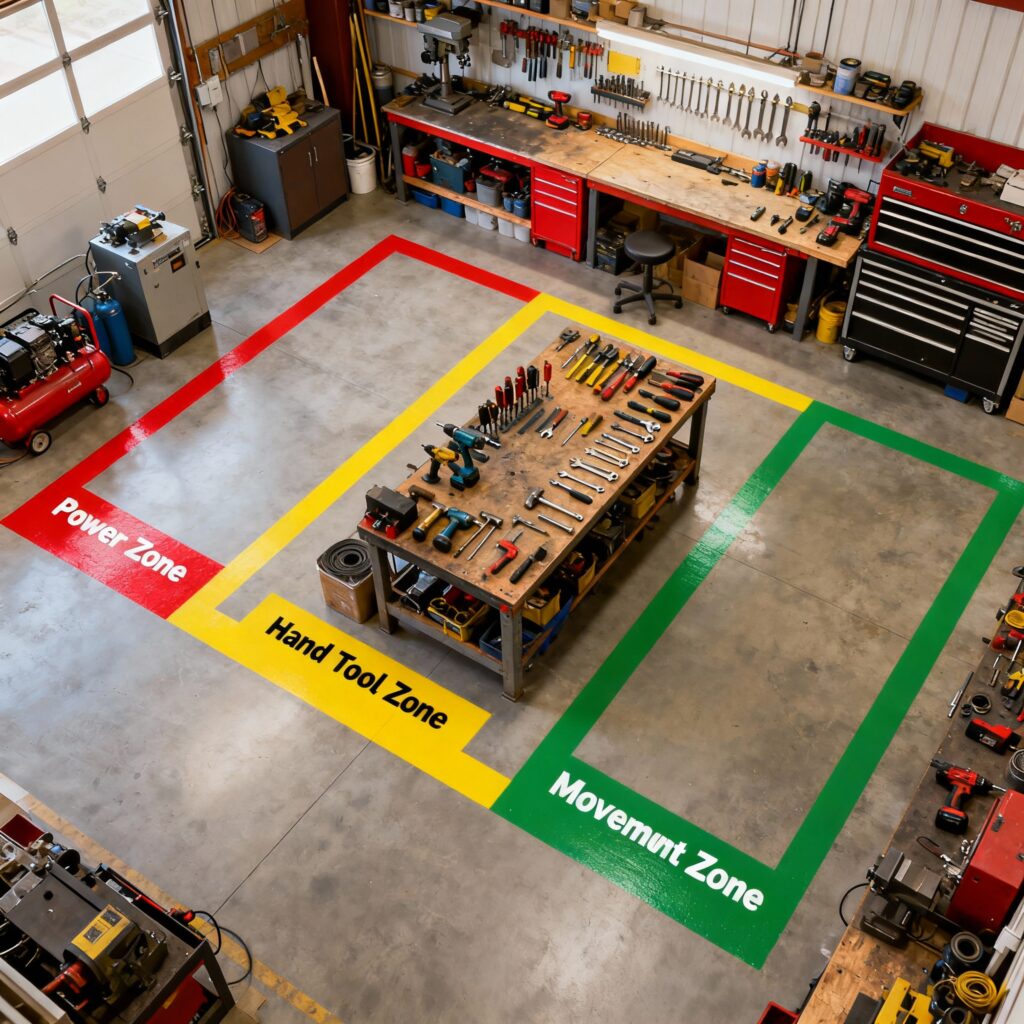
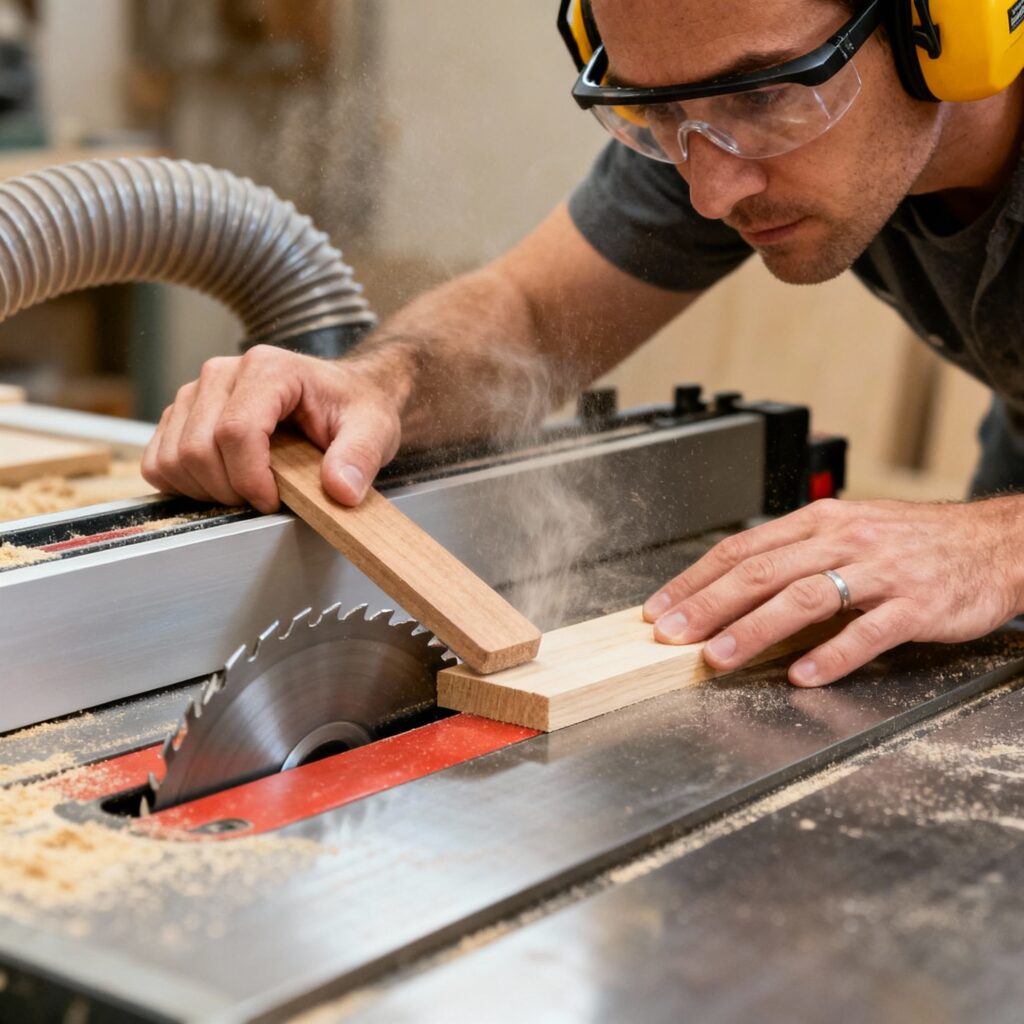
Zone 1: The Power Tool Safety Perimeter (Red Zone)
This is your danger zone — the 3-foot circle around any tool with a spinning blade. Table saw. Router. Jointer. Bandsaw. If it cuts, it belongs here.
And in this zone, complacency kills.
I learned that the hard way. I used to keep my push sticks in a drawer six feet from my table saw. “I’ll just grab one when I need it,” I told myself. One afternoon, I was in a hurry. I thought, “It’s just a quick cut.” I didn’t use a push stick.
My fingertip still has the scar.
Now? My push sticks, featherboards, and safety glasses hang right on the saw. No excuses. No shortcuts.
The rules in the Red Zone are non-negotiable:
- Only one person allowed — no spectators, no helpers, no distractions.
- Push sticks for every rip cut under 6 inches — your hand never gets closer than 6 inches to the blade.
- Riving knife always installed — no exceptions, even for “just this one cut.”
- Dust collection ON before you turn on the tool — airborne dust is a fire and health hazard.
- No loose sleeves, dangling jewelry, or unsecured long hair — spinning blades don’t forgive small mistakes.
To set it up right:
- Outline the zone with red painter’s tape on the floor — a visible boundary your brain respects.
- Mount your safety gear on the tool itself — if it’s out of reach, you won’t use it.
- Keep the floor completely clear — no offcuts, no cords, no coffee mugs.
A properly tuned table saw isn’t just about clean cuts — it’s a safety requirement. Misalignment causes binding, kickback, and loss of control. For a full breakdown of setup, safety features, and alignment, see our Ultimate Table Saw Guide for Beginners .
🧑🔧 Daniel’s Story: I used to keep my push sticks in a drawer 6 feet away. One day, I skipped them “just this once.” My fingertip still has the scar. Now, they hang right on my saw.
Zone 2: The Hand Tool Work Area (Yellow Zone)
This is your precision zone — for chisels, planes, sanding, finishing.
Rules:
- Sharp tools only (dull tools slip)
- Clamped workpieces (never hold by hand)
- Good lighting (shadows hide dangers)
- Ventilation for finishes (fumes are silent killers)
Setup Tips:
- Use yellow tape to mark this area
- Store hand tools in wall-mounted racks — not drawers
- Keep a small first aid kit within arm’s reach
Pro Tip: Label your chisels with their size. Reaching blindly into a roll-up case is how accidents happen.
Zone 3: The Movement & Material Zone (Green Zone)
This is your breathing room. Your thinking space. Your safe path.
It’s not for building. It’s not for cutting.
It’s for moving — safely, calmly, without tripping over your own workshop.
Most woodworkers focus all their safety energy on the tool.
But here’s the truth: most accidents happen between tools — when you’re walking, turning, or reaching for something.
The rules here are simple but vital:
- Always keep it clear — no tools, no half-finished projects, no “I’ll move that later” piles.
- Store lumber vertically — leaning stacks fall. Vertical racks stay put.
- Keep heavy items at waist level — no climbing, no straining, no dropped materials.
To set it up right:
- Mark the perimeter with green tape — a visual cue that says, “This is your safe zone.”
- Maintain a 3-foot-wide path around your entire shop — wide enough to pivot, carry materials, or step back.
- Store sheet goods on a ceiling hoist, not on the floor — keeps them flat and your path clear.
Keeping this zone clear starts with smart spatial planning. Our Small Workshop Organization guide shows you how to design a layout that’s both efficient and safe — because safety isn’t just about gear. It’s about flow.
Safety Insight: You’re more likely to fall in this zone than get cut at your saw. Respect the space. Protect your body.
Your Emergency Preparedness Checklist
Even with perfect zones, be ready:
✅ First Aid Kit: Bandages, gauze, antiseptic, tweezers
✅ Emergency Contacts: Posted on the wall (not just in your phone)
✅ Fire Extinguisher: Class ABC, mounted near the exit
✅ Eye Wash Station: For chemical or dust exposure
✅ Phone Access: Keep a charged phone in your shop
Personal Protective Equipment (PPE): What, When, Why
Tool | Safety Glasses | Hearing Protection | Respirator | Dust Collection |
|---|---|---|---|---|
Table Saw | ✅ Always | ✅ Always | ❌ | ✅ Always |
Router | ✅ Always | ✅ Always | ✅ (for MDF) | ✅ Always |
Sander | ✅ Always | ✅ (orbital) | ✅ Always | ✅ Always |
Chisels | ✅ (flying chips) | ❌ | ❌ | ❌ |
Rule: If it makes dust or noise, protect yourself.
Real Impact: How the 3-Zone System Changed My Shop
Before:
- Tools everywhere
- Push sticks lost
- First aid kit in the house
- 3 minor injuries in 6 months
After:
- Zones clearly marked
- Safety gear on every tool
- First aid kit on the wall
- Zero injuries in 2 years
It’s not magic.
It’s intentional design.
Don’t Skip the Basics (3 Mistakes I Still See)
- “It won’t happen to me” → Complacency kills.
- Ignoring dust → Wood dust is a carcinogen.
- Rushing setup → Take the extra 30 seconds to clamp, guard, and protect.
Safety Isn’t Optional — It’s Respect
Respect for your craft.
Respect for your tools.
Respect for the people who depend on you.
A safe shop isn’t restrictive.
It’s freeing.
Because when you’re not worried about getting hurt, you can focus on building something beautiful.
🛠️ One Last Step Before You Start
No matter how well you organize your zones, if your table saw isn’t properly tuned, it can become a serious safety risk. Misalignment causes binding, kickback, and loss of control — even with perfect technique.
That’s why I always begin every safety refresh with a 15-minute tune-up of my saw.
It’s the first step to a safer shop — and peace of mind.
Let’s build something great — together.
— Daniel
HMZ Woodz