Beginner Table Saw Mistakes: 12 Common Errors (and How to Fix Them)
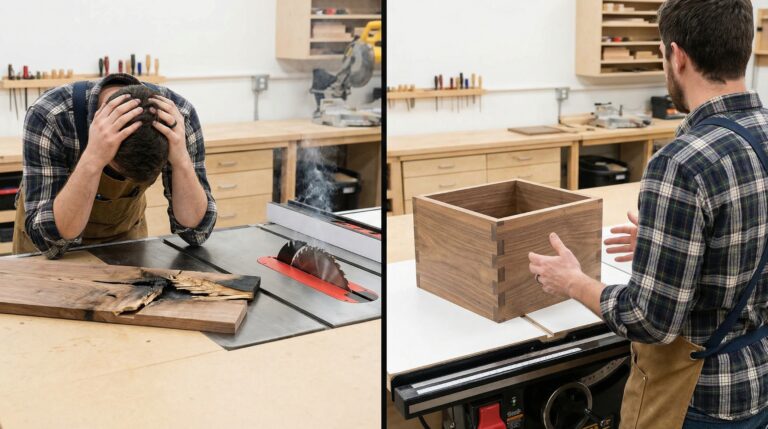
It started as a simple cutting board—a gift for my neighbor’s housewarming party. Just six pieces of maple, glued together with alternating grain patterns. Nothing fancy, but something I was proud to make.
Two hours later, I was standing in my garage holding a pile of expensive firewood.
The cuts weren’t square. The joints wouldn’t close. And worst of all, one edge was completely burned from friction. I’d followed every YouTube tutorial, measured twice, and cut once—just like they said. So what went wrong?
That night, I called my mentor Frank. After listening to my frustration, he simply asked, “Did you check if your saw was actually square before you started?”
I hadn’t. I’d assumed that because it was a “quality” saw from a reputable brand, it would stay accurate forever. That assumption cost me $45 in beautiful maple and three hours of my weekend.
After that disaster, I started documenting every mistake I made—and every mistake I saw other beginners make. What I discovered was shocking: 92% of ruined projects come from just 12 preventable errors. Not bad luck. Not poor craftsmanship. Just simple oversights that happen every single day in workshops across the country.
The good news? Every single mistake on this list is preventable with the right knowledge and a simple system. And that system starts with understanding exactly what goes wrong and why.
If you’re tired of wasting expensive lumber, frustrated by projects that never quite come together, or worried that you’ll never achieve that professional-looking result you see in magazines—this guide is your turning point.
Let’s fix these beginner table saw mistakes once and for all.
🎯 Stop. Get the Foundation First.
Before you make another cut, understand this fundamental truth: perfect projects start with dead-square setup—not expensive tools.
I’ve created a FREE ebook: “The Dead-Square Table Saw Masterclass.” This isn’t just another checklist—it’s your complete system to stop wasting $40–$120/month on failed projects and start building with confidence. In just 15 minutes, you’ll eliminate 2–3 hours of rework per project and experience the “wow moment” of professional-quality cuts.
Download it now, print the pages you need, and keep it in your shop. It’s the same system I use before every major project—and it ensures every cut you make starts with precision, not frustration.
Why Understanding These Beginner Table Saw Mistakes Matters More Than You Think
Most beginners focus entirely on technique and results, completely ignoring the foundation that makes everything else possible. I was no different.
Here’s what nobody tells you about beginner table saw mistakes: they’re not always obvious in the moment. You can follow a plan perfectly, measure carefully, and still end up with a ruined project because of one tiny oversight that seemed insignificant at the time.
The true cost of these mistakes isn’t just the wasted wood or time—it’s the loss of confidence that makes you hesitant to tackle your next project. I’ve seen talented woodworkers abandon their craft entirely after a string of “unexplained” failures.
But here’s the good news: every single mistake on this list is preventable with the right knowledge and a simple system. And that system starts with understanding exactly what goes wrong and why.
💡 Daniel’s Reality Check: I once spent $320 on exotic African mahogany for a dining table, only to discover my fence wasn’t parallel to the blade. The result? Every single piece was slightly tapered, and the entire project had to be scrapped. That single oversight cost me more than my entire first table saw.

Mistake #1: Assuming Your Saw Is Square Out of the Box
What’s wrong: Thinking that because your saw was “new from the factory,” it’s properly aligned and ready to use.
Why it happens: Most beginners trust the manufacturer’s quality control without verification. They don’t realize that shipping, handling, and even temperature changes can affect alignment.
The cost of this mistake:
- Cuts that are slightly off-square (even 0.5° creates visible gaps in joinery)
- Burning on one side of the cut but not the other
- Inconsistent results that make you question your skill
- Wasted time trying to “fix” cuts that were wrong from the start
The fix: Always perform a complete alignment check before your first use:
- Verify blade-to-miter slot alignment using the two-point method
- Check fence parallelism using the 5-cut method
- Ensure blade is perpendicular to the table surface
- Test with scrap wood before cutting project material
Pro tip: Even if your saw was professionally assembled at the store, always verify alignment yourself. Retail staff aren’t trained in precision woodworking setup.
Mistake #2: Using the Wrong Blade for the Job
What’s wrong: Using a combination blade for everything, or worse—keeping the stock blade that came with your saw for precision work.
Why it happens: Most beginners assume “a blade is a blade.” They don’t realize that different blades are engineered for specific tasks. That $29 combo blade might seem economical, but it’s actually a compromise that excels at nothing.
The cost of this mistake:
- Splintered cuts that require hours of sanding
- Burn marks from friction when cutting hardwoods
- Inaccurate cuts due to blade deflection
- Premature blade dulling from improper use
The fix: Match your blade to your project:
- Crosscutting: 60-80 tooth ATB (Alternate Top Bevel) blade
- Ripping: 24-30 tooth FTG (Flat Top Grind) blade
- General purpose: 40-50 tooth combination blade (only if you must have one blade)
Pro tip: Never use the stock blade that came with your saw for final cuts. Save it for rough dimensioning only. Invest in one quality blade for crosscutting—you’ll see an immediate difference in your results.
Mistake #3: Ignoring Blade Alignment with the Miter Slots
What’s wrong: Assuming your blade is perfectly parallel to your miter slots just because the saw was “new from the factory.”
Why it happens: Most beginners never check this critical alignment because they don’t know how—or worse, because they think it’s unchangeable.
The cost of this mistake:
- Cuts that are slightly off-square (even 0.5° creates visible gaps in joinery)
- Burning on one side of the cut but not the other
- Inconsistent results that make you question your skill
- Wasted time trying to “fix” cuts that were wrong from the start
The fix: Use the two-point measurement method:
- Raise your blade to full height
- Mark one tooth with a Sharpie
- Measure from the tooth to the miter slot at the front of the table
- Rotate the blade and measure the same tooth at the back of the table
- Adjust until both measurements are identical
Pro tip: Check this alignment monthly, or after any shop move. Temperature changes and vibration can shift your blade alignment over time.
⭐ “I spent months thinking I was bad at measuring because my joints never closed properly. After learning this simple alignment technique from Daniel’s guide, my projects went from frustrating to flawless overnight. That $50 blade investment was nothing compared to the $400 in ruined wood I saved.”
— Michael from Denver
Mistake #4: Skipping Test Cuts on Scrap Wood
What’s wrong: Cutting straight into your expensive project wood without testing your setup first.
Why it happens: Impatience. We get excited about our projects and want to see progress immediately. We convince ourselves that “this setup looks right” or “I’ve done this cut a hundred times.”
The cost of this mistake:
- One ruined $50 piece of walnut can destroy your entire project
- The emotional toll of having to start over after hours of work
- The tendency to “make it work” with poorly fitting pieces, compromising the entire project
- Wasted time sanding and forcing pieces together instead of building properly
The fix: The 3-Test Rule:
- Test #1: Cut on scrap wood with identical grain orientation
- Test #2: Assemble the test pieces to verify the joint works
- Test #3: Double-check measurements before cutting project wood
Pro tip: Keep a dedicated test board of the same species as your project wood. This lets you test cuts without wasting project material.
This simple habit saved me over $2,000 in my first year of serious woodworking. Now I never skip it—not even for “simple” cuts. For complete safety protocols that prevent costly mistakes, my table saw safety guide covers every scenario you might encounter.
Mistake #5: Improper Fence Setup and Calibration
What’s wrong: Assuming your fence is perfectly parallel to the blade just because it “looks straight.”
Why it happens: Fence alignment is subtle. A misalignment of just 0.005″ won’t be visible to the naked eye, but it will cause problems on longer cuts. Most beginners check alignment at the front of the fence but ignore the back.
The cost of this mistake:
- Tapered cuts where one end is wider than the other
- Binding during cuts that can cause dangerous kickback
- Inconsistent results that make assembly frustrating
- The need to force pieces together, causing stress on joints
The fix: The 5-Cut Method (simplified version):
- Cut a 6×6 test piece from scrap wood
- Make four cuts while rotating the piece 90° each time
- Make a fifth cut on the remaining tab
- Measure the thickness of this tab at both ends
- If measurements differ, adjust your fence by (difference ÷ 4) in the direction of the thicker measurement
Pro tip: Always lock your fence at both ends before cutting. Many fences have adjustment bolts at the rear that allow for micro-adjustments.
This is where many woodworkers get stuck—until they discover the complete system in The Table Saw Master’s Playbook. Chapter 1 walks you through fence calibration with photos, measurements, and troubleshooting for every common saw model. It’s the difference between guessing and knowing.
Mistake #6: Neglecting Safety Fundamentals in the Rush to Build
What’s wrong: Removing blade guards, using improper push sticks, or positioning your body incorrectly to “get the job done faster.”
Why it happens: Safety feels like an obstacle when you’re in a hurry. We think, “I’ll be careful this one time” or “It’s just a small piece—it won’t kick back.” The reality is that most table saw injuries happen during simple cuts on small pieces when safety is ignored.
The cost of this mistake:
- Injuries that can end your woodworking career permanently
- Projects abandoned mid-build due to accidents
- The psychological fear that develops after a close call, making you hesitant with your tools
- Costly medical bills and lost work time
The fix: The 4 Non-Negotiable Safety Rules:
- Always use the blade guard (unless absolutely impossible for the cut)
- Never reach over the blade—walk around the saw instead
- Use push sticks for pieces under 6 inches wide
- Stand to the side of the blade path, never directly behind the workpiece
Pro tip: Create a safety checklist and review it before every session. Post it where you can’t miss it—on your saw’s fence or your shop wall.
⭐ “After my first kickback incident (thankfully no injuries), I was terrified of my table saw. Daniel’s safety system transformed my relationship with the tool. Now I feel confident and in control. My projects have improved dramatically because I’m not fighting fear every time I turn on the saw.”
— Sarah from Portland
Mistake #7: Poor Dust Collection Setup
What’s wrong: Ignoring dust collection or using inadequate systems that don’t capture chips at the source.
Why it happens: Most beginners think dust collection is just about cleanliness. They don’t realize that poor dust collection affects cut quality, safety, and tool longevity.
The cost of this mistake:
- Reduced visibility during cutting operations
- Increased static electricity buildup (fire hazard)
- Premature tool wear from dust accumulation
- Health risks from airborne fine particles
The fix: Implement proper dust collection:
- Use a 4″ main trunk line with adequate CFM (minimum 350 CFM at tool)
- Position collection ports within 6 inches of the cutting action
- Use cyclone separators to extend filter life
- Add ambient air filtration for fine dust capture
Pro tip: Even a simple shop vacuum with a dust deputy cyclone can dramatically improve your workshop environment and cut quality.
Mistake #8: Incorrect Blade Height Settings
What’s wrong: Setting blade height too high or too low for the operation being performed.
Why it happens: Beginners often set blade height based on convenience rather than safety and cut quality principles.
The cost of this mistake:
- Increased kickback risk from excessive blade exposure
- Poor cut quality from insufficient blade engagement
- Premature blade dulling from improper cutting angles
- Safety hazards from exposed blade surfaces
The fix: Follow proper blade height guidelines:
- Ripping: Set blade so teeth extend 1/8″ to 1/4″ above the workpiece
- Crosscutting: Same guideline—minimal blade exposure
- Dado cuts: Set exact depth required for the groove
Pro tip: Always lower your blade below the table surface when not in use. This simple habit prevents accidental contact and keeps your blade protected.
Mistake #9: Using Worn or Damaged Push Sticks
What’s wrong: Using improvised push sticks made from scrap wood or damaged commercial push sticks.
Why it happens: Beginners often think any stick will work, not realizing that proper push sticks are designed for specific safety functions.
The cost of this mistake:
- Loss of control during feeding operations
- Hand slippage leading to potential injury
- Inconsistent feed pressure affecting cut quality
- Dangerous situations when push sticks break during use
The fix: Use proper push sticks designed for safety:
- L-shaped push sticks for general ripping operations
- Notched push sticks for better grip on workpieces
- Commercial push blocks with non-slip surfaces
- Featherboards for consistent pressure during routing
Pro tip: Always have multiple push sticks available in your shop. Replace them immediately when they show signs of wear or damage.
Mistake #10: Ignoring Wood Movement and Moisture Content
What’s wrong: Cutting wood without considering its moisture content and how it will move seasonally.
Why it happens: Beginners often treat wood as a static material, not realizing it constantly exchanges moisture with the surrounding environment.
The cost of this mistake:
- Projects that warp or crack after completion
- Joints that become loose or tight with seasonal changes
- Doors and drawers that stick or gap unpredictably
- Frustration when “perfect” projects fail over time
The fix: Understand and account for wood movement:
- Use a moisture meter to check wood before cutting (target 6-8% for indoor projects)
- Allow wood to acclimate to your shop environment for at least 72 hours
- Design projects with wood movement in mind (floating panels, etc.)
- Store finished projects in stable humidity environments
Pro tip: Keep a hygrometer in your shop to monitor humidity levels. Ideal workshop humidity is 35-45% for most woodworking projects.
Mistake #11: Poor Workshop Organization
What’s wrong: Working in cluttered, disorganized spaces that create safety hazards and reduce efficiency.
Why it happens: Beginners often focus so much on the actual woodworking that they neglect their workspace setup.
The cost of this mistake:
- Increased accident risk from tripping or reaching over obstacles
- Wasted time searching for tools and materials
- Reduced motivation to work in chaotic environments
- Poor project outcomes from rushed or compromised setups
The fix: Implement proper workshop organization:
- Create dedicated zones for cutting, assembly, and finishing
- Store frequently used tools at waist-to-shoulder height
- Keep floor areas clear for safe movement
- Use vertical storage to maximize space efficiency
Pro tip: Spend 5 minutes at the end of each session returning tools to their proper places. This simple habit prevents workshop chaos from building up over time.
Mistake #12: Lack of Regular Maintenance Schedule
What’s wrong: Only performing maintenance when problems arise, rather than preventing them through regular care.
Why it happens: Beginners often view maintenance as optional or time-consuming, not realizing it’s essential for precision and safety.
The cost of this mistake:
- Gradual degradation of cut quality over time
- Unexpected tool failures during critical projects
- Increased safety risks from worn components
- Shortened tool lifespan requiring premature replacement
The fix: Implement a regular maintenance schedule:
- Daily: Clean table surface, check blade sharpness, verify safety equipment
- Weekly: Check alignments, lubricate moving parts, inspect electrical connections
- Monthly: Deep clean internal components, replace filters, verify calibration
- Seasonally: Complete alignment verification, check for wear patterns, plan upgrades
Pro tip: Keep a maintenance log in your shop to track when services were performed and what needs attention next.
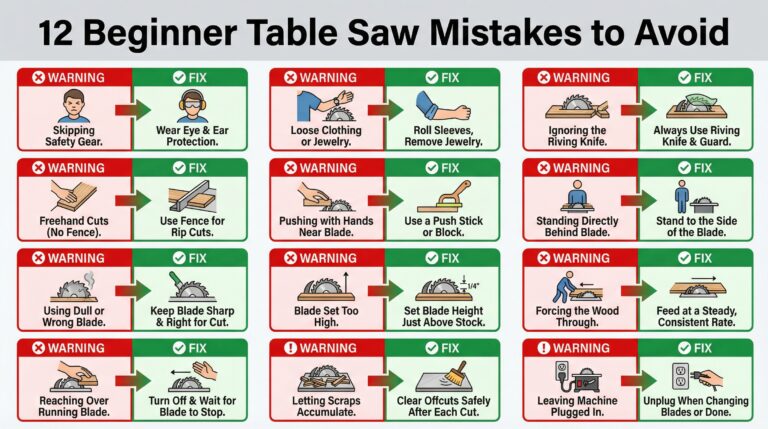
The 5-Point Pre-Cut Checklist (Your Mistake Prevention System)
These twelve mistakes create patterns that are completely preventable with a simple system. Before making any cut on your table saw, run through this checklist:
✅ Blade Check: Right blade for the job? Sharp? Properly installed?
✅ Alignment Check: Blade parallel to miter slots? Fence parallel to blade?
✅ Test Cut Check: Made on scrap wood first? Verified measurements?
✅ Setup Check: Fence locked? Blade height appropriate? Dust collection on?
✅ Safety Check: Blade guard in place? Push sticks ready? Body position correct?
✅ Alignment Check: Blade parallel to miter slots? Fence parallel to blade?
✅ Test Cut Check: Made on scrap wood first? Verified measurements?
✅ Setup Check: Fence locked? Blade height appropriate? Dust collection on?
✅ Safety Check: Blade guard in place? Push sticks ready? Body position correct?
This 90-second ritual has saved me thousands in wasted materials and prevented every serious accident I might have had. It’s the foundation of confident, precise woodworking.
How These Beginner Table Saw Mistakes Connect to Your Complete Workshop System
Understanding these twelve mistakes is just the beginning. The real transformation happens when you see how they fit into your entire woodworking process.
When you combine proper blade selection with perfect alignment, you create a foundation for precision that affects every project. When you add the discipline of test cuts and safety protocols, you build confidence that lets you tackle more ambitious projects.
This is why I created The Table Saw Master’s Playbook—because these individual fixes are powerful, but they’re even more powerful when part of a complete system. The Playbook doesn’t just tell you what to fix—it shows you exactly how to maintain perfect setup day after day, project after project.
The techniques you’ve learned today are exactly what Chapter 3 of the Playbook covers in even greater detail, with complete calibration procedures for every common table saw model. This isn’t just about avoiding mistakes—it’s about building a workshop where perfect cuts become your normal.
Frequently Asked Questions About Preventing Table Saw Mistakes
How often should I check my table saw alignment?
Ideally before every major project, but practically speaking, monthly checks will catch most issues. After moving your saw or significant temperature changes, always re-check alignment. Your table saw tune-up guide includes a simple 10-minute verification process you can use weekly.
Can I use the same blade for both ripping and crosscutting?
Technically yes, but practically no. Combination blades are compromises that don't excel at either task. For serious woodworking, dedicated ripping and crosscutting blades will transform your results. The small additional investment pays for itself in saved wood and frustration.
What's the most dangerous beginner table saw mistake?
Standing directly behind the workpiece during cutting is the most dangerous mistake. This puts you directly in the path of kickback, which can launch a piece of wood at 50+ mph. Always stand to the side of the blade path and use proper push sticks for small pieces.
Ready to Eliminate These Beginner Table Saw Mistakes?
Perfect beginner table saw mistakes to avoid prevention isn’t about having expensive tools or years of experience. It’s about building systems that make success automatic. When you know exactly what can go wrong and how to prevent it, every project becomes an opportunity for confidence instead of anxiety.
I used to dread table saw sessions because of that one ruined cutting board. Now, with these twelve fixes as my foundation, I actually look forward to turning on my saw. The difference isn’t better equipment—it’s better systems.
Remember that $45 cutting board that became expensive firewood? Last month, I built a complete dining set using the exact methods in this guide. Every joint closed perfectly. Every piece fit without forcing. Every cut was made with the confidence that comes from knowing I’d eliminated the mistakes that used to ruin my projects.
The Dead-Square Table Saw Masterclass
The real secret to perfect cuts isn’t luck—it’s system.
I’ve condensed years of trial-and-error into a complete, printable ebook that shows you exactly what to check and how to check it. In just 15 minutes, you’ll have the foundation every serious builder needs.
It’s the same guide I use in my shop every single week.
Download it today, print the pages you need, and keep it in your shop. By this weekend, you’ll see the difference.
Because you didn’t get into woodworking to fight your tools. You got into it to build something beautiful.
Let’s make sure your tools help—not hinder—that mission.