DIY Featherboard from Wood Scrap: 3 Configurations for Perfect Cuts
I still remember the first time I lost control of a workpiece on my table saw.
It was a simple rip cut on a 6-inch wide pine board, but as I fed it through, the board started to twist slightly away from the fence. Before I could react, the back edge caught the blade and launched the entire piece sideways like a wooden missile. It didn’t hit me—thankfully—but it shattered against my tool cabinet with a sound that still makes me wince.
That moment taught me a brutal lesson: consistent pressure against your fence isn’t optional—it’s essential for safety and precision.
Most beginners think featherboards are fancy accessories for advanced woodworkers. What I discovered is that they’re actually the simplest, most effective safety device you can build—and you can make one from scraps you already have in your shop.
If you’re tired of fighting your workpieces, worried about kickback, or just want cleaner, more consistent cuts—this guide is your solution. In under 30 minutes, you’ll have three featherboard configurations that work on your table saw, router table, and drill press.
Let’s turn your wood scrap into your best safety investment.
🎯 Stop. Get the Foundation First.
Before you start cutting your featherboard, understand this fundamental truth: proper safety setup prevents accidents before they happen.
I’ve created a FREE Ebook “Dead-Square Every Time” Table Saw Tune-Up that walks you through every critical alignment step in just 15 minutes.
Download it now, print it, and tape it to your saw. It’s the same checklist I use in my shop before every major project—and it ensures every piece you cut starts with precision and safety.
Why Your DIY Featherboard Is The Most Important Safety Tool You’ll Ever Build
Most woodworkers focus on expensive safety equipment while ignoring the simplest, most effective solution: consistent downward and inward pressure on your workpiece.
Here’s why DIY featherboard from wood scrap matters more than you think:
It prevents the #1 cause of table saw accidents
Kickback happens when your workpiece lifts off the table or moves away from the fence. A featherboard maintains constant pressure, eliminating the variables that cause dangerous situations.
It creates cleaner, more consistent cuts
When your workpiece stays flat against the table and tight against the fence, your cuts are cleaner and more accurate. No more tear-out from lifting or wandering cuts from fence gaps.
It costs absolutely nothing to build
Unlike expensive commercial featherboards, you can build three effective configurations from scrap wood you already have in your shop. Total cost: $0.
💡 Daniel’s Reality Check: I spent $45 on a fancy commercial featherboard that looked impressive but kept slipping on my fence. My $0 scrap wood version has been rock-solid for three years and works better than anything I’ve bought.

Essential Materials and Tools for Your DIY Featherboard
Materials Needed (Total Cost: $0)
For All Configurations:
- Hardwood scrap (maple, oak, or birch preferred) – Use what you have
- Wood glue – Already in your shop
- Sandpaper (120, 220 grit) – Standard shop supplies
Optional Upgrades:
- Brass screws for mounting – $3.99
- Rare earth magnets for quick attachment – $8.99
Tools Required (The Minimal Setup)
- Bandsaw or jigsaw (for cutting fingers)
- Drill/driver with small drill bits
- Clamps (2 minimum)
- Safety glasses and hearing protection
- Combination square (for alignment)
⭐ “I built my first featherboard from scrap maple I was going to throw away. It cost me nothing but 20 minutes, and it completely transformed my table saw safety. Now I never make a cut without it, and my cuts are cleaner than ever. Sometimes the best solutions are the simplest ones.”
— Mike from Boston
⭐ “As a weekend woodworker with limited shop time, I was intimidated by all the safety equipment I thought I needed. Daniel’s scrap wood featherboard gave me confidence to tackle projects I’d been avoiding. Last month, I built a complete dining set using this simple safety device, and every cut was perfect.”— Sarah from Portland
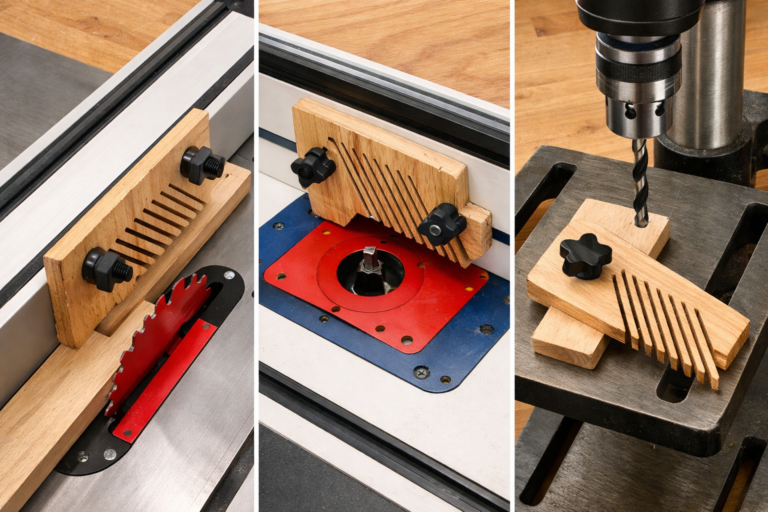
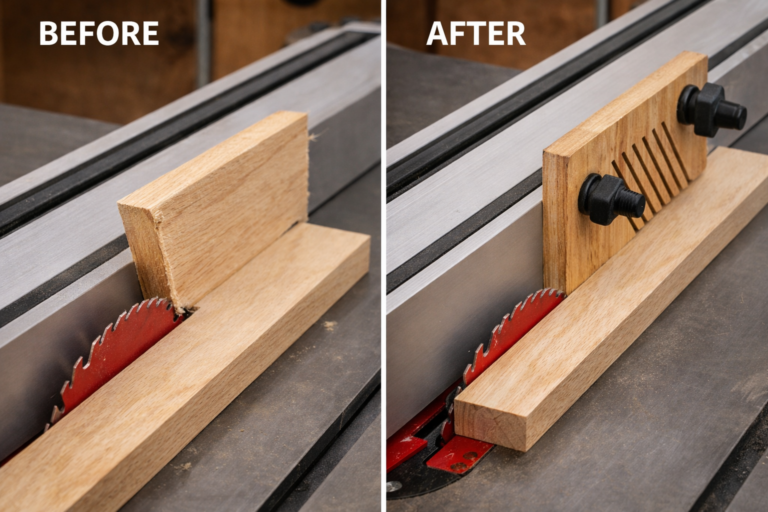
DIY Featherboard Configuration #1: Table Saw Fence Mount
This is your primary featherboard—the one you’ll use for 80% of your ripping operations.
Step-by-Step Build (15 minutes)
Step 1: Select Your Base Material
Choose a straight piece of hardwood scrap approximately 1″x3″x8″. The grain should run parallel to the length for maximum flexibility. Avoid warped or twisted pieces—they won’t provide consistent pressure.
Step 2: Cut the Pressure Fingers
Using your bandsaw or jigsaw, cut 6-8 fingers along one edge. Each finger should be:
- 1/4″ wide at the base
- 1/8″ wide at the tip
- 2″ long
- Spaced 1/4″ apart
The key is making the fingers flexible enough to apply pressure without breaking. Hardwood works best because it has the right spring tension—softwood tends to be too flexible and breaks easily.
Step 3: Create the Mounting Base
Cut a second piece of scrap 1″x2″x6″ to serve as your mounting base. This provides stability and prevents the featherboard from flexing during use. Glue this base perpendicular to your fingered piece.
Step 4: Assemble and Glue
Glue the fingered piece to the mounting base, ensuring the fingers extend beyond the base by 1/2″. Clamp and let dry for 30 minutes. Make sure the assembly is square—use a combination square to verify 90-degree angles.
Step 5: Add Mounting Hardware
Drill two holes through the mounting base for screws or add rare earth magnets for quick attachment to your fence. If using screws, countersink the holes so the screw heads don’t interfere with your workpiece.
Pro Tip: Angle the fingers slightly toward the fence (about 5 degrees) to create natural pressure as you feed your workpiece. This subtle angle makes feeding smoother and more consistent.
DIY Featherboard Configuration #2: Router Table Fence Mount
Router tables present unique challenges—your workpiece needs consistent pressure from above and behind the bit.
Step-by-Step Build (10 minutes)
Step 1: Choose Vertical Orientation
Select a taller piece of scrap (1″x2″x10″) to provide vertical pressure over your router bit. This configuration needs to be tall enough to clear your router bit while still applying downward pressure.
Step 2: Cut Dual-Finger Pattern
Create fingers on both the bottom edge (for table pressure) and the front edge (for fence pressure). This dual-action design keeps your workpiece stable in both directions. The bottom fingers should be shorter (1.5″ long) while the front fingers can be longer (2″ long).
Step 3: Add Height Adjustment
Drill elongated mounting holes so you can adjust the featherboard height based on your bit size and workpiece thickness. This flexibility allows you to use the same featherboard for different router bits and materials.
Step 4: Secure Mounting
Use T-track hardware if your router table fence has T-slots, or simple screws for solid fences. Make sure the mounting is secure—router vibrations can loosen hardware over time.
Critical Detail: Position the featherboard so it applies pressure just before the router bit—not directly over it. This prevents binding while maintaining control. The sweet spot is typically 1-2 inches before the bit.
DIY Featherboard Configuration #3: Drill Press Workpiece Holder
Drill presses are often overlooked for safety, but they present their own risks when drilling angled or small pieces.
Step-by-Step Build (5 minutes)
Step 1: Create a Simple Clamp Design
Cut a basic L-shaped piece from scrap wood (2″x2″x6″ with a 2″x2″ base). This creates a stable platform that holds your workpiece firmly against the drill press table.
Step 2: Add Single Pressure Point
Instead of multiple fingers, create one broad pressure pad that holds your workpiece firmly against the drill press table. This single-point design is more effective for drilling operations where you need consistent downward pressure.
Step 3: Incorporate Quick Release
Use a simple cam clamp or wing nut system that allows you to quickly secure and release workpieces. This is especially important when drilling multiple pieces—you don’t want to waste time with complex clamping systems.
Step 4: Add Non-Slip Surface
Glue sandpaper to the pressure pad to prevent your workpiece from sliding during drilling. This simple addition dramatically improves safety and accuracy.
Safety Insight: This configuration is especially valuable for drilling small or irregularly shaped pieces that are difficult to hold safely by hand. It eliminates the need to hold workpieces with your fingers near the drill bit.
Advanced Featherboard Techniques for Professional Results
Once you’ve mastered the basic configurations, these pro techniques will elevate your safety and precision even further:
The Magnetic Attachment System
Instead of drilling holes in your fence, embed rare earth magnets in your featherboard base. This allows for instant attachment and removal without damaging your fence. For fences without metal backing, attach a thin steel strip with double-sided tape. This system lets you swap featherboards in seconds for different operations.
The Adjustable Pressure Method
Different woods require different pressure levels. Create a simple screw adjustment system that lets you fine-tune the pressure based on your material. Softwoods need less pressure than hardwoods, and this system prevents crushing delicate pieces. Simply drill a hole through your mounting base and thread a machine screw with a knob—turning the knob adjusts the pressure.
The Multi-Angle Configuration
For complex projects requiring cuts at various angles, build a rotating base that allows your featherboard to pivot to any angle while maintaining consistent pressure. This is especially valuable for miter cuts and bevel work. Use a simple hinge mechanism with a locking bolt to secure the angle once you’ve positioned it correctly.
How This DIY Featherboard Fits Into Your Complete Workshop Safety System
Your featherboard isn’t just a standalone safety device—it’s the first piece of a comprehensive safety system that transforms your entire workshop.
When you combine this simple device with proper table saw safety protocols, you create a workspace where accidents become impossible rather than just unlikely. No more worrying about kickback. No more fighting your workpieces. Just clean, confident cuts every time.
This is exactly what Chapter 3 of The Table Saw Master’s Playbook covers in complete detail—how to build a comprehensive safety system that includes featherboards, push sticks, and other essential devices that work together to keep you safe while improving your results.
The techniques you’ve learned today are the foundation of everything we build. When your safety is dialed in, your creativity can flourish without fear.
Frequently Asked Questions About DIY Featherboards
Can I use softwood like pine for my featherboard?
How close should the featherboard be to the blade or bit?
Do I need special tools to cut the fingers?
How do I know if my featherboard is applying the right amount of pressure?
Ready to Build Your DIY Featherboard Today?
Perfect DIY featherboard from wood scrap isn’t about having expensive materials or fancy tools. It’s about understanding that the simplest solutions are often the most effective. When your workpiece stays flat and tight against your fence, everything becomes easier: cuts are cleaner, safety is guaranteed, and your confidence soars.
I used to dread rip cuts because of that one scary accident. Now, with my simple scrap wood featherboard as my foundation, I actually look forward to turning on my saw. The difference isn’t better equipment—it’s better safety habits.
Remember that wooden missile that shattered against my tool cabinet? Last month, I built a complete dining set using the exact featherboard configurations in this guide. Every cut was clean. Every piece stayed perfectly controlled. Every project was completed with the confidence that comes from knowing I’m protected.
The Dead-Square Every Time Table Saw Tune-Up Checklist
The real secret to safe, precise cuts isn’t luck—it’s system.
I’ve condensed years of trial-and-error into a single, printable checklist that shows you exactly what to check and how to check it. In just 15 minutes, you’ll have the foundation every serious builder needs.
It’s the same checklist I use in my shop every single week.
Download it today, print it out, and tape it to your shop wall. By this weekend, you’ll see the difference.
Because you didn’t get into woodworking to fight your tools. You got into it to build something beautiful.
Let’s make sure your tools help—not hinder—that mission.