You know that feeling?
You’re mid-project. You need your ¾” chisel. You know you had it last week. You dig through the bottom drawer. You check the shelf. You lift up piles of sandpaper. You mutter a few choice words under your breath.
And then — there it is. Buried under a stack of offcuts you swore you’d “sort later.”
Sound familiar?
I’ve been there. My second shop — the one in my basement — looked like a tornado hit a hardware store. Tools everywhere. Clamps tangled like Christmas lights. Drill bits rolling around in a coffee can.
It wasn’t just frustrating. It was expensive. I bought duplicate tools because I couldn’t find the originals. I ruined cuts because I grabbed the wrong bit in a hurry. I avoided going into the shop because… well, because it was a mess.
Then I did something radical.
I spent one weekend — just two days — building 5 simple DIY tool storage projects.
And it changed everything.
No more searching. No more frustration. No more “I’ll organize it later.”
Just a clean, calm, functional workshop where everything has its place — and you can actually find it.
That’s what I’m going to show you today.
These aren’t fancy, expensive builds. They’re simple, beginner-friendly projects you can knock out with scrap wood, basic tools, and a little elbow grease.
And the best part? You don’t need to do them all at once. Pick one. Build it this weekend. Feel the difference. Then tackle the next one.
Let’s turn your chaotic shop into a place you love to be.
Why DIY Tool Storage Beats Buying It (Every Time)
Before we jump into the projects, let’s talk about why building your own storage is the smartest move you can make.
First — it’s cheaper. A single wall organizer from the big box store can cost $80+. My version? Under $15 in materials (and that’s if you don’t use scrap).
Second — it’s customizable. Bought storage is one-size-fits-all. Yours should fit your tools, your space, and your workflow. Build it yourself, and you control every inch.
Third — it’s satisfying. There’s something deeply rewarding about building a home for your tools. It’s functional art. And every time you hang your chisel in its custom slot, you’ll feel a little burst of pride.
So if you’re tired of tripping over tool bags and digging through drawers… this is your weekend.
5 DIY Tool Storage Projects You Can Build in a Weekend
These projects are designed to solve your biggest storage headaches — fast. Each one includes a simple materials list, clear instructions, and tips to make it even better.
Let’s dive in.
1. The Wall-Mounted Drill & Driver Charging Station (Never Lose a Battery Again)
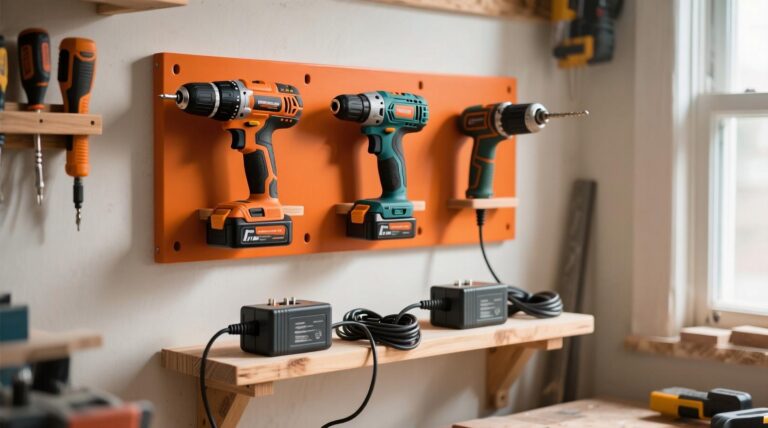
This was my first project — and honestly, it had the biggest impact.
The Problem: Drill batteries scattered everywhere. Drivers missing. Chargers buried under sawdust.
The Solution: A dedicated, wall-mounted station that holds your tools, charges your batteries, and keeps everything visible and accessible.
What You’ll Need:
- 1x ¾” plywood (12” x 24”)
- 2x French cleats (for easy mounting)
- 3x tool holsters (or make your own from scrap wood)
- 1x small shelf (for chargers)
- Wood glue, screws, sandpaper
- Optional: HMZ orange paint for the back panel (because why not?)
How to Build It:
- Cut your plywood to size.
- Attach French cleats to the back (so you can move it later if needed).
- Mount your tool holsters — space them so handles don’t bump.
- Add a small shelf below for chargers (leave space for cord routing).
- Sand, paint (optional), and mount it near your workbench.
Pro Tip: Label each holster with a Sharpie: “Impact Driver,” “Drill,” “Right-Angle Driver.” Takes 10 seconds and saves you 10 minutes every week.
🧑🔧 Daniel’s Story: I used to keep my drill and impact driver in a plastic tote. One day, I grabbed the wrong one mid-cut — ruined a $40 piece of walnut. That night, I built this station. Now, I never grab the wrong tool — and my chargers stay plugged in, so I’m never stranded mid-project.
2. The Simple Hand-Tool Wall Rack (See Everything at a Glance)
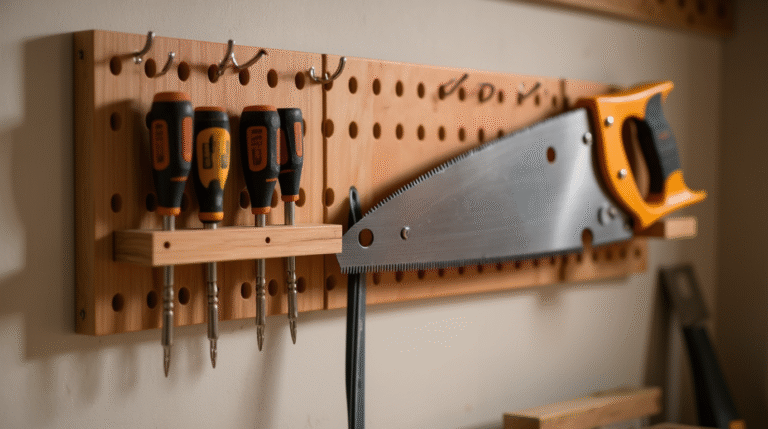
If your hand tools are buried in drawers, you’re not using them enough.
This simple wall rack puts your most-used tools front and center — so you actually reach for them.
What You’ll Need:
- 1x ¾” plywood panel (24” x 36”)
- French cleat for mounting
- Scrap wood for custom holders
- Small hooks, magnets, or routed slots (depending on the tool)
How to Build It:
- Mount the plywood panel using a French cleat.
- For chisels: Cut thin strips of wood, drill holes at an angle, and mount them in a row.
- For hand saws: Install simple J-hooks or routed slots.
- For clamps: Use angled dowels or routed grooves so they hang securely.
- Leave space to grow — you’ll want to add more holders later.
Common Mistake: Making slots too tight. Tools expand and contract with humidity. Leave a tiny bit of wiggle room.
🧑🔧 Daniel’s Story: I used to store my chisels in a roll-up case. One day, I grabbed the wrong size and nicked a perfect dovetail. I built this wall rack that weekend. Now, I see every tool at a glance — and I use them 3x more often.
3. Customizable French Cleat Bins & Holders (The Ultimate Flexible System)
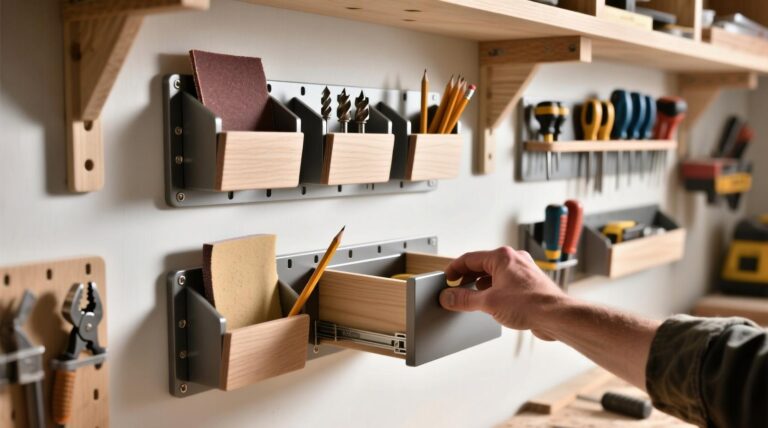
This is the project I told you to build this weekend. Why? Because it’s infinitely adaptable — and stupidly simple.
French cleats are magic. A 30-45 degree bevel on a strip of wood. Anything with a matching bevel locks right in — and can be moved in seconds.
What You’ll Need:
- ¾” plywood (for cleats and bins)
- Table saw or circular saw (to cut the bevel)
- Wood glue, screws
- Optional: Casters (if you want a mobile version)
How to Build It:
- Cut your wall cleats: 3” wide strips with a 30-degree bevel on top.
- Screw them to the wall, spaced 16” apart (like studs).
- For bins: Cut a matching bevel on the back top edge of any box or holder.
- Slide it onto the wall cleat — it locks in place.
- Build holders for sandpaper, router bits, pencils, clamps — whatever you need.
Pro Tip: Paint the back of your bins a bright color (again, HMZ orange works great). It makes them pop against the wall and looks pro.
🧑🔧 Daniel’s Story: I built my first French cleat system thinking I’d only use it for clamps. Within a month, I had bins for sandpaper, router bits, safety glasses, even my coffee mug. When I moved shops, I just unhooked everything and rehung it in the new space. Total lifesaver.
4. The Rolling Scrap Wood Cart (Tame the Offcut Chaos)
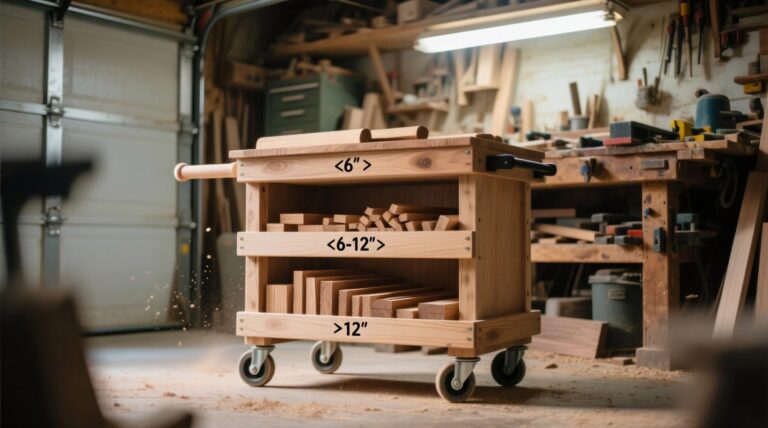
This one’s for the perfectionists — and the tool lovers.
A magnetic bar keeps your most-used precision tools within arm’s reach — and looks damn good doing it.
What You’ll Need:
- 1x hardwood board (1” x 4” x 24”)
- Rare earth magnets (or a pre-made magnetic knife bar)
- French cleat or keyhole hangers
- Finish of your choice (I use tung oil for a natural look)
How to Build It:
- Sand and finish your board.
- Embed rare earth magnets in routed holes — or simply mount a magnetic knife bar to the front.
- Mount it vertically near your workbench.
- Hang your chisels, squares, marking knives, and layout tools.
Safety Tip: Keep magnets away from mechanical watches or digital calipers. Strong magnets can mess with their internals.
🧑🔧 Daniel’s Story: I used to keep my chisels in a drawer. One day, I grabbed a dull one by mistake and ruined a glue-up. I mounted this magnetic bar right above my bench. Now, I see every tool, grab the right one instantly, and my chisels stay sharp because they’re not banging around in a drawer.
5. The Magnetic Tool Bar for Chisels & Squares (Elegant & Instant Access)
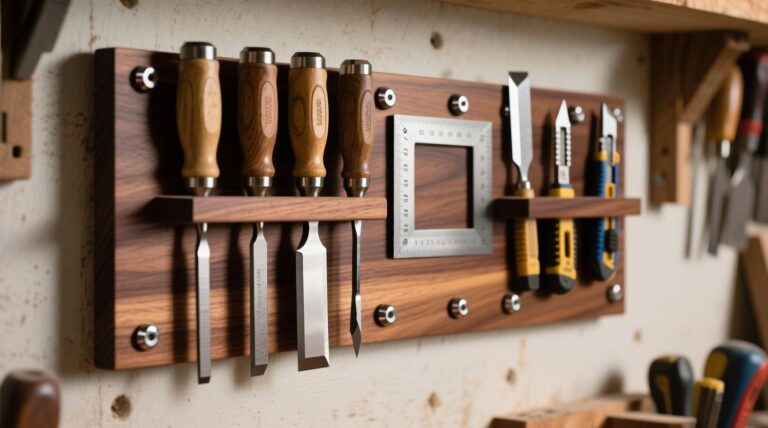
This one’s for the perfectionists — and the tool lovers.
A magnetic bar keeps your most-used precision tools within arm’s reach — and looks damn good doing it.
What You’ll Need:
- 1x hardwood board (1” x 4” x 24”)
- Rare earth magnets (or a pre-made magnetic knife bar)
- French cleat or keyhole hangers
- Finish of your choice (I use tung oil for a natural look)
How to Build It:
- Sand and finish your board.
- Embed rare earth magnets in routed holes — or simply mount a magnetic knife bar to the front.
- Mount it vertically near your workbench.
- Hang your chisels, squares, marking knives, and layout tools.
Safety Tip: Keep magnets away from mechanical watches or digital calipers. Strong magnets can mess with their internals.
🧑🔧 Daniel’s Story: I used to keep my chisels in a drawer. One day, I grabbed a dull one by mistake and ruined a glue-up. I mounted this magnetic bar right above my bench. Now, I see every tool, grab the right one instantly, and my chisels stay sharp because they’re not banging around in a drawer.
How This Solves Your Biggest Workshop Questions
Let’s answer the real questions you came here with — naturally, as you read.
❓ “How can I design vertical storage for a tiny workshop?”
→ Use French cleats. They’re thin, strong, and let you hang bins, tools, or shelves without eating floor space. Build them from ¾” plywood — takes 20 minutes.
❓ “What pegboard layout works best for mixed hand tools?”
→ Skip pegboard. It’s flimsy and holes strip out. Use French cleats with custom holders — way stronger, and you can move things without re-drilling.
❓ “Tips to prevent lost fasteners and small parts in workshops?”
→ Build labeled bins on your French cleat wall. One for screws, one for nails, one for sandpaper. If it’s small and gets lost — give it a home on the wall.
❓ “Best compact solutions for power tool storage and charging?”
→ The wall-mounted charging station (Project #1). Holds tools, charges batteries, keeps cords tidy. Mount it near your bench — takes up zero floor space.
❓ “How to create labeled zones to speed up tool retrieval?”
→ Label everything. Use a Sharpie on holsters, shelves, bins. “Drill,” “<6” scraps,” “1/4” bits.” Takes seconds. Saves minutes every day.
❓ “Budget-friendly shelving and workbench plans to build?”
→ All these projects use scrap wood and basic hardware. Total cost per project: under $25. No fancy joinery needed — screws and glue work fine.
❓ “Best mobile storage solutions for small workshops?”
→ Put it on wheels. The scrap cart (Project #4) and mobile tool bases (from our previous Blog Post ) let you clear your floor in seconds. Locking casters are a must.
Common Mistakes to Avoid When Building DIY Tool Storage
Even simple projects can go sideways if you’re not careful. Avoid these common pitfalls:
❌ Building for “someday.” Only build storage for tools you actually own and use. Don’t waste space (or time) on hypothetical future tools.
❌ Making it too complicated. You don’t need dovetails or fancy joinery. Use screws, glue, and simple butt joints. Function over form — always.
❌ Forgetting about weight. A full scrap cart or tool rack is heavy. Use strong wall anchors, thick plywood, and locking casters.
❌ Ignoring ergonomics. Store frequently used tools between waist and eye level. Don’t make yourself bend or stretch constantly.
❌ Not leaving room to grow. Your tool collection will expand. Build modular systems (like French cleats) that let you add, move, or remove holders easily.
Wrapping It Up: Your Workshop, Your Rules
You don’t need a fancy, Instagram-perfect shop to build beautiful things.
You just need a space that works for you — not against you.
These 5 DIY tool storage projects are your starting point. Pick one. Build it this weekend. Feel the difference.
Then come back for the next one.
Because an organized shop isn’t just about neatness — it’s about flow. It’s about spending less time searching and more time creating.
It’s about walking into your shop and feeling calm, focused, and ready to build.
That’s the real win.
🛠️ Ready to Build? Start With a Tuned-Up Table Saw.
No matter how clever your storage is, if your table saw isn’t running perfectly, you’re setting yourself up for frustration.
That’s why I created the free Table Saw Tune-Up Checklist — a simple, 15-minute guide to calibrating your saw for dead-on accuracy, smoother cuts, and safer operation.
It’s the first step to a better shop — and better projects.
Let’s build something great,
— Daniel
HMZ Woodz