Router table setup for beginners doesn’t have to be intimidating. At HMZ Woodz, we’ve helped countless woodworkers master router table setup for beginners and transform their dusty routers into precision cutting machines. The key to successful router table setup for beginners is understanding that proper preparation makes all the difference between frustrating failures and clean, professional results.
That is why we created The Essential Router Bit Guide, which provides the foundational knowledge on bit types, critical speed management, and a complete mastery checklist to ensure your setup is perfect every time. By following non-negotiable safety protocols and maintaining your bits properly, you can move from intimidation to true craftsmanship.

Once you master router table setup for beginners techniques, this tool becomes absolutely essential for dados, edge profiles, and joinery that looks factory-perfect. Router table setup for beginners takes just 30 minutes to learn properly when you follow the right steps.
Why Flip Your Router Upside Down? The Magic of Router Tables
Okay, so you might be wondering why we’d want to flip our handheld router upside down and mount it under a table. Fair question! When I explain router table tips to newcomers, I always start here because understanding the “why” makes the “how” so much easier.
Understanding why you’d mount a router upside down makes the whole setup process clearer. When using a handheld router, you’re trying to guide this powerful spinning tool across your workpiece while maintaining perfect control. Not exactly beginner-friendly.
Flip that router upside down and mount it in a table, and suddenly you control the process. The router stays put, you guide the wood. It’s like having a stationary machine instead of wrestling with a handheld tool.
The difference shows immediately in your cuts. Handheld routing often results in uneven profiles and shaky lines. Router table work produces consistent, smooth cuts every time. That’s why proper router table setup for beginners is worth mastering – it turns difficult cuts into repeatable processes.
Essential Router Table Setup Steps: Getting It Right From the Start
Alright, let’s dive into the meat and potatoes of router table setup for beginners. I’m going to walk you through each step like we’re standing right there in your shop together. Trust me, by the end of this, you’ll be wondering why you waited so long to master this setup.
Step 1: Proper Height Adjustment – The Foundation of Everything
The first thing to tackle in router table setup for beginners is getting that bit height exactly right. Router table setup for beginners requires precision here because this affects safety, accuracy, and prevents waste on expensive wood.
Here’s my foolproof method that I’ve been using for years: Always, and I mean ALWAYS, start with your router unplugged when making height adjustments. I learned this the hard way when I accidentally bumped the power switch during setup. Let’s just say my shop wall still has a very artistic gouge in it as a reminder.
Start by installing your bit finger-tight only. Don’t crank down on that collet yet – we’re just getting things positioned. Now, most router lifts have a height adjustment wheel or crank. Turn it slowly and watch that bit come up through the table insert.
The key router table tip here is to use a setup block or ruler to get consistent heights. I keep a set of aluminum setup bars right next to my router table for exactly this purpose. Need a 1/4-inch rabbet? Grab the 1/4-inch bar, set the bit height to match, and you’re golden.
Once you’ve got the height where you want it, NOW you can tighten that collet properly. But here’s a router safety tip that’ll save you some grief – always use the proper wrenches, and don’t over-tighten. I’ve seen folks crank down so hard they actually deformed the collet, and then wonder why their bits keep coming loose.
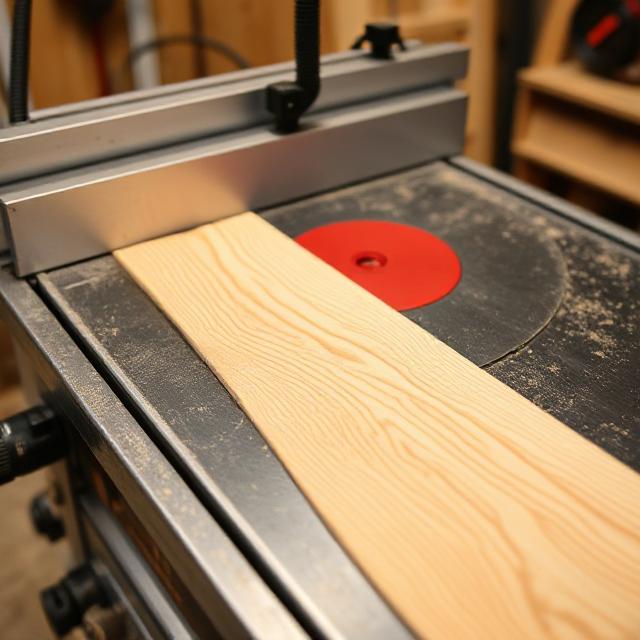
Step 2: Fence Alignment – Your Guide to Straight Cuts
Now we’re getting to the part that separates the pros from the weekend warriors – fence alignment. Poor fence setup is responsible for more wonky cuts than any other factor in router table setup for beginners, and I see this mistake constantly.
Your fence needs to be perfectly parallel to the miter slot (if your table has one) or to the edge of your table. I use a simple method that works every time: Take a long straightedge – I use a 4-foot aluminum ruler – and place it against your fence. Now slide it along the entire length of the fence, checking for gaps.
If you see light under that straightedge anywhere along the fence, you’ve got alignment issues. Most aftermarket fences have adjustment screws or bolts that let you tweak this. Take your time here, because a fence that’s even 1/32-inch out of parallel will give you cuts that get progressively worse as you move along the board.
Here’s one of my favorite router table tips for checking fence alignment: Take a piece of scrap wood and make a test cut. If the wood burns or binds partway through the cut, your fence probably isn’t parallel. The bit should cut smoothly from start to finish without the wood fighting you.
Step 3: Safety Features Check – Because All Your Fingers Are Important
Router safety isn’t optional when working with tools that spin at 20,000+ RPM. These router safety checks need to become routine for every router table setup for beginners session.
First, check your table insert. It should sit flush with the tabletop – not proud, not recessed. A table insert that’s even slightly high will catch your workpiece, and one that’s too low creates a dangerous gap that can grab your wood and send it flying.
Next, make sure your router is properly mounted and secure. Give the whole setup a gentle shake. Nothing should move. I once had a student whose router came loose mid-cut, and let me tell you, that’s not a sound you ever want to hear in your shop.
Your fence should have a dust port if possible. Router work creates a LOT of fine dust, and proper dust collection isn’t just about keeping your shop clean – it’s about being able to see what you’re cutting. Plus, your lungs will thank you later.
Always, ALWAYS have proper safety gear within arm’s reach. Safety glasses are non-negotiable, and ear protection is highly recommended. These tools are loud, and your hearing is irreplaceable. I also keep a push stick and featherboard handy for every router table setup for beginners session.
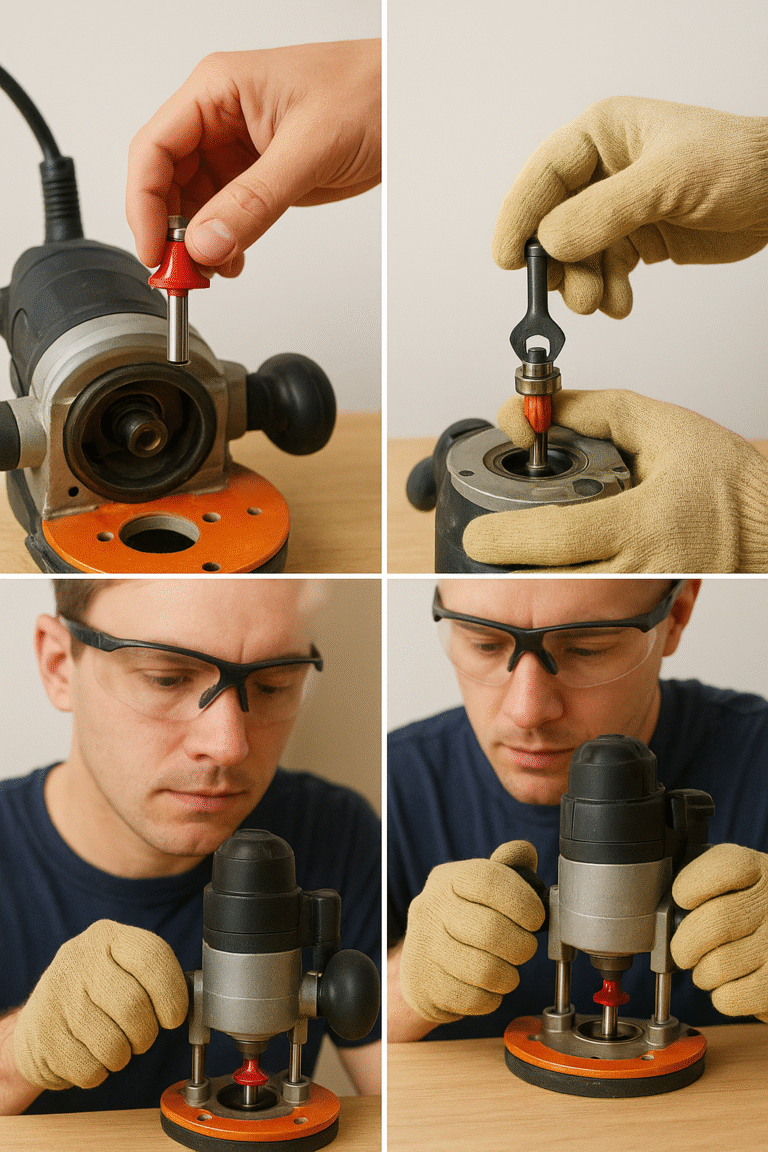
Step 4: Bit Installation – The Right Way Every Time
Now let’s talk about installing bits properly, because this is where I see a lot of folks get into trouble. Router bits are precision tools, and they deserve to be treated that way.
First rule of bit installation: Always unplug your router. I don’t care if you’re just swapping bits quickly – unplug it. This isn’t paranoia; it’s common sense. I’ve seen too many close calls from folks who thought they could beat the odds.
When inserting the bit, make sure it goes all the way into the collet, then back it out just about 1/16-inch. This prevents the bit from bottoming out and gives the collet something to grab onto. A bit that’s not properly seated can work loose during operation, and that’s a recipe for disaster.
Here’s a router safety tip that could save your project: Always check your bit for damage before installing it. Look for chips in the cutting edges, bent shanks, or buildup of pitch and resin. A damaged bit won’t just cut poorly – it can be dangerous.
When tightening the collet, use the proper wrenches and get it snug, but don’t over-tighten. The collet is designed to grip with specific force, and cranking it down beyond spec can actually make it less secure, not more.
Your First Three Cuts: Building Confidence One Pass at a Time
Alright, now comes the fun part! Let’s make some actual cuts and build your confidence with the router table setup for beginners process. I always recommend starting with these three basic cuts because they teach you the fundamental skills you’ll use for everything else.
Cut #1: Simple Edge Profile
For your first cut, we’re going to create a simple roundover on the edge of a board. This is perfect for router table setup for beginners because it’s forgiving, useful, and builds confidence quickly.
Grab a piece of scrap pine or poplar – nothing fancy or expensive for your first attempts. Install a 1/4-inch roundover bit and set the height so about half the bit is above the table surface.
Position your fence so there’s just a tiny gap between it and the bearing on the bit – maybe 1/32-inch. This setup will let you take a light cut and get comfortable with the feel of feeding wood past the bit.
Start your router and let it come up to full speed before making contact with the wood. Feed the wood from right to left (against the bit rotation), keeping steady pressure against both the table and the fence. Don’t rush it – let the bit do the work.
I remember my first roundover – I was so nervous I was barely touching the wood to the bit. The result looked like a mouse had been nibbling on the edge! Don’t be afraid to maintain contact with the bit, but don’t force it either. You’ll find your rhythm after a few passes.
Cut #2: Basic Rabbet
Once you’re comfortable with that roundover, let’s step up to a rabbet. This cut teaches you to work without a bearing-guided bit and really understand fence positioning.
Install a straight bit – 1/2-inch works well for this. Set the bit height to about 1/4-inch above the table. Now position your fence so you’ll cut a 1/4-inch rabbet (1/4-inch deep, 1/4-inch wide).
Here’s where router table tips really matter: Use a sacrificial fence face for this cut. Clamp a piece of scrap wood to your fence, and position it so the bit will cut slightly into it. This prevents tear-out and gives you a zero-clearance cut.
Make your pass the same way – right to left, steady pressure against table and fence. The difference here is that you’ll feel more resistance because you’re removing more material. This is normal, just don’t force it.
Cut #3: Simple Dado
For your third cut, let’s make a dado – a groove across the grain. This introduces you to using the miter gauge with your router table setup for beginners.
Keep that same 1/2-inch straight bit, but raise it to about 3/8-inch high. Position your fence about 1-inch from the bit (we’ll use the miter gauge to control the cut, not the fence).
Place your workpiece against the miter gauge and slide it slowly past the bit. The key here is to keep the wood tight against the miter gauge throughout the entire cut. Any rocking or shifting will give you a sloppy dado.
These three cuts cover the basics: bearing-guided profiles, fence-guided cuts, and miter gauge work. Master these, and you’ll have the foundation for 90% of router table work.
Router Safety Protocol: The Rules That Keep You Whole
Now that you’ve made some cuts, let’s talk about the router safety rules that should become second nature. These aren’t suggestions – they’re requirements if you want to keep all ten fingers and enjoy woodworking for years to come.
Router safety rule #1: Never start a cut with the router already touching the wood. Always start the router, let it reach full speed, then bring the wood to the bit. Starting with contact can cause dangerous grabbing.
Router safety rule #2: Always feed against the bit rotation. On a router table, this means right to left when standing at the fence. Feed with the rotation, and the bit can grab your wood and pull your hands toward the cutter.
Rule #3: Keep your hands at least 4 inches from the bit at all times. Use push sticks, featherboards, or other safety devices to maintain this distance. I keep a collection of push sticks right at my router table for exactly this reason.
Rule #4: Never attempt to cut freehand on a router table without proper support or guidance. Every cut should either be guided by the fence, a template, or a bearing on the bit. Trying to guide cuts by eye alone is asking for trouble.
I learned this lesson early in my woodworking journey when I tried to “just quickly clean up” a small piece without proper setup. The bit grabbed the wood, spun it like a propeller, and left me with bruised knuckles and a healthy respect for router safety.
Rule #5: Always unplug the router when changing bits or making adjustments. This seems obvious, but you’d be surprised how many “quick adjustments” happen with the router still plugged in. Don’t risk it.
Maintenance Tips: Keeping Your Setup Running Smooth
A well-maintained setup will serve for decades. These router table tips for maintenance prevent constant headaches down the road.
Keep your table clean and waxed. A smooth table surface lets your wood glide easily and prevents burning. I use paste wax on my table top every few months, and it makes a huge difference in how smoothly cuts feed.
Check your collet regularly for wear. Collets are wear items, and a worn collet won’t hold bits securely. If you notice bits slipping or difficulty getting bits seated properly, it might be time for a new collet.
Keep your bits sharp and clean. Dull bits don’t just cut poorly – they’re dangerous. They require more force to feed, which increases the chance of losing control. I clean my bits with oven cleaner and a brass brush after every few uses.
Lubricate your router lift mechanism if you have one. Most lifts have grease fittings or need occasional oil on the threaded rod. Check your manual for specifics, but don’t let things get dry and stiff.
Finally, periodically check all your setup for square and parallel. Tables can shift, fences can get bumped, and nothing stays perfectly aligned forever. I do a complete setup check every few months to make sure everything’s still true.
Common Beginner Mistakes: Learn From These Errors
These router table tips can save serious frustration. The most frequent router table setup for beginners errors include taking cuts too heavy, poor workpiece support, and incorrect fence positioning.
Mistake #1: Taking too heavy a cut on the first pass. I get it – you want to get the job done quickly. But router bits work best with multiple light passes rather than one heavy cut. Heavy cuts cause tear-out, burning, and can overload your router.
Mistake #2: Not supporting long pieces properly. A 4-foot board hanging off your table will want to tip down as it exits the cut. Use outfeed supports or have a helper support the far end. I learned this when a beautiful cabinet door went flying across my shop because I didn’t provide proper support.
Mistake #3: Forgetting to account for bit changes when setting fence position. Different diameter bits require different fence positions, even for the same cut depth. Always double-check your setup when changing bits.
Mistake #4: Not using proper dust collection. Router work creates incredibly fine dust that gets everywhere. Without good dust collection, you can’t see your cut line, your shop becomes a mess, and you’re breathing stuff you shouldn’t. Invest in good dust collection – your lungs and your spouse will thank you.
Troubleshooting Your Router Table Setup
Even with perfect router table setup for beginners techniques, sometimes things don’t go as planned. Here are the most common issues and how to fix them:
Burning or scorch marks on your cuts: This usually means you’re feeding too slowly or your bit is dull. Try feeding faster (while maintaining control) or replace/sharpen your bit. Also check that your fence is parallel – a misaligned fence can cause binding and burning.
Tear-out on the exit end of cuts: Use a backer board behind your workpiece to support the fibers as the bit exits. For profile cuts, you can also climb cut the last inch or so (feeding with the bit rotation instead of against it), but do this very carefully with light cuts only.
Cuts that aren’t consistent depth: Check your table insert – if it’s not perfectly flush, it can cause variations in cut depth. Also verify that your workpiece is staying flat against the table throughout the cut.
Router bogging down or stalling: You’re probably taking too heavy a cut. Back off the depth and make multiple passes. Also check that your bit is sharp – dull bits require much more power.
Advanced Router Table Tips for Growing Skills
Once you’ve mastered basic router table setup for beginners, here are some router table tips to take your skills to the next level:
Learn to use templates and pattern bits. This opens up a world of curved cuts and complex profiles that would be impossible to do freehand. I use templates for everything from cabinet door arcs to custom molding profiles.
Invest in a good router lift if you don’t have one. Being able to adjust bit height from above the table without removing the router makes setup so much faster and more accurate.
Consider a router table box joint jig. Box joints cut on a router table are incredibly strong and look fantastic. It’s a great way to step up your joinery game.
Learn to use your router table for joinery, not just profiles. Dados, grooves, tenons, and even dovetail sockets can all be cut on a router table with the right setup.
Taking Care of Your Investment
Your router and router table represent a significant investment in your woodworking future. Here’s how to protect that investment:
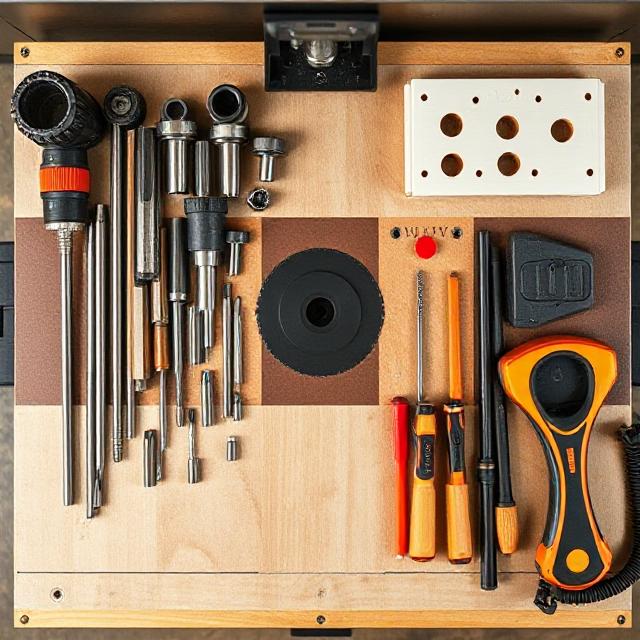
Store bits properly in a bit organizer, not loose in a drawer where they can bang against each other. I use a wooden bit holder that keeps each bit separate and protected.
Clean your router regularly, especially the collet area where dust and debris can accumulate. A clean router runs cooler and more smoothly.
Check motor brushes periodically if you have a brushed motor. Worn brushes reduce power and can damage the motor if left too long.
Keep spare parts on hand – collets, template guides, and wrenches have a way of disappearing when you need them most.
Building Your Router Bit Collection
As your skills grow, you’ll want to expand your bit collection. Here’s my recommended progression for router table setup for beginners:
Start with the basics: 1/4″ and 1/2″ straight bits, 1/4″ roundover, 45-degree chamfer, and a rabbeting bit. These five bits will handle 80% of common router table tasks.
Add profile bits gradually based on your projects. Roman ogee, cove, and beading bits are popular choices for decorative work.
Invest in quality bits from reputable manufacturers. Cheap bits don’t hold edges well and can be dangerous. I’d rather have five excellent bits than twenty mediocre ones.
Consider bit sets carefully – they seem like good value, but you may never use half the bits. Buy individual bits as you need them instead.
Your Next Steps: Continuing the Journey
Congratulations! You now understand the fundamentals of router table setup for beginners. But learning doesn’t stop here – woodworking is a lifelong journey of discovery and improvement.
Practice these techniques on scrap wood until they become second nature. Muscle memory is crucial for safe and accurate router work.
Start simple projects that use your new skills. A picture frame with rounded edges or a small box with rabbeted corners are great first projects.
Join online woodworking communities where you can share your successes and learn from others’ experiences. The woodworking community is incredibly supportive of beginners.
Consider taking a local woodworking class to get hands-on instruction and feedback on your technique.
Most importantly, be patient with yourself. Every expert was once a beginner, and every mistake is a learning opportunity. I still make mistakes after fifteen years – the difference is now I know how to fix them!
Wrapping Up: From Scary to Essential
Remember when I told you that your router doesn’t have to be the scary tool in your shop? I hope by now you’re starting to believe that. With proper router table setup for beginners techniques, good router safety habits, and a little practice, your router table can become one of your most-used and trusted tools.
The key is starting with proper fundamentals – the techniques we’ve covered today – and building your skills gradually. Don’t try to master everything at once. Focus on getting these basics down solid, and more advanced techniques will come naturally.
Your woodworking journey is unique to you. Some folks dive deep into hand tools, others embrace every power tool they can find. There’s no wrong path as long as you’re enjoying the process and staying safe.
I’ve been privileged to help thousands of woodworkers over the years, from complete beginners to folks with decades of experience. The one thing they all have in common? They started with a single cut, just like the ones we’ve practiced today.
So fire up that router, make some cuts, and start building the confidence that comes with mastering new skills. Before you know it, you’ll be the one helping other beginners discover that router tables aren’t scary at all – they’re just incredibly useful tools waiting to help you create something beautiful.
Ready to master all your woodworking tools with precision? Get our FREE Table Saw Tune-Up Checklist and discover how to keep your most important tools running like new. This comprehensive checklist covers everything from blade alignment to fence calibration – the same techniques we use at HMZ Woodz to ensure perfect cuts every time. Download your free checklist now and take your woodworking accuracy to the next level!