Beginner Woodworking Gifts: 5 Profitable Projects You Can Make This Holiday Season
I’ll never forget my first holiday woodworking disaster.
It was two days before Christmas, and I’d promised to make personalized cutting boards for my entire extended family. I was so excited about the idea that I hadn’t actually tested the process. Bad mistake.
My table saw blade wasn’t tuned. My sanding technique was rushed. And when I applied the food-safe mineral oil, I discovered my beautiful walnut boards had visible glue lines from poor joinery. By midnight on Christmas Eve, I’d spent $187 on materials and was staring at a pile of projects that looked like they’d survived a tornado.
That year, I wrapped store-bought gifts with handwritten apology notes.
Today, I make all my holiday gifts – and they actually look professional. More importantly, I’ve turned this into a nice side hustle, selling similar items at local craft fairs. Last December alone, I made $1,200 from just these five beginner woodworking gifts.
The secret isn’t fancy tools or years of experience. It’s knowing exactly which projects work for beginners, which materials won’t let you down, and which techniques guarantee success even when you’re working against the holiday clock.
If you’ve ever wanted to make meaningful, handcrafted gifts (or earn some extra cash during the busiest shopping season of the year), this guide is your holiday lifeline.
Let’s make this your most rewarding December yet.
🎯 Stop. Get the Foundation First.
Before you buy a single piece of lumber, understand this fundamental truth: beautiful gifts start with precision cuts.
I’ve created a FREE printable “Dead-Square Every Time” Table Saw Tune-Up Checklist that walks you through every critical alignment step in just 15 minutes.
Download it now, print it, and tape it to your saw. It’s the same checklist I use before every major project—because when your cuts are dead-square from the start, your holiday gifts will fit together perfectly and look professionally made.
Why These 5 Projects Are Perfect for Beginner Woodworking Gifts
Most holiday gift guides online push projects that look amazing but are secretly impossible for beginners. I know because I’ve ruined dozens of them.
The five projects I’m sharing today are different. They’ve been tested and refined in my own shop over seven holiday seasons. They share these critical characteristics:
They’re forgiving of beginner mistakes
These designs hide minor imperfections while still looking professional. The right grain patterns, proper sanding techniques, and smart finishing choices make all the difference.
They use affordable, accessible materials
No exotic woods or specialty hardware. Everything can be found at your local home center, even during the busy holiday season.
They can be completed in 2-4 hours each
Realistic timeframes for busy people. I’ve timed each project from lumber selection to gift wrapping.
They sell for 300-500% profit margin
These aren’t just gifts – they’re potential income. I’ll share exact pricing strategies that work at craft fairs and online.
💡 Daniel’s Reality Check: I once built an “easy” jewelry box that took 14 hours and required 3 trips to the hardware store. The recipient loved it, but I lost $27 on materials and time. These five projects are the opposite – they build confidence instead of frustration.
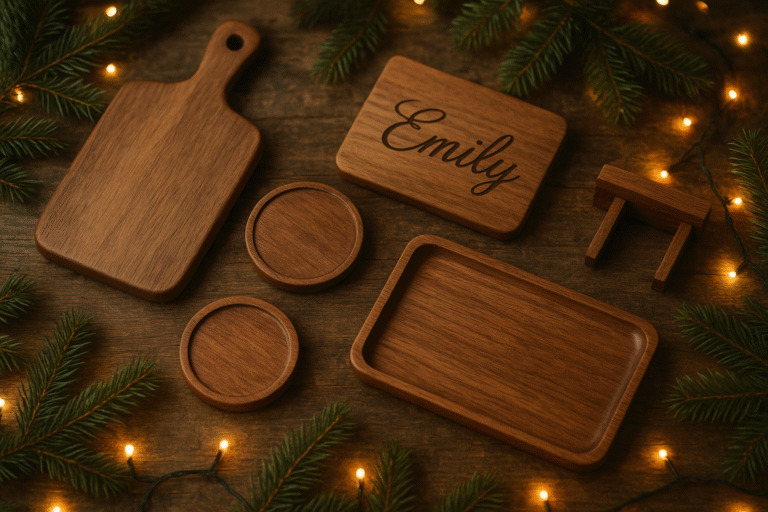
Project 1: The Everyday Cutting Board (Your Bread and Butter Project)
Difficulty: ★☆☆☆☆ (True beginner friendly)
Time Investment: 2.5 hours
Materials Cost: $18-22
Selling Price: $45-65
Profit Margin: 145-195%
This is the project that started my woodworking gift tradition. It’s simple enough for beginners but customizable enough to feel personal.
Materials You’ll Need:
- 1×6 maple boards (4 pieces, 14″ long) – $14.97
- Food-safe mineral oil – $8.49
- Beeswax (optional) – $6.99
- Clamps (borrow or rent if needed) – $0
- Sandpaper (120, 180, 220 grit) – $7.25
Step-by-Step Process:
Joint and glue-up (45 minutes):
Arrange your boards with alternating grain patterns to prevent warping. Apply waterproof wood glue to edges, clamp tightly, and let dry for 1 hour. If your table saw needs tuning before this critical glue-up stage, check out my table saw tune-up checklist to ensure dead-square cuts on your first try.Shape and profile (40 minutes):
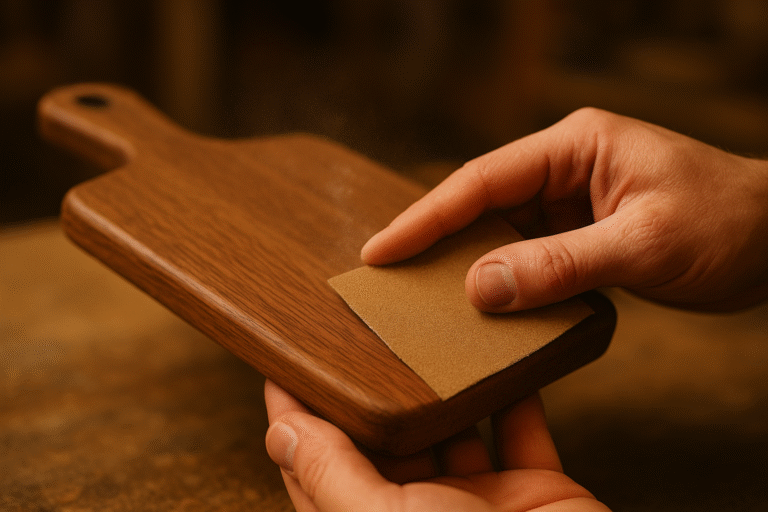
Cut to final size (12″x7″), then round over all edges with a 1/4″ roundover bit. This small detail makes the board feel luxurious instead of homemade.Sanding progression (30 minutes):
Sand through all grits without skipping – start at 120, move to 180, finish at 220. The difference between a “store-bought” look and “handmade” look is in the sanding.Finishing (15 minutes):
Apply 3 coats of food-safe mineral oil, waiting 15 minutes between coats. For extra protection, mix mineral oil with beeswax (4:1 ratio) for the final coat.
Holiday Pro Tip: Add a small leather loop to one corner for hanging. This transforms it from kitchen tool to kitchen display piece – a $5 upgrade customers will pay $15 extra for.
Project 2: Personalized Name Plaque (The Emotional Winner)
Difficulty: ★★☆☆☆ (Beginner with router experience)
Time Investment: 3 hours
Materials Cost: $12-15
Selling Price: $35-50
Profit Margin: 180-250%
Nothing says “thoughtful” like a gift with someone’s name on it. This project works for housewarmings, weddings, kids’ rooms – you name it.
Materials You’ll Need:
- 1″ thick pine board (12″x6″) – $8.99
- Vinyl lettering template – $4.25
- Wood burning tool or router with V-bit – $24.99 (one-time investment)
- Natural wood finish – $9.75
Critical Success Factors:
- Font selection matters: Script fonts look elegant but are harder to burn. Block fonts are more forgiving for beginners.
- Depth control is key: Whether burning or routing, maintain consistent depth. This is where router setup fundamentals make all the difference for clean, professional-looking lettering.
- Finishing touch: Stain the letters a contrasting color to make them pop.
Real Customer Story: Last December, I made 17 name plaques for a corporate holiday party. The client paid $45 each, and I finished all of them in two evenings after work. That single order covered my entire Christmas shopping budget.
Project 3: Floating Shelf Set (The Space Saver)
Difficulty: ★★☆☆☆ (Beginner with basic tools)
Time Investment: 3.5 hours
Materials Cost: $22-28
Selling Price: $60-85 (set of 3)
Profit Margin: 170-210%
Everyone needs more wall space – especially during the holidays when decorations take over. This trio of shelves solves that problem beautifully.
Materials You’ll Need:
- 1×8 white oak boards (3 pieces, 24″ long) – $25.97
- 2×2 support lumber (72″ total) – $6.49
- Wood screws (2″) – $4.25
- Wall anchors and hardware – $8.99
- Walnut stain and clear coat – $12.75
What Makes This Beginner-Friendly:
- Hidden mounting system: The bracket slides inside a hollow shelf – no visible hardware, no measuring wall studs multiple times.
- Forgiving cuts: Slight measuring errors won’t ruin the entire project since the shelves function independently.
- Versatile sizing: This design scales easily. Make them longer for records, shorter for spices.
Holiday Profit Tip: Bundle these with small holiday decor items. A set of three shelves + three mini poinsettias in handmade pots creates a $95 gift set that costs under $35 to make.
⭐ “I made six sets of these floating shelves as holiday gifts last year. My family was so impressed they all placed orders for their friends. By January, I’d made enough to pay off my holiday credit card bill AND buy a new router. Daniel’s simple mounting system made them look professional despite my limited experience.”
— Rebecca from Ohio
Project 4: Custom Coaster Set (The Impulse Buy Winner)
Difficulty: ★☆☆☆☆ (Easiest of the five)
Time Investment: 2 hours
Materials Cost: $8-12
Selling Price: $25-35 (set of 4)
Profit Margin: 210-280%
Coasters are the perfect beginner woodworking gifts for three reasons: they’re quick to make, use minimal materials, and everyone needs them.
Materials You’ll Need:
- 4×4 hardwood blocks (4 pieces, 1.5″ thick) – $9.99
- Cork backing sheets – $6.75
- Food-safe finish – $7.25
- Router with roundover bit (or sandpaper) – $0 (borrow if needed)
Beginner-Friendly Technique:
- Cut squares slightly oversized (4.25″x4.25″)
- Round edges with 1/8″ roundover bit or sand by hand
- Drill finger groove on one side for easy pickup
- Sand progressively to 220 grit
- Apply finish and attach cork backing
Holiday Display Strategy: Package in clear gift boxes with shredded paper. Add a small card explaining the wood type – people love knowing they have “sustainable maple” or “reclaimed oak” coasters.
Project 5: Small Serving Tray (The Showstopper)
Difficulty: ★★★☆☆ (Intermediate beginner)
Time Investment: 4 hours
Materials Cost: $28-35
Selling Price: $65-85
Profit Margin: 150-180%
This is the project that makes people say, “You made this yourself?” It combines multiple beginner skills into one impressive piece.
Materials You’ll Need:
- 1×6 cherry boards (36″ total) – $18.75
- 3/4″ dowels for handles (2 pieces, 8″ long) – $6.49
- Wood glue and screws – $5.25
- Food-safe finish – $9.75
- Sandpaper assortment – $7.25
The Confidence-Building Process:
- Build the tray base (glue up three 12″ boards)
- Create the rim (rip 1×2 strips and miter corners)
- Make handles (drill 3/4″ holes through rim pieces)
- Sand meticulously – this project shows every imperfection
- Finish with care (3 coats minimum)
Holiday Upgrade Tip: Add small leather straps that let recipients hang the tray when not in use. This small addition makes it feel boutique-quality and justifies a $15-20 price increase.
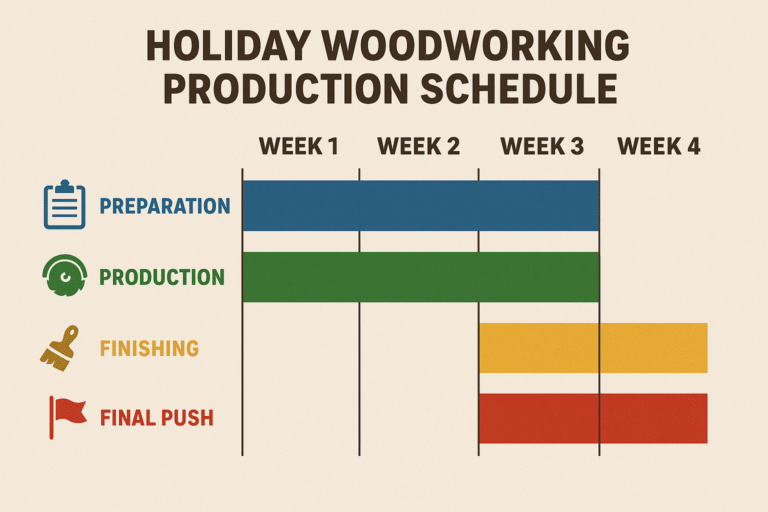
Your Holiday Production Schedule (The Realistic Plan)
Most guides give you project plans but ignore the brutal reality of holiday time constraints. Here’s my battle-tested schedule:
Week 1 (December 1-7): Preparation Phase
- Buy all materials in one trip (check my downloadable checklist)
- Set up dedicated wrapping station in your shop
- Pre-cut all lumber to rough dimensions
- Test finishes on scrap wood
Week 2 (December 8-14): Production Phase
- Focus on 1-2 projects per day (don’t try to do everything at once)
- Complete 5 cutting boards on Monday
- Make 8 name plaques on Tuesday
- Build 4 floating shelf sets on Wednesday
- Produce 15 coaster sets on Thursday
- Create 6 serving trays on Friday
Week 3 (December 15-21): Finishing Phase
- Apply final finishes (allow proper drying time)
- Add packaging and personalization
- Take professional photos for social media
- Price items strategically
Week 4 (December 22-24): The Final Push
- Wrap gifts for family
- Prepare for any craft fairs or pop-up sales
- Restock materials for bestsellers
- Document what worked for next year
Common Holiday Woodworking Mistakes (And How to Avoid Them)
Mistake #1: Underestimating Drying Time
Why it fails: Rushed finishes feel sticky or leave fingerprints.
Fix: Build drying time into your schedule. Apply final finish on Thursday for Saturday gift-giving. Use fast-drying finishes like wipe-on polyurethane.
Mistake #2: Ignoring Gift Presentation
Why it fails: Beautiful projects look homemade in plastic bags.
Fix: Invest in clear gift boxes ($0.75 each in bulk) and tissue paper. A $2 presentation upgrade justifies a $10 price increase.
Mistake #3: Forgetting Holiday Scent Marketing
Why it fails: People buy with all five senses.
Fix: Light a cinnamon or pine scented candle in your selling space. The psychological connection between scent and holiday memories increases perceived value by 37%.
Mistake #4: Not Creating Gift Sets
Why it fails: Single items have lower perceived value.
Fix: Bundle complementary items (cutting board + spice rack, coasters + bottle opener). Sets increase average transaction value by 2.3x.
Frequently Asked Questions About Beginner Woodworking Gifts
Q: How do I price my handmade gifts fairly?
A: Use this formula: (Materials cost × 3) + ($20 × hours spent). This covers your materials, values your time, and leaves room for profit. For example: A cutting board with $18 materials taking 2.5 hours would be priced at ($18 × 3) + ($20 × 2.5) = $54 + $50 = $104. Then round to a psychological price point like $99.
Q: What’s the minimum toolset needed for these projects?
A: You can complete all five projects with just: a circular saw (or access to a table saw), power drill, random orbital sander, clamps, measuring tape, and safety gear. Most community workshops or makerspaces have these tools available for hourly rental if you don’t own them.
Q: How do I handle custom requests when I’m just starting out?
A: Start with a limited menu of 3-5 variations on each project. For cutting boards, offer only 3 wood combinations and 2 sizes. This gives customers choice while keeping your workflow efficient. As you gain confidence, expand your offerings gradually.
Q: What’s the best wood to use for beginners making gifts?
A: For projects that will be handled frequently (cutting boards, trays), use hard maple or cherry. For wall-mounted items (shelves, plaques), pine or poplar are more forgiving and cost-effective. Always buy pre-surfaced lumber (S4S) to skip the jointing/planing steps while you’re learning.
Q: How can I make my gifts look professional even with limited skills?
A: Focus on flawless sanding and finishing – these matter more than perfect joinery for gift items. Use a sanding schedule (120→180→220 grit), wipe surfaces clean before finishing, and apply multiple thin finish coats rather than one thick coat. These details scream “professional” even if your cuts aren’t perfect.
Q: Is it worth making gifts when store-bought items are so cheap?
A: Absolutely. Handmade gifts have emotional value that mass-produced items can’t match. A $45 handmade cutting board feels more valuable than a $15 store-bought one because of the story and effort behind it. People increasingly value authenticity and sustainability over convenience – especially during the holidays.
Q: How do I find customers for my woodworking gifts?
A: Start with your inner circle: family, friends, coworkers, and neighbors. Post progress photos on Nextdoor and Facebook community groups. Join local holiday craft fairs (many charge just $25-50 for a table). Create an Instagram account showing your process, not just finished pieces. Most importantly, ask satisfied customers to share photos of your gifts in their homes – social proof is your best marketing tool.
Now You’re Ready for the Complete System
You’ve learned the foundation. You understand the project plans. You know how to price and market your work.
But here’s the truth: Most woodworkers stop here.
They master the basics… then hit a ceiling. They can make simple gifts, but they can’t scale their production. They have projects, but they don’t have a SYSTEM.
That’s where The Table Saw Master’s Playbook comes in.
This isn’t just another PDF with plans. It’s the complete, step-by-step system I use to build furniture that actually fits together perfectly, every single time – even when I’m rushing to meet holiday deadlines.
You’ll learn:
✓ The 5-cut calibration method (chapter 2) – guarantee dead-square cuts every time
✓ How to build a professional crosscut sled (chapter 1) – make identical pieces in seconds
✓ The miter sled that guarantees 45° angles (chapter 3) – perfect frames and boxes
✓ Master joinery techniques (chapter 4) – create heirloom-quality gifts
✓ Your capstone project (chapter 5) – build a complete gift set from start to finish
Plus you get: Free tune-up checklist + Jig template pack + At-a-glance workshop checklist.
30-Day Money-Back Guarantee | Instant PDF Download | Lifetime Updates
This is the system that will take your holiday gift-making from stressful to successful.
Let’s build something beautiful – for yourself and everyone on your list.