How to Build a Crosscut Sled for Your Table Saw: The Step-by-Step Guide That Guarantees Dead-Square Cuts
I still remember the shame of presenting my first serious woodworking project to my father-in-law. I’d spent three weekends building a beautiful cherry bookshelf, but when he assembled it, the shelves wouldn’t sit flush. Gaps that I’d tried to hide with excessive glue and clamping pressure were obvious to everyone.
“You have good design sense,” he said diplomatically, “but your cuts aren’t square.”
That moment haunted me. I measured twice and cut once—I followed all the rules. What I didn’t understand was that my table saw’s miter gauge—the flimsy metal thing that came with the saw—wasn’t capable of making truly square cuts. The slots were worn, the gauge itself wobbled, and my projects suffered for it.
Everything changed the day I built my first crosscut sled. It wasn’t fancy—just some plywood and a couple of hardwood runners—but it transformed my workshop overnight. Suddenly, my mitered frames closed perfectly. My box joints fit without forcing. And that bookshelf? I rebuilt it last month using this exact sled, and when my father-in-law assembled it this time, he simply nodded and said, “Now that’s craftsmanship.”
If you’re tired of forcing pieces together, wasting expensive lumber on inaccurate cuts, or avoiding projects that require precision joinery—you need a proper crosscut sled. Not the wobbly factory miter gauge. Not some expensive store-bought version that costs more than your saw. A real, shop-built sled that cuts dead-square every single time.
This isn’t just another woodworking project—it’s the foundation of everything you’ll ever build. Let’s get you set up with the exact system I use in my own shop.
🎯 Stop. Get the Foundation First.
Before you buy a single piece of lumber for your sled, understand this fundamental truth: perfect crosscuts start with a dead-square table saw.
I’ve created a FREE printable “Crosscut Sled Measurement Templates” that includes exact dimensions for every component, plus calibration marks and hardware placement guides.
Download it now, print it at full size, and tape it to your workbench. It’s the same templates I use when building sleds for my students—and it eliminates the measuring mistakes that ruin precision.
Why Your Crosscut Sled Is The Most Important Jig In Your Shop
Most beginners focus on fancy tools and expensive blades, completely missing the foundation of precision woodworking: a properly built crosscut sled.
Here’s why this matters more than you think:
It eliminates the #1 cause of project failure
Worn miter slots and sloppy factory gauges create cumulative errors that compound through every project. A well-built sled rides in both miter slots simultaneously, eliminating side-to-side play that ruins accuracy.
It transforms dangerous cuts into safe operations
Crosscutting small pieces with a miter gauge is terrifying—you have to balance the workpiece while keeping your hands away from the blade. A proper sled gives you full support and keeps your hands safely behind the fence.
It’s the gateway to advanced joinery
Once you master basic crosscuts, your sled becomes the foundation for tenons, half-laps, box joints, and more. It’s not just a sled—it’s your precision workshop companion.
💡 Daniel’s Reality Check: I once wasted $200 in exotic wood on a project that failed because of inaccurate miter cuts. After building my first proper sled using the method below, I completed the same project in two weekends with zero material waste. That’s the ROI of precision.
Essential Materials and Tools for Your Crosscut Sled
Materials Needed (Total Cost: $65-85)
For the Sled Base:
- 1/2″ Baltic birch plywood (24″x30″) – $38.99
(Available at Woodcraft or Rockler—don’t substitute MDF or particle board) - 3/4″ maple hardwood (2 pieces, 3″x36″) for fences – $24.75
- 3/4″ maple hardwood (2 pieces, 3/4″x24″) for runners – $18.50
For Hardware:
- 1-1/4″ pocket hole screws (25 pack) – $8.99
- 2″ brass-plated wood screws (12 pack) – $6.49
- T-track (18″ length) – $15.99
- Stop block kit (optional but recommended) – $22.50
For Finishing:
- Paste wax – $7.99
- Sandpaper (120, 180, 220 grit) – $6.25
Tools Required (The Minimal Setup)
- Drill/driver with pocket hole jig (Kreg Jig K3 recommended)
- Combination square (Starrett or equivalent quality)
- Digital calipers or precision ruler
- Clamps (4 minimum)
- Safety glasses and hearing protection
- Table saw with freshly tuned blade (use my table saw tune-up guide first)
⭐ “I built my first sled following Daniel’s instructions and was shocked at the difference. My mitered frames that used to have visible gaps now close perfectly without clamps. The investment in quality plywood and hardwood runners was worth every penny—my sled has survived three years of heavy shop use and still cuts dead-on square.”
— Mike from Boston
⭐ “As a woman in a male-dominated hobby, I was intimidated by table saw work until I built this sled. The detailed measurements and calibration method gave me confidence to tackle projects I’d been avoiding. Last month, I built a complete dining set using this sled for all my crosscuts. The precision it delivers is game-changing.”— Sarah from Portland
How to Build a Crosscut Sled: 8 Steps to Perfect Accuracy
Step 1: Prepare Your Base (15 minutes)
Start with your 1/2″ Baltic birch plywood. Cut to 24″x30″ using your table saw’s rip fence. Don’t worry about perfect squareness yet—we’ll achieve that through the calibration process.
Critical detail: Sand the bottom surface completely smooth with 220 grit paper. Any roughness here will cause binding during use.
Step 2: Install the Runners (25 minutes)
This is where most sleds fail—poor runner fit. Your runners must be precisely the width of your miter slots.
- Measure your miter slots at three points using digital calipers
- Mill your maple runners to exactly 0.001″ wider than your narrowest measurement
- Test fit in slots—they should slide smoothly but without any wiggle
- Position runners parallel to the sled edges using a drafting square
- Drill pilot holes and attach with 1-1/4″ pocket hole screws from underneath
Pro tip: Apply a thin coat of paste wax to the runners before final installation. This reduces friction and prevents binding during temperature changes.
Step 3: Build the Front Fence (20 minutes)
The front fence provides structural stability and supports your workpieces.
- Cut your 3/4″ maple to 3″x24″
- Sand one edge perfectly straight using a jointer or hand plane
- Position 2″ from the front edge of your sled base
- Clamp in place and verify 90 degrees to the runners with your combination square
- Secure from underneath with pocket hole screws (6 minimum)
Why this matters: This fence doesn’t guide cuts—it provides rigidity. A solid front fence prevents the sled from flexing during use.
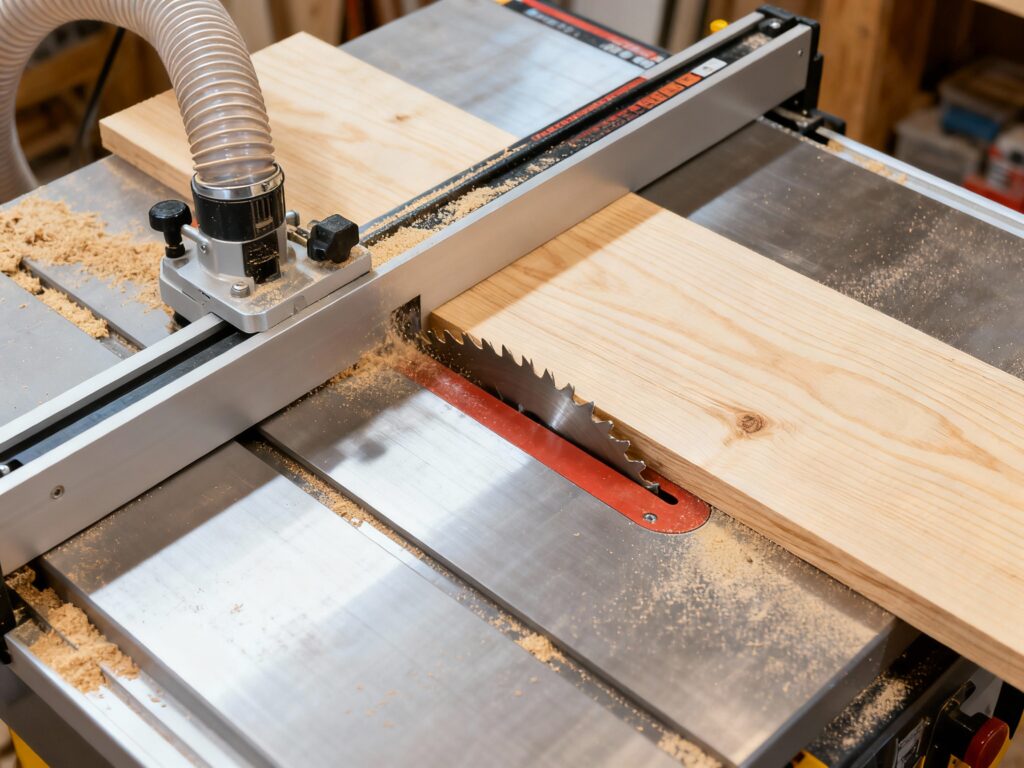
Step 4: Cut the Kerf (10 minutes)
This is the moment that defines your sled’s accuracy.
- Unplug your table saw
- Position sled on saw, aligning runners with miter slots
- Plug in saw and slowly push sled forward until the blade barely scores the base
- Unplug saw and draw a line exactly along this score mark
- Replug saw and complete the cut following your line
Critical technique: This first cut must go about 2/3 through the base material. Save the cutoff piece—we’ll use it in Step 7.
Step 5: Build the Rear Fence (30 minutes)
This is your primary cutting guide—everything depends on this being perfectly square.
- Cut your second 3/4″ maple piece to 3″x24″
- Sand one edge perfectly straight
- Position behind the kerf line, leaving 1/8″ gap for blade clearance
- Clamp in place temporarily—DO NOT attach permanently yet
- We’ll calibrate this fence using the 5-cut method in Step 6
Material note: The height of your rear fence (3″) is intentional—it provides stability while allowing good visibility of the cut line. Shorter fences wobble; taller ones block your view.
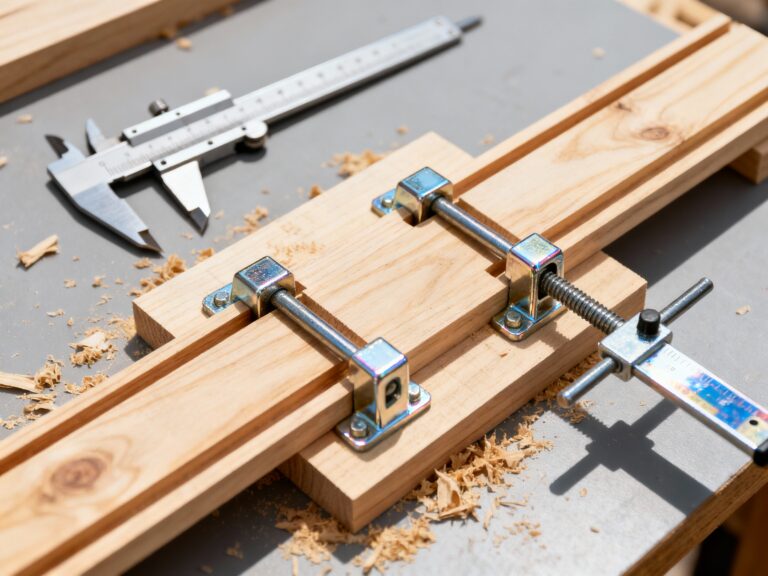
Step 6: The 5-Cut Calibration Method (40 minutes)
This isn’t theory—it’s the exact method professional cabinet shops use to guarantee perfect accuracy.
- Cut a 6″x6″ test piece from scrap wood
- Make first cut along one edge
- Rotate piece 90 degrees clockwise and make second cut
- Repeat two more times for cuts 3 and 4
- Make final cut (cut #5) on the remaining tab
- Measure thickness of this final tab at both ends
The magic formula:
If measurements differ by X inches, move your rear fence by (X ÷ 4) inches in the direction of the thicker measurement.
Why this works: This method multiplies tiny errors by 4, making them measurable with basic tools. What might be a 0.001″ error becomes a 0.004″ difference—easily detectable.
Step 7: Final Fence Attachment (15 minutes)
Once calibrated, permanently attach your rear fence:
- Drill clearance holes through the fence into the sled base
- Use brass-plated screws to avoid corrosion
- Apply wood glue to the joint for maximum stability
- Clamp and let cure for 2 hours before use
Pro detail: Save that cutoff piece from Step 4. Attach it to the back of your sled as a dust shield—it catches chips and protects your hands during operation.
Step 8: Add T-Track and Accessories (20 minutes)
This transforms your basic sled into a precision workshop system:
- Route or dado a channel 1/2″ deep across the sled front
- Install T-track with machine screws from underneath
- Add a stop block with threaded knob for repeatable cuts
- Create a zero-clearance insert for tear-out prevention
These additions might seem optional, but they’re what separate a “good enough” sled from a professional-grade tool. For advanced accessory ideas, my essential table saw jigs guide includes 12 specialized sled attachments that solve 90% of common problems.
Troubleshooting Common Crosscut Sled Problems
My sled binds in the miter slots during use.
Cuts are consistently off by about 1/32".
Tear-out on the exit side of cuts.
My sled rocks slightly on the table.
The blade guard won't clear my sled.
Advanced Techniques for Professional Results
Once you’ve mastered the basic sled build, these pro techniques will elevate your precision even further:
The Seasonal Adjustment System
Wood expands and contracts with humidity changes. Install your rear fence with elongated holes rather than round ones. This allows you to micro-adjust fence position throughout the year without rebuilding the entire sled. Mark your summer and winter positions with permanent marker for quick reference.
The Dust Collection Integration
Drill 1-1/4″ holes through the sled base behind the blade area. Connect a flexible hose to these holes using rubber grommets. This pulls sawdust away from your cut line, improving visibility and preventing buildup that affects accuracy.
The Sacrificial Top System
Instead of replacing your entire sled when the top gets damaged, build it with a replaceable sacrificial surface. Attach a 1/4″ plywood top layer with countersunk screws. When this surface becomes too damaged, simply replace it without rebuilding the entire sled.
How This Crosscut Sled Fits Into Your Complete Workshop System
Your crosscut sled isn’t just a standalone tool—it’s the first piece of a precision woodworking system that transforms your entire workshop.
When you combine this sled with proper workshop organization strategies, you create a space where every tool has a purpose and every cut serves your vision. No more hunting for jigs buried under sawdust. No more guessing at measurements because you can’t find your square. Just clean, efficient workflow from start to finish.
The real magic happens when you pair this sled with a properly tuned table saw. When both elements work together, you achieve results that rival professional cabinet shops. This is why I teach the complete system in The Table Saw Master’s Playbook—because precision isn’t about individual tools, it’s about how they work together to create something greater than the sum of their parts.
Ready to Transform Your Small Workshop?
Creating a functional woodworking space in a small area isn’t about having the most tools or the biggest budget. It’s about working smarter with what you have.
I’ve seen 8×10 foot closets transformed into productive shops and 2-car garages turned into woodworking paradises—all with systems far more sophisticated than expensive cabinetry.
The difference between a frustrating workspace and an inspiring one isn’t square footage—it’s thoughtful design based on how you actually work.
To make sure your saw is perfectly calibrated before starting, grab our free Tune-Up Checklist here:
Download it today, print it out, and tape it to your shop wall. By this weekend, you’ll see the difference.
Because you didn’t get into woodworking to fight your space. You got into it to build something beautiful.
Let’s make sure your workshop helps—not hinders—that mission.