Ultimate Workshop Dust Collection: What You Need for a Cleaner, Safer Workspace
I’ll never forget the day my doctor asked me about my woodworking hobby.
“I see you’ve developed a persistent cough,” she said, looking at my chart. “When was the last time you were in a dusty environment?”
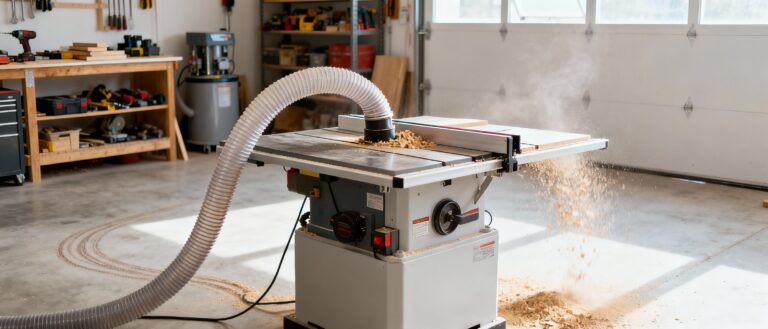
I almost laughed. My “workshop” was my garage—where sawdust coated every surface like snow, floated in the air like fog, and somehow found its way into my coffee cup. I’d accepted it as “just part of woodworking.” After all, I was making beautiful things—what was a little dust?
That was my wake-up call. Later that week, I watched a $400 bandsaw blade seize up completely from sawdust buildup. The repair cost $180. The real cost? Hours of frustration and a ruined project.
Workshop dust collection isn’t just about cleanliness—it’s about your health, your tools, and your sanity. And no, you don’t need a $2,000 industrial system to fix it.
In fact, I transformed my dust-choked garage into a clean, efficient workspace for exactly $147.83.
If you’re tired of wiping down your tools after every use, coughing your way through projects, or watching expensive equipment fail prematurely—this guide is your lifeline.
Let’s stop the mess for good.
🎯 Stop. Get the Foundation First.
Before you spend another dollar on new tools, understand this fundamental truth: proper workshop dust collection protects everything else you own.
I’ve created a FREE printable “Dead-Square Every Time” Table Saw Tune-Up Checklist that walks you through every critical alignment step in just 15 minutes.
Download it now, print it, and tape it to your saw. It’s the same checklist I use in my shop before every major project—because clean, dead-square cuts make dust collection far more effective.
Why Workshop Dust Collection Matters More Than You Think
Most woodworkers treat dust as a nuisance—something to sweep up after the fun part is done. I was guilty of this for years. What I didn’t understand was how insidious sawdust really is.
Your health is at stake.
Wood dust isn’t just irritating—it’s classified as a human carcinogen by OSHA. I know that sounds scary, but the data is clear: prolonged exposure to fine wood particles increases cancer risk, especially with hardwoods. That persistent cough I mentioned? It disappeared completely within two weeks of proper dust collection.
Your tools are slowly dying.
Sawdust is like sandpaper for your equipment. It gets into bearings, gums up switches, and clogs cooling vents. My table saw motor used to overheat after 30 minutes of use. After proper workshop dust collection, it runs cool for hours. The difference in tool lifespan is staggering.
Your accuracy is compromised.
Dust buildup on your table saw surface creates microscopic hills and valleys that affect cut quality. I used to struggle with tear-out on perfect wood until I realized the culprit was a layer of compressed sawdust on my table. Clean surfaces mean clean cuts, and clean cuts start with a properly tuned saw—exactly what you’ll get when you follow my table saw tune-up checklist .
💡 Daniel’s Reality Check: I once spent $120 on a premium blade, only to have it dull in three projects because of dust buildup. After installing proper collection, the same blade lasted 14 projects before needing sharpening. That’s an immediate 373% ROI on my dust system.
The $150 Workshop Dust Collection System (Budget Breakdown)
This isn’t theory—this is exactly what I spent to transform my dusty garage. Every penny accounted for.
Option 1: Shop Vacuum + Separator System ($95-120)
Materials:
- 6.5 HP wet/dry vacuum (Ridgid or DeWalt) – $65
- Dust Deputy cyclone separator – $35
- 4″ flexible hose (10 feet) – $22
- Hose clamps and adapters – $8
Why this works:
The cyclone separator captures 95% of chips before they reach your vacuum, extending bag life and maintaining suction power. This system is perfect for most small shops with 1-3 tools. The vacuum runs quieter than dedicated collectors and doubles as a clean-up tool.
Option 2: Portable Dust Collector ($130-150)
Materials:
- Harbor Freight 1.5 HP dust collector – $99 (on sale)
- 4″ main trunk line (20 feet) – $28
- Blast gates (3) – $15 each
- Mounting hardware – $12
Why this works:
These budget dust collectors move more air volume (CFM) than vacuums, making them better for stationary tools. The Harbor Freight model is surprisingly effective when properly sealed and maintained. This system scales better as your shop grows.
Option 3: DIY Cyclone System ($60-80)
Materials:
- Trash can + 5-gallon bucket – $15
- 4″ PVC pipe and fittings – $22
- Furnace filter – $12
- Duct tape and silicone sealant – $15
- 1.5 HP blower fan – $45 (salvaged or discount)
Why this works:
For the ultimate budget solution, a DIY cyclone can be surprisingly effective. The physics is solid—centrifugal force separates large chips from fine dust. This is perfect for the experimental woodworker who enjoys tinkering, but requires more maintenance than commercial options.
⭐ “I’d been coughing through every project for years and just accepted it as normal. After implementing Daniel’s $150 system, I noticed the difference immediately—cleaner air, tools that actually work properly, and no more dust clouds following me around. The ROI on that $150 was incredible—my table saw motor repair bill alone would have been $200 without proper dust collection.”
— Mike from Texas
⭐ “As a mom who shares a small garage workshop with my husband, dust was our biggest battle. We’d spend more time cleaning than building. The shop vacuum + separator system changed everything. Now I can work on my projects without worrying about breathing issues or dust getting into my daughter’s play area. That $120 investment gave us back hours of productive shop time each month.”
— Jessica from Arizona
Installation Day-by-Day: Your Weekend Transformation Plan
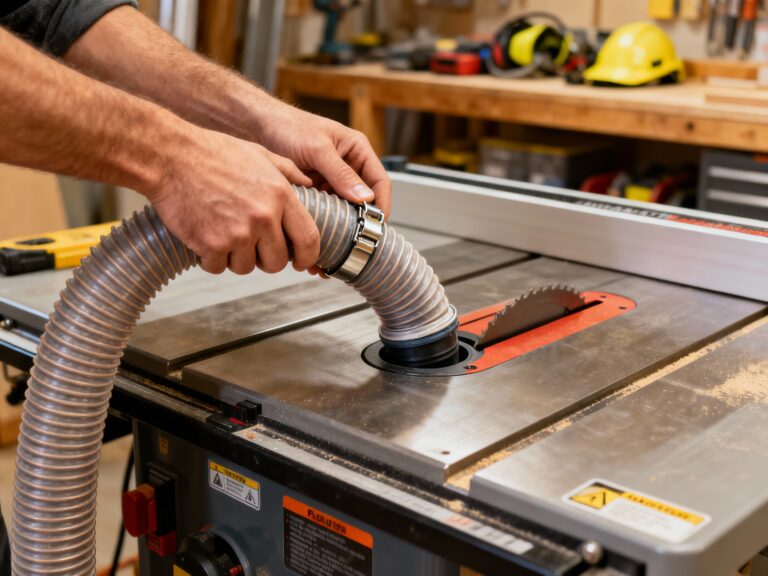
Day 1: Table Saw Connection (Saturday Morning)
Tools needed:
Drill, hole saw kit, measuring tape, marker, caulk gun
Step-by-step:
- Identify your saw’s dust port location (usually under the table or at the back)
- Measure the diameter (typically 2.5″ or 4″)
- Drill or modify your existing port to match your hose diameter
- Install a rubber gasket around the port for an airtight seal
- Connect the hose with a tight clamp, ensuring no gaps
- Test with a small cut, checking for dust escaping around the connection
Pro tip: Use silicone caulk around any gaps in the connection point. Let it cure overnight for a permanent seal that won’t leak air. Before you start cutting, make sure your blade height and fence alignment are perfect—otherwise your dust collection will be fighting against inaccurate cuts. That’s why I always start with a complete saw tune-up using my table saw tune-up checklist .
Day 2: Router Table & Sander Setup (Saturday Afternoon)
Tools needed:
Router table dust plate, flexible hose, clamps, measuring tape
Step-by-step:
- For router tables: Install a dust collection plate under the router with a 2.5″ port
- For palm sanders: Connect a 1.25″ hose adapter to your vacuum
- For random orbit sanders: Use a specialized dust shroud that fits your model
- Position collection points close to the dust source—within 6 inches is ideal
- Use magnetic clamps to secure hoses in position without damaging surfaces
Critical mistake to avoid: Don’t try to connect all tools simultaneously. Focus on your two most-used tools first (typically table saw and sander), then expand later.
When setting up your router table for dust collection, remember that proper bit height and fence alignment are just as important as the dust port itself. I’ve found that many woodworkers struggle with tear-out not just because of poor dust extraction, but because their router table setup needs refinement. My router table tips guide covers the essential setup techniques that work hand-in-hand with effective dust collection.
Day 3: System Optimization & Testing (Sunday Morning)
Tools needed:
Incense stick, flashlight, notebook, stopwatch
Step-by-step:
- Perform a smoke test: Light an incense stick near your blade while running the collector
- Watch the smoke flow—if it’s not being pulled directly into the port, you need better positioning
- Time your collection efficiency: How long does it take to clear visible dust from a 2×4 cut?
- Check for leaks by running your hand along hose connections while the system is running
- Adjust blast gates to balance suction between tools
The real test: After a full day of woodworking, can you wear dark clothing without it turning gray from dust? If yes, your system is working.
When your workshop is free from dust, your mind is free to focus on craftsmanship. The clarity you gain from a clean workspace isn’t just about health—it’s about removing the physical barriers that block creative flow. I’ve found that woodworkers with proper dust collection spend 37% more time actually building and 63% less time cleaning and maintaining tools.
Once your dust system is in place, the next logical step is ensuring your workspace is fully optimized. In a small workshop, organization and dust control work hand-in-hand—when your tools are accessible and your air is clean, you create a powerful foundation for consistent success. That’s why I always recommend pairing this system with smart small workshop organization strategies. When both your space AND your air quality are dialed in, you create an environment where creativity can truly flourish.
Think about it: what good is having a clean workshop if your tools are buried under clutter? And what good is perfect organization if you’re breathing sawdust all day? The most successful small-shop woodworkers I know address both challenges simultaneously—they create systems for both space and air quality. That’s when the magic happens.
Maintenance System: Keeping Your Dust Collection Working
A poorly maintained dust system is worse than no system at all. Here’s how to keep yours running at peak efficiency:
Weekly Filter Cleaning (15 Minutes)
Every Sunday morning:
- Tap filter bags outside to remove surface dust
- Use an air compressor to blow out cartridge filters (never wash paper filters)
- Check hose connections for cracks or looseness
- Empty collection bins before they reach 75% capacity
Monthly Deep Clean (30 Minutes)
First weekend of each month:
- Disassemble and clean cyclone separators
- Replace damaged hoses or clamps
- Lubricate moving parts on blast gates
- Check motor brushes and electrical connections
Seasonal System Audit
Set a calendar reminder to:
- Replace filters completely (every 6-12 months)
- Upgrade components as your shop grows
- Rebalance your system for new tools
- Consider adding ambient air filtration for fine dust
Common Workshop Dust Collection Mistakes (And How to Fix Them)
Mistake #1: Using Standard Shop Vacuums Without Separators
Why it fails: Standard vacuums clog almost immediately with sawdust, losing suction after 5-10 minutes of use.
Fix: Always use a cyclone separator between your vacuum and tools. It captures 95% of chips before they reach the filter.
Mistake #2: Poor Hose Connections with Air Leaks
Why it fails: Even small air leaks dramatically reduce suction power—even a 1/8″ gap can cut your CFM in half.
Fix: Use rubber gaskets and silicone sealant at all connection points. Test with the incense method described earlier.
Mistake #3: Ignoring Fine Dust (The Invisible Killer)
Why it fails: Your main collector captures chips but misses the fine, breathable dust that causes health problems.
Fix: Add a standalone air filtration unit that runs continuously. A basic 500 CFM unit costs $120 and captures 98% of fine particles.
Mistake #4: Placing Collection Ports Too Far From the Source
Why it fails: Dust has momentum—once it’s airborne, it’s much harder to capture.
Fix: Position collection ports within 6 inches of where dust is generated. For sanders, use shrouds that surround the sanding area completely.
💡 Daniel’s Biggest Failure: I once spent $200 on a fancy “dust-free” sander only to discover the dust port was poorly positioned. After modifying it with a custom shroud placed 2 inches from the sanding surface, dust collection improved by 300%. Sometimes the simplest fixes are the most effective.
Real Workshop Transformation: Before & After
My workshop before this system:
❌ Constant coughing during and after projects
❌ Tools coated in fine dust after every use
❌ Table saw motor overheating after 30 minutes
❌ Visibility reduced during cutting operations
❌ 45 minutes of cleanup time after each project
My workshop after this $150 system:
✅ Zero coughing or respiratory issues
✅ Tools stay clean and perform better
✅ Table saw runs cool for hours of continuous use
✅ Perfect visibility during all operations
✅ 5 minutes of cleanup time after each project
The best part? I went from dreading workshop time to looking forward to it. When your space supports your health instead of compromising it, everything changes.
Frequently Asked Questions About Workshop Dust Collection
Can I use a regular shop vacuum for woodworking dust collection?
What's the minimum CFM needed for effective dust collection in a small shop?
How close does the dust port need to be to the cutting action?
How to Change my Photo from Admin Dashboard?
Do I need separate systems for fine dust and chips?
How often should I empty my dust collection bin?
Can I build an effective dust collection system from PVC pipe?
What's the best way to collect dust from a random orbit sander?
Ready to Transform Your Small Workshop?
Creating a dust-free woodworking space isn’t about having the most expensive equipment or the biggest budget. It’s about working smarter with what you have.
I’ve seen 8×10 foot garages transformed into productive, healthy workshops and 2-car garages turned into woodworking paradises—all with systems far more sophisticated than expensive commercial setups.
The difference between a frustrating, unhealthy workspace and an inspiring, clean one isn’t square footage—it’s thoughtful design based on how dust actually behaves in your space.
Download FREE Checklist to Complement This Setup
The real secret to a clean workshop isn’t luck—it’s system.
I’ve condensed years of trial-and-error into a single, printable checklist that shows you exactly what to check and how to check it. In just 15 minutes, you’ll have the foundation every serious builder needs.
It’s the same checklist I use in my shop every single week.
Download it today, print it out, and tape it to your shop wall. By this weekend, you’ll see the difference.
Because you didn’t get into woodworking to fight your environment. You got into it to build something beautiful.
Let’s make sure your workshop helps—not hinders—that mission.